🧶 Beautiful ✨ Detailed 💝 Adorable

Bulbasaur Amigurumi Pattern

Bulbasaur Amigurumi Pattern
4.8★ Rating
3-4 Hours Time Needed
3.7K Made This
✂️

Beginner Friendly Level

Perfect for those just starting their sewing journey, with clear instructions and simple techniques

⏱️

Bite-Sized Project

Complete in under 2 hours—quick, fun, and perfect for a little creative escape.

🧸

Cute Companion

An adorable friend to cherish, handcrafted with love to bring comfort and joy for years to come.

About This Bulbasaur Amigurumi Pattern

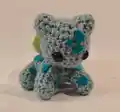
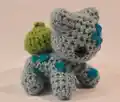
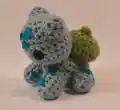
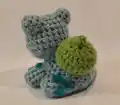
This Bulbasaur amigurumi pattern captures the essence of everyone's favorite grass-type starter Pokémon in a huggable form. The pattern uses straightforward construction techniques with the light teal body as the base, complemented by the iconic green bulb pod that sits proudly on Bulbasaur's back. Simple shaping creates the characteristic rounded head and sturdy body, while felt markings add those recognizable spots that make Bulbasaur instantly identifiable to fans of all ages.

Bulbasaur Amigurumi Pattern crochet pattern - detailed view of completed project

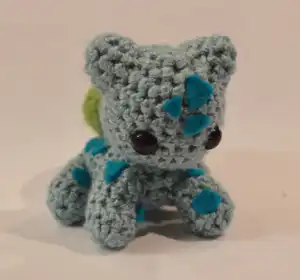
The pattern includes clear placement guides for the safety eyes, ears, and pod, ensuring your finished Bulbasaur has perfect proportions and personality. With minimal color changes and straightforward assembly, this project comes together quickly while delivering maximum cuteness.

Why You'll Love This Bulbasaur Amigurumi Pattern

I absolutely love this pattern because it perfectly captures Bulbasaur's charm in such an approachable way! As someone who grew up with Pokémon, being able to create this iconic character with my own hands brings back wonderful memories. I appreciate how the pattern breaks down what could seem complex into manageable steps that even newer crocheters can follow confidently. The combination of crochet work and felt details gives you creative freedom to customize the markings however you like. What really makes this special is how quickly it works up - you can start in the morning and have your very own Bulbasaur companion by afternoon, ready to display proudly or gift to a fellow Pokémon enthusiast!

Bulbasaur Amigurumi Pattern step 1 - construction progress Bulbasaur Amigurumi Pattern step 2 - assembly progress Bulbasaur Amigurumi Pattern step 3 - details and accessories Bulbasaur Amigurumi Pattern step 4 - final assembly and finishing

Switch Things Up

I love experimenting with different color variations for this classic Bulbasaur pattern! While the traditional light teal and green combination is iconic, try creating a shiny Bulbasaur using light lime green for the body and deeper emerald for the pod. The result is stunning and perfect for collectors who appreciate rare variants.

Consider adding dimensional texture to the pod by crocheting small bumps or nubs on its surface instead of keeping it smooth. You can create these by working popcorn stitches randomly across rows 3-4, giving your Bulbasaur's bulb a more organic, plant-like appearance that adds visual interest.

If you want to make your Bulbasaur extra special, embroider tiny vines or leaves coming from the pod using green embroidery floss. This small detail adds a botanical touch that emphasizes Bulbasaur's grass-type nature and makes your creation stand out from standard versions.

For a softer, more cuddly version, I sometimes use velvet or chenille yarn for the body. The plush texture makes Bulbasaur incredibly huggable and adds a luxurious feel that regular worsted weight can't quite achieve. Just be prepared for a slightly larger finished size with these bulkier yarns.

You can also personalize the felt markings by creating patterns within the spots - try adding lighter teal centers to each triangle or creating gradient effects. Some crafters even use multiple shades of felt layered together for depth and dimension that brings Bulbasaur to life in three dimensions.

Common Mistakes & How to Fix Them

✗ Placing safety eyes too close together or too far apart changes Bulbasaur's expression dramatically so measure the five stitch spacing carefully ✗ Not stuffing the head and body firmly enough before closing creates a floppy amigurumi that loses its adorable rounded shape ✗ Forgetting to position the pod placement before sewing means you might attach it off center ruining the iconic Bulbasaur silhouette ✗ Cutting felt markings too uniform in size makes them look artificial instead of natural varied spots like the character design

Bulbasaur Amigurumi Pattern

Bring the beloved Pokémon starter to life with this charming Bulbasaur crochet pattern! This adorable amigurumi features Bulbasaur's iconic teal body, distinctive ears, and signature bulb pod on its back. Perfect for Pokémon fans and amigurumi enthusiasts alike, this pattern combines simple stitches with creative details to capture Bulbasaur's lovable personality. Whether you're creating a gift for a Pokémon trainer or adding to your own collection, this pattern guides you through every step of crafting this nostalgire companion.

Beginner Friendly 3-4 Hours

Materials Needed for Bulbasaur Amigurumi Pattern

— Main Fabric

  • 01
    Worsted weight yarn in light teal or aqua color for body and head
  • 02
    Worsted weight yarn in green color for bulb pod
  • 03
    Dark teal felt for creating the characteristic spots and markings

— Tools Required

  • 01
    3.5mm crochet hook
  • 02
    Scissors
  • 03
    Tapestry needle
  • 04
    Glue gun or fabric glue
  • 05
    1 pair 10mm safety eyes
  • 06
    Polyfil or soft stuffing material

Progress Tracker

0% Complete

— Head :

Info :

Using the light teal yarn

Row 1 :

CH 2, SC 8 in first stitch (8 stitches). Alternatively, SC 8 into a magic circle

Row 2 :

INC x 8 (16 stitches)

Row 3 :

*SC, INC* x 8 (24 stitches)

Row 4-6 :

SC x 24 (24 stitches)

Row 7 :

*SC x 9*, INC, *SC x 4*, INC, *SC x 9* (26 stitches)

Info :

Place eyes 5 stitches apart (in between each of the increases)

Row 8 :

SC x 26 (26 stitches)

Row 9 :

*SC x 2*, DEC x 11*, *SC x 2* (15 stitches)

Info :

Stuff as much of the head as you can

Row 10 :

*SC x 4*, *DEC x 3*, *SC x 5*

Info :

Finish stuffing head, FO with SlSt

— Body :

Row 1 :

CH 2, SC 6 in first stitch (6 stitches). Alternatively, SC 6 into a magic circle

Row 2 :

INC x 6 (12 stitches)

Row 3 :

*SC, INC* x 6 (18 stitches)

Row 4-6 :

SC x 18 (18 stitches)

Row 7 :

*SC x 5*, INC, *SC x 6*, INC, *SC x 5* (20 stitches)

Row 8-10 :

SC x 20 (20 stitches)

Row 11 :

DEC to close, stuffing the body as you go. FO with a SlSt

Info :

Sew head onto body (row 1 is the front of the body, and the increases done face upwards)

— Ears :

Row 1 :

CH 2, SC 6 in first stitch (6 stitches). Alternatively, SC 6 into a magic circle

Row 2 :

*SC, INC* x 3

Row 3 :

*SC 2, INC* x 3

Info :

FO with SlSt. Sew ears onto head using provided picture as placement guide

— Pod :

Row 1 :

CH 12, join the ends into a loop with a SlSt (You're making a crochet ring with 12 stitches around) (12 stitches)

Row 2 :

INC x 12 (24 stitches)

Row 3-4 :

SC x 24 (24 stitches)

Row 5 :

*SC 4, DEC* x 4 (20 stitches)

Row 6 :

DEC x 10 (10 stitches)

Row 7 :

DEC x 5 (5 stitches)

Row 8 :

SC 4, SlSt, FO

Info :

Stuff pod from the bottom. Sew pod to the back of your Bulbasaur

— Arms and Legs :

Row 1 :

CH 2, SC 10 in first stitch (10 stitches). Alternatively, SC 10 into a magic circle

Row 2-5 :

SC x 10 (10 stitches)

Info :

FO with SlSt. Stuff legs lightly and sew them onto body (see pictures for placement)

— Markings :

Info :

Cut out a bunch of triangles and other angled shapes of varying sizes from dark teal felt. Using fabric glue or hot glue gun, fasten them to your Bulbasaur

Assembly Instructions

  • Sew the completed head onto the body with row 1 positioned as the front and the increases facing upward for proper orientation
  • Attach ears to the head using the provided placement photos as your guide to ensure they sit at the correct angle
  • Stuff the green pod firmly from the bottom opening before sewing it securely to the back of Bulbasaur's body
  • Make four arms and legs pieces, stuff the legs lightly, and sew all limbs onto the body using reference photos for placement
  • Cut varied sizes of triangles and angled shapes from dark teal felt to create Bulbasaur's characteristic markings
  • Apply felt markings using fabric glue or hot glue gun, varying the placement and sizes for a natural spotted appearance

Important Notes

  • 💡This pattern is copyrighted by Tessa D'Achille and may not be resold, rewritten, or shared without permission
  • 💡Place safety eyes exactly 5 stitches apart between the increases in row 7 before closing the head
  • 💡Stuff the head and body firmly as you work to maintain proper shape and prevent sagging
  • 💡Row 1 of the body serves as the front, so position accordingly when attaching the head
  • 💡The pod should be stuffed from the bottom opening to maintain its bulb shape before attaching
  • 💡Vary the sizes of felt triangles to create natural-looking markings rather than uniform patterns
  • 💡Use the provided photos throughout the pattern as placement guides for accurate assembly

This adorable Bulbasaur pattern was created by LoopTeeLoops to bring the classic Pokémon starter into huggable amigurumi form! The combination of simple crochet techniques and creative felt detailing makes this project accessible while delivering a recognizable and beloved character. Perfect for Pokémon fans of all ages, this pattern transforms basic stitches into a companion that captures Bulbasaur's gentle spirit and iconic design. Whether displayed on a shelf or carried on adventures, your handmade Bulbasaur will bring smiles and nostalgia wherever it goes. 🌱🧶✨

You ask,

we answer.

FAQs

Can I use safety eyes in a different size than recommended?

While 10mm safety eyes are recommended for proper proportions, you can use 8mm or 12mm eyes if needed. Just adjust the placement spacing accordingly - smaller eyes should be placed slightly closer together, while larger eyes may need an extra stitch of spacing between them.

What if I don't have felt for the markings?

You can embroider the markings using dark teal yarn instead of felt, or even crochet small triangular patches and sew them on. Some crafters also use fabric paint to create the spots directly on the finished amigurumi.

How do I prevent the pod from flopping over on the back?

Stuff the pod very firmly and make sure to sew it securely all around the base where it attaches to the body. You can also add a few extra stitches through the top of the pod down to the body for additional stability.

Can I make the arms and legs poseable?

Yes! Insert pipe cleaners or floral wire into the arms and legs before stuffing them lightly. This will allow you to pose your Bulbasaur in different positions, though be cautious if the toy is intended for young children.

What's the finished size of this Bulbasaur amigurumi?

Using worsted weight yarn and a 3.5mm hook, the finished Bulbasaur will be approximately 4-5 inches tall. Your tension and yarn choices may create slight size variations, but the proportions will remain consistent.