🧢 Beautiful ✨ Detailed πŸ’ Adorable

Bunny Pillow Crochet Pattern

Bunny Pillow Crochet Pattern
4.2β˜… Rating
6-8 Hours Time Needed
3.3K Made This
βœ‚οΈ

Intermediate Level

Ideal for those with basic knitting experience, featuring slightly more advanced stitches and techniques to expand your skills.

⏱️

Weekend Treat

Takes 5-7 hours, making it an enjoyable project to finish over a couple of days.

🏑

Cozy Accent

A warm touch for your space that transforms ordinary corners into inviting nooks filled with handmade charm.

About This Bunny Pillow Crochet Pattern

This adorable bunny pillow pattern creates a functional and decorative piece that will brighten any room. Working with soft plush yarn, you'll craft a cuddly companion featuring expressive safety eyes, a sweet pink nose, and charming embroidered details. The rectangular pillow body is worked in continuous rounds, while the long floppy ears, arms, and legs are attached separately to bring this bunny to life.

Bunny Pillow Crochet Pattern crochet pattern - detailed view of completed project

The pattern uses simple stitches and clear instructions to guide you through creating each component. Assembly is straightforward, with detailed placement guidelines ensuring your bunny has perfect proportions and an endearing expression.

Why You'll Love This Bunny Pillow Crochet Pattern

I absolutely love this bunny pillow pattern because it creates something both beautiful and functional. The combination of the soft plush yarn and the adorable bunny design makes it impossible not to smile every time you see it. I appreciate how the pattern balances simplicity with charming details like the embroidered nose and sleepy eyelids. It's rewarding to watch the flat pillow transform into a character full of personality as you add each feature. Plus, knowing that this handmade creation can bring comfort and joy to a child's room or add a playful touch to any living space makes every stitch worthwhile.

Bunny Pillow Crochet Pattern step 1 - construction progress Bunny Pillow Crochet Pattern step 2 - assembly progress Bunny Pillow Crochet Pattern step 3 - details and accessories Bunny Pillow Crochet Pattern step 4 - final assembly and finishing

Switch Things Up

I love how versatile this bunny pillow pattern can be with just a few creative tweaks. Try experimenting with different color combinations - a gray bunny with pink accents creates an elegant look, while pastel rainbow ears bring a playful vibe. You could add a bow tie or ribbon around the neck for extra charm, or embroider a little heart on the chest for a Valentine's theme.

I've found that changing the ear length creates completely different characters - shorter ears make it look like a bear, while even longer, thinner ears give it a more realistic rabbit appearance. Consider adding dimensional details like felt inner ears in pink or white, or embroider a few whiskers for more personality.

For seasonal variations, I love adding small crocheted accessories - a tiny flower crown for spring, a miniature scarf for winter, or even a small basket for Easter. You can also adjust the facial expression by changing the eyebrow embroidery angle or adding rosy cheeks with fabric paint or embroidery.

Common Mistakes & How to Fix Them

βœ— Not maintaining consistent tension throughout the pillow body, which can result in an uneven rectangular shape with visible gaps or puckering βœ— Forgetting to count stitches regularly during the ear shaping rounds, leading to asymmetrical ears that don't match in size or appearance βœ— Placing the safety eyes too close together or at the wrong height, which dramatically changes the bunny's facial expression and overall look βœ— Overstuffing the pillow, arms, or legs, making them too firm and losing the soft, huggable quality that makes this project special

Bunny Pillow Crochet Pattern

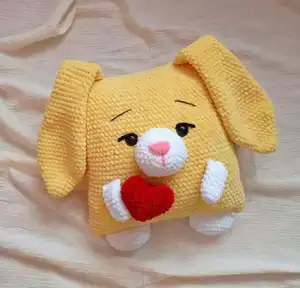
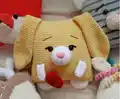
Create this charming bunny pillow that measures approximately 34 cm in height and 42 cm in width. This delightful project combines comfort with cuteness, featuring adorable long ears, a sweet embroidered face, and tiny arms and legs. Perfect for decorating your home, nursery, or gifting to someone special, this plush bunny pillow will bring warmth and joy to any space while showcasing your crochet skills.

Intermediate 6-8 Hours

Materials Needed for Bunny Pillow Crochet Pattern

β€” Main Fabric

  • 01
    Himalaya Dolphin Baby or YarnArt Dolce plush yarn in yellow (3 skeins)
  • 02
    Himalaya Dolphin Baby or YarnArt Dolce plush yarn in white (less than half a skein)
  • 03
    Himalaya Dolphin Baby or YarnArt Dolce plush yarn in pink for nose
  • 04
    Himalaya Dolphin Baby or YarnArt Dolce plush yarn in black for eyelids
  • 05
    Black semi-cotton or acrylic yarn for eyebrows (such as YarnArt Jeans)

β€” Tools Required

  • 01
    Crochet hook size 3.5mm (or 4mm)
  • 02
    Safety eyes 22-24mm
  • 03
    Needle with large eye for sewing
  • 04
    Scissors
  • 05
    Holofiber stuffing
  • 06
    Transparent glue
  • 07
    Stitch markers (recommended)

Progress Tracker

0% Complete

β€” Pillow :

Row 1 :

90 ch

Row 2 :

Connect with the first loop crocheting 1 sc (it will be the first sc of the second row) and crochet 89 sc {90}

Rows 3-40 (38 rows) :

90 sc {90}

Info :

In the end of the last row crochet 10-11 sc more to the edge of the pillow. Tighten the thread, leave the long end for sewing. Sew the top of the pillow using a needle.

β€” Nose :

Row 1 :

4 ch

Row 2 :

From the second loop from the hook: 2 sc, 3 sc in one loop. On the other side of the chain: 2 sc, 3 sc in one loop {10}

Row 3 :

2 sc, inc, inc, inc, 2 sc, inc, inc, inc {16}

Row 4 :

(3 sc, inc) repeat 4 times {20}

Row 5 :

(4 sc, inc) repeat 4 times {24}

Row 6 :

(4 sc, inc) repeat 5 times {30}

Row 7 :

(5 sc, inc) repeat 5 times {35}

Row 8 :

35 sc

Infos :

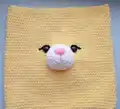
Tighten the loop, leave the long thread for sewing. Embroider the nose with pink plush (or semi-cotton) thread. Tie a knot and hide the thread inside. Fill the detail and sew on it between the rows 16 and 26, counting from the bottom of the pillow. Secure the thread, hide it inside the pillow.

Info :

Insert the safety eyes (or sew on them if you have buttons) between the rows 24 and 25. The distance between the eyes is 9 sc.

Info :

Embroider the eyelids with black plush yarn. Secure the thread inside the pillow. Optional you can glue the eyelids to the pillow.

β€” Ears (2 details) :

Row 1 :

6 sc in magic ring {6}

Row 2 :

(inc) repeat 6 times {12}

Row 3 :

(5 sc, inc) repeat 2 times {14}

Row 4 :

(6 sc, inc) repeat 2 times {16}

Row 5 :

(7 sc, inc) repeat 2 times {18}

Row 6 :

(8 sc, inc) repeat 3 times {20}

Row 7 :

inc, 8 sc, inc, inc, 8 sc, inc {24}

Row 8 :

inc, 9 sc, inc, inc, 10 sc, inc, inc {29}

Row 9 :

12 sc, inc, inc, 15 sc {31}

Rows 10-15 (6 rows) :

31 sc

Row 16 :

14 sc, dec, 13 sc, dec {29}

Row 17 :

29 sc

Row 18 :

13 sc, dec, 12 sc, dec {27}

Rows 19-20 (2 rows) :

27 sc

Row 21 :

12 sc, dec, 11 sc, dec {25}

Row 22 :

25 sc

Row 23 :

1 sc, dec, 11 sc, dec, 9 sc {23}

Row 24 :

23 sc

Row 25 :

1 sc, dec, 10 sc, dec, 8 sc {21}

Row 26 :

21 sc

Row 27 :

2 sc, dec, 8 sc, dec, 7 sc {19}

Rows 28-38 (11 rows) :

19 sc

Info :

Tighten the thread, leave the long thread for sewing.

β€” Arms (2 details) :

Row 1 :

6 sc in magic ring {6}

Row 2 :

(inc) repeat 6 times {12}

Rows 3-9 (7 rows) :

12 sc {14}

Info :

Do not fill the arms. Sew two halves, crocheting 6 sc. Leave the long thread for sewing.

β€” Legs (2 details) :

Row 1 :

6 sc in magic ring {6}

Row 2 :

(inc) repeat 6 times {12}

Row 3 :

(1 sc, inc) repeat 6 times {18}

Row 4 :

(2 sc, inc) repeat 6 times {24}

Row 5 :

(11 sc, inc) repeat 2 times {26}

Row 6 :

26 sc

Row 7 :

(11 sc, dec) repeat 2 times {24}

Row 8 :

24 sc

Info :

Fill the leg a little, not tightly. Sew two halves crocheting 12 sc. Leave the long thread for sewing.

β€” Tail (Optional) :

Row 1 :

6 sc in magic ring {6}

Row 2 :

(inc) repeat 6 times {12}

Row 3 :

(1 sc, inc) repeat 6 times {18}

Row 4 :

(2 sc, inc) repeat 6 times {24}

Row 5 :

(3 sc, inc) repeat 6 times {30}

Row 6 :

30 sc

Row 7 :

(3 sc, dec) repeat 6 times {24}

Info :

Leave the long thread for sewing. Fill the tail and sew on it to the pillow from behind. Secure the thread, hide it inside.

Assembly Instructions

  • Fill the pillow evenly and slowly, paying special attention to the corners to ensure they're well stuffed and have an even shape.
  • Sew the bottom of the pillow closed using a needle and matching yarn, ensuring all edges are secure.
  • Attach the ears to the top of the pillow, counting 3-4 sc from the edge on each side for symmetrical placement.
  • Sew the arms diagonally between rows 14 and 17, with approximately 18-19 sc distance between them.
  • Attach the legs to the bottom of the pillow, counting 2-3 sc from the edge for proper positioning.
  • Embroider the eyebrows using black semi-cotton thread above the eyes for expression.
  • Optional: Sew the filled tail to the back of the pillow and secure the thread inside.

Important Notes

  • πŸ’‘Maintain consistent tension throughout the pillow body to ensure an even rectangular shape
  • πŸ’‘Use stitch markers to track your rounds, especially during the ear shaping sections
  • πŸ’‘Place safety eyes carefully between rows 24 and 25 with exactly 9 sc distance for proper facial proportions
  • πŸ’‘Do not overstuff the arms and legs - they should remain soft and slightly flat for better appearance
  • πŸ’‘Secure all thread ends by hiding them inside the pillow to maintain a clean, professional finish
  • πŸ’‘The pillow size may vary depending on your yarn choice, hook size, and personal tension

This delightful bunny pillow pattern brings together comfort and cuteness in one charming project. With its sweet embroidered face, floppy ears, and cuddly body, this pillow is perfect for nurseries, children's rooms, or as a handmade gift. The pattern uses simple stitches and clear assembly instructions to create a treasured piece that combines functionality with adorable character. 🐰🧢✨

You ask,

we answer.

FAQs

Can I use a different yarn weight for this pillow?

Yes, you can use different yarn, but keep in mind that your finished pillow size will vary. If using thinner yarn, go down a hook size; for thicker yarn, go up a hook size. The pattern will work with any yarn as long as you adjust your hook accordingly.

How much stuffing will I need for this project?

You'll need approximately 200-300 grams of polyester fiberfill or holofiber stuffing, depending on how firmly you prefer to stuff your pillow. The body requires the most filling, while the arms, legs, and tail need minimal stuffing.

Can I make this pillow child-safe without safety eyes?

Absolutely! Instead of safety eyes, you can embroider eyes using black yarn or felt circles sewn securely. This makes the pillow safer for babies and young children who might pull off plastic safety eyes.

Is the tail necessary or can I skip it?

The tail is completely optional as noted in the pattern. The bunny looks adorable with or without it, so you can decide based on your preference and the intended use of the pillow.

How do I prevent the ears from flopping incorrectly?

Position the ears carefully by counting the stitches from the edge as instructed, and use pins to test placement before sewing. You can also add a few internal stitches through the ear to make it stand or flop in your desired direction.