🧢 Beautiful ✨ Detailed πŸ’ Adorable

Infinity Cube Fidget Toy Crochet Pattern

Infinity Cube Fidget Toy Crochet Pattern
4.0β˜… Rating
8-10 Hours Time Needed
2.8K Made This
βœ‚οΈ

Intermediate Level

Ideal for those with basic knitting experience, featuring slightly more advanced stitches and techniques to expand your skills.

⏱️

All-Day Adventure

Requires 8-10 hours, ideal for a full day of immersive knitting.

🧸

Tiny Treasure

Small, sweet, and gift-worthy creations that fit perfectly in the palm of your hand with detailed charm.

About This Infinity Cube Fidget Toy Crochet Pattern

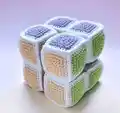
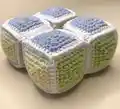
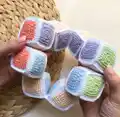
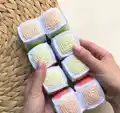
This Infinity Cube pattern is a delightful challenge that results in a truly unique fidget toy. You'll crochet 48 colorful squares using a special increase technique, then carefully assemble them into eight individual cubes. The magic happens when you connect these cubes in a specific configuration, creating an endlessly transformable sensory toy that folds, twists, and flips in mesmerizing ways.

Infinity Cube Fidget Toy Crochet Pattern crochet pattern - detailed view of completed project

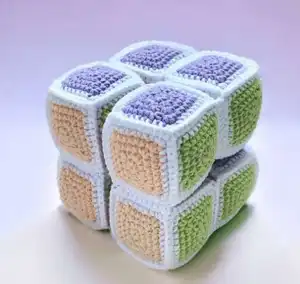
The finished cube measures approximately 10cm and features a beautiful rainbow of colors including blue, purple, light green, carrot orange, yellow, and peach, all bordered with crisp white edges. It's a perfect project for using up yarn scraps while creating something truly special.

Why You'll Love This Infinity Cube Fidget Toy Crochet Pattern

I absolutely love this pattern because it's so much more than just a simple crochet project. Watching those individual squares come together into something that moves and transforms is genuinely magical. The repetitive square-making is wonderfully meditative, and then the assembly phase brings that exciting puzzle-solving satisfaction. I find myself fidgeting with the finished cube constantly – it's incredibly soothing and addictive! Plus, there's something deeply rewarding about creating a functional toy that helps with stress relief and focus. Whether you're making it for yourself or gifting it to someone who needs a calming fidget tool, this pattern delivers pure handmade joy.

Infinity Cube Fidget Toy Crochet Pattern step 1 - construction progress Infinity Cube Fidget Toy Crochet Pattern step 2 - assembly progress Infinity Cube Fidget Toy Crochet Pattern step 3 - details and accessories Infinity Cube Fidget Toy Crochet Pattern step 4 - final assembly and finishing

Switch Things Up

I'm always thinking about ways to personalize this incredible infinity cube pattern to make it uniquely yours! One fun variation would be to work with a monochromatic color scheme – imagine all shades of blue from navy to sky, or a gorgeous ombre effect transitioning through the rainbow. You could also experiment with textured yarns like velvet or chenille for an extra sensory experience, though you'll want to test how they hold up to repeated folding.

For a more advanced twist, consider embroidering small designs or initials on each square face before assembly, creating a truly personalized fidget toy. I've also thought about adding tiny bells or rattles inside one or two cubes for an auditory element, though you'd want to secure them well so they don't shift around.

If you're making this for a child, safety eyes (well-secured) on some faces could create little characters that peek out as the cube transforms. Or go bold with neon or glow-in-the-dark yarn for a cube that stands out! You might even try a seasonal theme – pastels for spring, warm oranges and browns for autumn, or red and green for a holiday version. The construction method stays the same, but these personal touches make each cube special and meaningful to its owner.

Common Mistakes & How to Fix Them

βœ— Stuffing the cubes too firmly can prevent proper folding and movement – keep the filling light and loose for flexibility βœ— Forgetting to add the slip stitch in corners during assembly creates weak points that may come apart with use βœ— Not tracking which color faces go where during assembly results in an unbalanced cube that won't transform smoothly βœ— Skipping the steaming step leaves seams stiff and difficult to manipulate, reducing the cube's fidget-ability and playability

Infinity Cube Fidget Toy Crochet Pattern

Create your own mesmerizing Infinity Cube fidget toy with this colorful crochet pattern! This unique sensory project combines 48 individual granny squares in six vibrant colors to form an endlessly foldable, twistable cube that's perfect for stress relief and fidgeting. Whether you're making it for yourself, a child, or as a thoughtful handmade gift, this satisfying project will keep hands busy and minds calm while developing fine motor skills and color recognition.

Intermediate 8-10 Hours

Materials Needed for Infinity Cube Fidget Toy Crochet Pattern

β€” Main Fabric

  • 01
    YarnArt Jeans 75 (blue) - approximately 50g
  • 02
    YarnArt Jeans 72 (purple) - approximately 50g
  • 03
    YarnArt Jeans 53 (light green) - approximately 50g
  • 04
    YarnArt Jeans 23 (carrot/orange) - approximately 50g
  • 05
    YarnArt Jeans 88 (yellow) - approximately 50g
  • 06
    YarnArt Jeans 73 (peach) - approximately 50g
  • 07
    Alize Cotton Gold 55 (white) - approximately 100g for edging

β€” Tools Required

  • 01
    Crochet hook size 2mm (US B/1)
  • 02
    Holofiber stuffing or polyester fiberfill
  • 03
    Sewing needle (yarn needle for assembly)
  • 04
    Scissors
  • 05
    Stitch markers (optional but helpful)
  • 06
    Iron with steam function for final shaping

Progress Tracker

0% Complete

β€” Square :

Info :

Inc3 means (1 sc, 1 hdc, 1 sc) in one stitch. All inc3 are made in the corners of the square. In the last row with white yarn, inc3 becomes 3 sc in one stitch. Make 8 squares of each color for a total of 48 squares.

Row 1 :

7 sc in ar, sl st, ch (8)

Row 2 :

inc3 in the next stitch (count ch as sc when counting stitches), (sc, inc3)*3, sl st in ch of the beginning of the row, ch (16)

Row 3 :

inc3 in the next stitch, (3 sc, inc3)*3, 2 sc, sl st in ch of the beginning of the row, ch (24)

Row 4 :

inc3 in the next stitch, (5 sc, inc3)*3, 4 sc, sl st in ch of the beginning of the row (32)

Info :

Fasten off, cut the thread. Hide the end of the thread when you work along the edge of the square with white yarn.

Row 5 :

Attach white thread to any side of the square and work along the edge with sc, make inc3 in the corners (3 sc in one stitch). Finish with a needle and fasten thread from inside. Result: 7 sc + 3 sc (on corners)*4 = 40 stitches total

β€” Cube Assembly :

Info :

Work with sc to connect two squares. When working in corners that have already been connected, make additional sl st through sc in the corner to sharpen the corner. Fasten and hide thread tails inside the cube.

Cube Making Scheme :

Follow the color arrangement: peach (top), light green (left), purple (center), carrot (right), blue (front), yellow (bottom). Connect squares stitch to stitch in the white yarn row.

Info :

When one side is left open, fill the cube with holofiber. Do not fill tightly (this is important) to avoid deforming the cube. After assembly, shape the cube properly with your hands.

β€” Cubes Connection :

Part 1 :

Assemble 4 cubes as shown with same color faces directed in same direction. Purple faces up, blue faces down. Sew together at marked seams using simple stitch to stitch method in white yarn row.

Part 2 :

Assemble 4 more cubes with purple faces down and blue faces up. Same side color arrangement as Part 1. Sew at marked seams.

Final Assembly :

Arrange Part 1 and Part 2 together ensuring side faces of same colors are directed in same direction and upper/lower faces match. Turn the toy 180 degrees so upper faces are at bottom. Sew in places marked with strokes.

β€” Finishing :

Steaming :

Pass iron with steam along all faces, giving the cube correct shape. Do not press iron too much as it can deform side faces. Pay special attention to seams between cubes, apply steam several times to make them soft for easy manipulation.

Assembly Instructions

  • Make 48 individual squares (8 of each color: blue, purple, light green, carrot, yellow, peach) with white edging
  • Assemble 8 separate cubes by connecting 6 squares each using single crochet stitches, following the color scheme provided
  • Leave one side open on each cube to add holofiber stuffing, fill lightly (not tightly) to maintain flexibility
  • Create Part 1 by sewing 4 cubes together in a cross formation with purple faces up and blue faces down
  • Create Part 2 by sewing 4 cubes together with purple faces down and blue faces up, maintaining same side color arrangement
  • Join Part 1 and Part 2 by turning 180 degrees and sewing at marked connection points between the two sections
  • Steam all faces and seams thoroughly with an iron to soften the connections and allow smooth transformation movements

Important Notes

  • πŸ’‘Keep stuffing light and loose in each cube to ensure proper folding and flexibility throughout the infinity cube
  • πŸ’‘Track color placement carefully during assembly using the provided diagrams to ensure correct cube configuration and smooth operation
  • πŸ’‘Make additional slip stitches through corners when connecting already-joined edges to create sharp, defined corners that hold shape
  • πŸ’‘The steaming step is essential for functionality - it softens the seams between cubes allowing smooth fidgeting movements
  • πŸ’‘Hide all thread tails securely inside cubes before closing to maintain clean appearance and prevent unraveling during use
  • πŸ’‘Use consistent tension throughout all squares to ensure uniform size and easier assembly of the final structure

This ingenious Infinity Cube fidget toy pattern transforms simple granny squares into an endlessly entertaining sensory experience! The satisfying process of creating 48 colorful squares and assembling them into a transformable cube is meditative and rewarding. Perfect for stress relief, developing fine motor skills, or simply having something soothing to fidget with during the day. The rainbow of colors makes it visually appealing while the endless folding possibilities make it impossible to put down! 🧢✨ Happy crocheting and happy fidgeting! 🌈

You ask,

we answer.

FAQs

Can I use different yarn weights for this pattern?

Yes, you can use any yarn weight with an appropriate hook size, but keep in mind that the finished cube size will change. The pattern specifies light worsted weight yarn with a 2mm hook for a 10cm cube. Using bulkier yarn will create a larger cube, while finer yarn makes a smaller one.

Why is it important not to stuff the cubes too tightly?

Loose stuffing is crucial for the cube's functionality as a fidget toy. If stuffed too firmly, the cubes won't fold and transform smoothly, defeating the purpose of the infinity cube design. The cubes need flexibility to move and manipulate properly.

Do I really need to steam the finished cube?

Yes, steaming is highly recommended! This step softens the seams between cubes, making them flexible and easy to fold. Without steaming, the connections will be stiff and the cube won't transform smoothly, reducing its effectiveness as a fidget toy.

Can I change the color arrangement?

While you can use different colors, it's important to follow the specific color placement pattern provided to ensure the cube folds and transforms correctly. The arrangement affects how the cube moves, so if you substitute colors, keep them in the same positions as indicated.

How long does this project take to complete?

The project typically takes 8-10 hours total. Making the 48 squares is repetitive and takes the bulk of the time, while assembly requires careful attention but moves fairly quickly once you understand the construction method.

Is this pattern suitable for children to make?

This is an intermediate-level pattern that requires understanding of basic crochet stitches plus the ability to follow complex assembly instructions. Older children or teens with crochet experience could complete it with guidance, but it's not recommended for beginners.