🧶 Beautiful ✨ Detailed 💝 Adorable

Canadian Maple Leaf Coaster Pattern

Canadian Maple Leaf Coaster Pattern
4.8★ Rating
2-3 Hours Time Needed
1.2K Made This
✂️

Intermediate Level

Ideal for those with basic knitting experience, featuring slightly more advanced stitches and techniques to expand your skills.

⏱️

Bite-Sized Project

Complete in under 2 hours—quick, fun, and perfect for a little creative escape.

🏡

Cozy Accent

A warm touch for your space that transforms ordinary corners into inviting nooks filled with handmade charm.

About This Canadian Maple Leaf Coaster Pattern

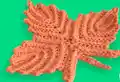
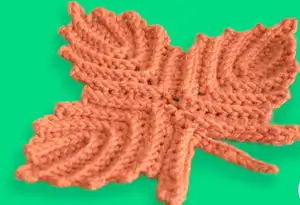
This Canadian Maple Leaf pattern is a delightful intermediate-level project that brings the iconic symbol of Canada to life through crochet. The design features three small leaves assembled together with a detailed stalk, creating a realistic maple leaf shape. Using front and back post stitches, this pattern adds beautiful texture and dimension to your finished piece, making it perfect as a coaster, appliqué, or decorative accent for your autumn crafts.

Canadian Maple Leaf Coaster Pattern crochet pattern - detailed view of completed project

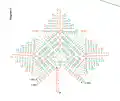
The pattern includes detailed step-by-step instructions with helpful photos and diagrams to guide you through each stage. Optional wet blocking techniques are included to help you achieve a crisp, professional finish that will make your maple leaf truly stand out.

Why You'll Love This Canadian Maple Leaf Coaster Pattern

I absolutely love this pattern because it combines simple techniques with stunning results. The way the post stitches create those realistic leaf veins never fails to impress me, and I find myself making these in different autumn colors throughout the season. What I appreciate most is how versatile this design is—you can use it as a coaster, sew it onto bags or clothing, or even create a beautiful garland by making several leaves. The satisfaction of watching three simple leaf pieces come together into such a recognizable symbol is truly rewarding, and I know you'll feel that same joy when you complete yours!

Canadian Maple Leaf Coaster Pattern step 1 - construction progress Canadian Maple Leaf Coaster Pattern step 2 - assembly progress Canadian Maple Leaf Coaster Pattern step 3 - details and accessories Canadian Maple Leaf Coaster Pattern step 4 - final assembly and finishing

Switch Things Up

I love experimenting with this maple leaf pattern because it's so versatile and open to creative interpretation. One of my favorite variations is making an entire set of coasters in gradient autumn colors—starting with deep burgundy, moving through burnt orange and golden yellow, then finishing with a rich chocolate brown. The color progression on a coffee table looks absolutely stunning.

I've also found that using variegated yarn creates a beautiful mottled effect that mimics real fallen leaves with their natural color variations. Another fun twist I enjoy is making miniature versions using sport weight yarn and a smaller hook—these tiny leaves are perfect as appliqués for fall sweaters, tote bags, or even as gift tags for autumn presents.

For a more modern look, I sometimes work the pattern in unexpected colors like navy blue, charcoal gray, or even metallic gold yarn for holiday décor. The textured post stitches really make metallic yarns shine beautifully. I've even created a table runner by making multiple leaves and joining them together in a cascading arrangement.

One creative idea I particularly love is making the leaves in green during spring and summer, then switching to traditional autumn colors as the seasons change. This way, you can enjoy this pattern year-round with different seasonal aesthetics. The possibilities are truly endless, and I encourage you to let your imagination guide your color and project choices!

Common Mistakes & How to Fix Them

✗ Not using stitch markers to track the center stitch when assembling leaves, which can lead to misalignment of the three small leaf sections ✗ Forgetting to work front and back post stitches correctly, resulting in flat texture instead of the dimensional ribbed effect that creates realistic leaf veins ✗ Skipping the wet blocking step, which prevents the leaf from achieving its crisp, professional shape and defined points at the edges ✗ Pulling stitches too tightly during assembly, causing the leaf to curl or buckle instead of lying flat as a proper coaster

Canadian Maple Leaf Coaster Pattern

Create a beautiful Canadian maple leaf coaster or appliqué with this charming crochet pattern. This versatile design measures approximately 8.5 inches wide and features intricate post stitches that capture the natural beauty of a maple leaf. Perfect for autumn décor, patriotic crafts, or as a thoughtful handmade gift, this coaster adds a touch of Canadian pride to any home.

Intermediate 2-3 Hours

Materials Needed for Canadian Maple Leaf Coaster Pattern

— Main Fabric

  • 01
    Red Heart Super Saver Yarn in red/orange autumn colors
  • 02
    Any worsted weight yarn (Medium / 4 weight) in your preferred maple leaf color

— Tools Required

  • 01
    Crochet hook size 4.5mm (G)
  • 02
    Tapestry needle
  • 03
    Straight pins
  • 04
    Stitch markers
  • 05
    Blocking board or interlocking play mat
  • 06
    Scissors

Progress Tracker

0% Complete

— Small Leaf :

Info :

Make 3 small leaves to complete 1 Maple leaf. Work in rows.

To begin :

ch 10

Row 1 (RS) :

sc in second ch from hook; sc in next 7 chs; 5 sc in last ch; work across the bottom of foundation ch, sc in next 6 chs; turn = 19 sts

Row 2 (WS) :

ch 1 (do not count as a st here & throughout); [fpsc around post of next st] 17 times; turn = 17 sts

Row 3 (RS) :

ch 1; sc in next 8 sts; 5 sc in next st; sc in next 6 sts; turn = 19 sts

Row 4-7 :

repeat 2 more times rows 2 & 3

Row 8 :

same as Row 2

Finishing :

Fasten off, leaving a long tail for sewing; weave in the end from the beg. Turn & place a MARKER in 9th st from finishing

— Assembling Maple Leaf :

Step 1 :

Place all small leaves next to each other, with the markers meeting in the center

Step 2 :

With WS facing you, whip stitch the leaves together across 9 sts on the sides. Remove markers as you go from the left and right leaves, but keep the middle MARKER. Weave in the ends on WS

— Leaf Stalk :

Info :

Make 1

To begin :

holding the leaf with RS facing you & with the center marker facing up, work ch 4

Row 1 (RS) :

work across the top 9 sts of right small leaf, sc in first st on the right, sc in next 6 sts, sc2tog; skip st with MARKER & remove the MARKER; work across the top 9 sts of left small leaf, sc2tog, sc in next 7 sts, ch 5; turn = 16 sts & 2 chs on each side

Row 2 (WS) :

sc in second ch from hook; sc in next 3 chs; sc in next 6 sts; sc4tog; sc in next 6 sts; sc in next 4 chs; turn = 21 sts

Row 3 (RS) :

ch 1 (do not count as a st); [bpsc around post of next st] 10 times; ch 10; sc in second ch from hook, sc in next 8 chs; [bpsc around post of next st] 10 times; sl st in last st = 30 sts

Finishing :

Fasten off & weave in all the ends on WS

— Wet Blocking :

Info :

Wet blocking is optional, but recommended. Blocking removes creases & adjusts the shape of crochet pieces

Step 1 :

Soak the leaves in warm water

Step 2 :

Squeeze excess moisture out

Step 3 :

Lay the leaves flat on a blocking board (or interlocking play mat)

Step 4 :

Shape & pin around the edges

Step 5 :

Let the leaves dry

Assembly Instructions

  • Create three identical small leaves following the pattern instructions through Row 8, making sure to leave a long tail for sewing on each piece.
  • Place all three small leaves side by side with the right sides facing up and the stitch markers meeting in the center point.
  • With wrong side facing you, use the whip stitch technique to sew the leaves together across 9 stitches on each side seam.
  • Remove the stitch markers from the left and right leaves as you sew, but keep the center marker in place for the stalk attachment.
  • Work the leaf stalk section by chaining 4 from the center marker position, then working across the top edges of both side leaves.
  • Complete the stalk by following Row 2 and Row 3 instructions, creating the stem portion that extends from the bottom of the leaf.
  • Weave in all remaining yarn ends on the wrong side for a clean, professional finish before blocking.

Important Notes

  • 💡This pattern is written using US crochet terminology, so if you use UK terms, refer to the conversion chart provided in the pattern
  • 💡Gauge is not critical for this project, but your finished size may vary slightly depending on your tension and yarn choice
  • 💡Keep stitch markers in place throughout assembly until instructed to remove them to ensure proper alignment of the three leaf sections
  • 💡Front post and back post single crochet stitches are essential for creating the realistic texture and dimensional veins in the maple leaf
  • 💡Wet blocking is highly recommended to achieve crisp points and a flat, professional finish suitable for use as a coaster
  • 💡To make a smaller leaf, simply use thinner yarn or crochet thread with a smaller hook size while following the same pattern instructions

This charming Canadian Maple Leaf coaster pattern celebrates the iconic symbol of Canada through the art of crochet. Designed by IraRott, this intermediate-level project combines basic stitches with textured post stitches to create a realistic, dimensional leaf that measures approximately 8.5 inches across. Whether you're making coasters for your autumn table, creating patriotic décor, or adding appliqués to garments and accessories, this versatile pattern offers endless creative possibilities. The detailed instructions, helpful photos, and clear diagrams make this an enjoyable project that you'll want to crochet in multiple colors! 🍁🧶

You ask,

we answer.

FAQs

Can I use a different yarn weight for this maple leaf pattern?

Yes! While the pattern calls for worsted weight (medium/4) yarn, you can absolutely use thinner yarn or even crochet thread with a smaller hook to create a miniature version. Just remember that your finished size will be smaller than the stated 8.5 inches across.

What are front post and back post single crochet stitches?

These are textured stitches that create dimension by working around the post of the stitch rather than into the top loops. Front post single crochet (fpsc) inserts the hook from front to back to front around the post, while back post single crochet (bpsc) goes from back to front to back. These stitches create the realistic vein texture in the maple leaf.

Is wet blocking really necessary for this project?

While optional, wet blocking is highly recommended for this pattern. It helps remove any creases, defines the pointed edges of the leaf, and ensures the coaster lies completely flat. Without blocking, your leaf may curl slightly or lack the crisp, professional appearance of a real maple leaf.

Can I sell items made from this pattern?

Yes! According to the designer's terms of use, you are welcome to sell finished items made from this IraRott pattern. Credit to the designer is appreciated but not required. However, you cannot copy, share, resell, or redistribute the pattern itself.

What colors work best for this maple leaf coaster?

Traditional autumn colors like red, orange, yellow, and burnt orange create beautiful seasonal coasters. However, you can also make them in green for spring/summer, or even use Canadian flag colors (red with a white background) for patriotic décor. Get creative with your color choices!