🧶 Beautiful ✨ Detailed 💝 Adorable

Crab Granny Square Crochet Pattern

Crab Granny Square Crochet Pattern
4.4★ Rating
2-3 Hours Time Needed
1.2K Made This
✂️

Intermediate Level

Ideal for those with basic knitting experience, featuring slightly more advanced stitches and techniques to expand your skills.

⏱️

Bite-Sized Project

Complete in under 2 hours—quick, fun, and perfect for a little creative escape.

🐾

Pocket Pal

A mini friend to carry anywhere, providing comfort and companionship in a perfectly portable size.

About This Crab Granny Square Crochet Pattern

Crab Granny Square Crochet Pattern crochet pattern - detailed view of completed project

Working in rounds with simple color changes, this pattern creates a perfectly sized square that's versatile enough for blankets, pillows, or wall hangings. The detailed instructions guide you through creating the adorable crab face and appendages that bring personality to your finished piece.

Why You'll Love This Crab Granny Square Crochet Pattern

I absolutely love this pattern because it transforms a simple granny square into something truly special and conversation-worthy. The combination of classic technique with playful design makes every stitch enjoyable, and watching the cheerful crab come to life is incredibly rewarding. What really draws me to this project is how it balances accessibility with creativity—the basic granny square foundation feels familiar and comfortable, while the appliqué details add that extra touch of whimsy. I find it perfect for using up yarn scraps in my stash, and the finished squares always bring smiles whether displayed alone or joined into larger beach-themed creations.

Crab Granny Square Crochet Pattern step 1 - construction progress Crab Granny Square Crochet Pattern step 2 - assembly progress Crab Granny Square Crochet Pattern step 3 - details and accessories Crab Granny Square Crochet Pattern step 4 - final assembly and finishing

Switch Things Up

I love experimenting with this pattern by playing with color variations that transform the entire mood of the square. Instead of traditional red, I've created purple crabs for a whimsical underwater fantasy feel, or bright orange ones that pop against navy blue borders for a bold nautical look. Sometimes I'll work the background square in ocean blues and teals instead of beige, creating the illusion that my crab is swimming in the sea.

Another fun twist I enjoy is adding embellishments like tiny button eyes instead of crocheted ones, or stitching small French knots around the square to represent bubbles. For special projects, I've even added a small bow between the crab's eyes using ribbon or embroidery thread to create a feminine touch. You could also experiment with different expressions by varying the mouth shape—try a surprised 'o' shape or a wavy line for different personalities.

I've discovered that these squares work wonderfully when combined with solid granny squares in coordinating colors to create larger blankets or throws. The contrast between the detailed crab squares and simple solid squares creates visual interest without overwhelming the design. For coastal-themed projects, consider making multiple sea creature squares—pair your crab with starfish, fish, or octopus designs for an entire ocean scene.

Common Mistakes & How to Fix Them

✗ Not maintaining consistent tension throughout color changes can create uneven edges and distorted square shapes ✗ Forgetting to count stitches in each round leads to lopsided squares that won't join properly with others ✗ Pulling the magic ring too tight too early makes it difficult to work the first round stitches smoothly ✗ Skipping the invisible finish creates visible gaps and messy color transitions between rounds ✗ Placing crab features asymmetrically without pinning first results in a crooked face that's difficult to correct

Crab Granny Square Crochet Pattern

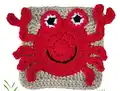
Create an adorable coastal-inspired granny square featuring a cheerful crab with playful details. This charming square pattern combines classic granny square construction with whimsical ocean-themed appliqué work. Perfect for blankets, cushions, or beach-themed home decor projects. The design features a vibrant red crab with detailed eyes, claws, and posable legs against a neutral square background. Each completed square measures approximately 11cm x 11cm, making it ideal for combining into larger projects or using as standalone decorative pieces.

Intermediate 2-3 Hours

Materials Needed for Crab Granny Square Crochet Pattern

— Main Fabric

  • 01
    Lightweight acrylic yarn in red color
  • 02
    Lightweight acrylic yarn in black color
  • 03
    Lightweight acrylic yarn in white color
  • 04
    Lightweight acrylic yarn in beige color

— Tools Required

  • 01
    4mm crochet hook
  • 02
    Yarn needle
  • 03
    Scissors

Progress Tracker

0% Complete

— Square :

Using red yarn :

Start with red yarn for the crab body

Round 1 :

MR, ch2, 12dc inside MR (12)

Info :

Tighten the MR by pulling on the tail and then sl st in the 1st dc (skip the ch2)

Round 2 :

ch2, *dc inc* all around (24)

Round 3 :

ch2, *dc, dc inc* all around (36)

Round 4 :

ch2, *2dc, dc inc* all around (48)

Info :

Color Change: at the end of Round 4, you will need to do a color change. Method 1: change color at the last dc of Round 4. Method 2: finish off with an invisible stitch and then attach the new color

Using beige yarn :

Insert your hook into any stitch and attach the new yarn by pulling it through the stitch

Round 5 :

ch1, *3sc, 2hdc, 2dc, [2tc + ch2 + 2tc] in the same stitch, 2dc, 2hdc* all around (68)

Info :

Sl st in the first sc that you did at the beginning of Round 5

Round 6 :

ch2, *dc* all around and [2dc + ch2 + 2dc] in the ch2 space (84)

Info :

At the end of the round, finish off and weave in any excess yarn. You can finish off using the invisible stitch method or sl st in the 1st dc and then yarn over and pull it all the way through

— Eyes :

Using black yarn :

Start with black yarn for eye centers

Round 1 :

MR, ch1, 5sc in MR (5)

Info :

Change color to white at the last sc

Round 2 :

*inc* all around (10)

Info :

Change color to red at the last sc

Round 3 :

*sc, inc* all around (15)

Info :

Cut the yarn and finish off. Leave a long tail for stitching

— Legs (Make 6) :

Using red yarn :

Start with red yarn

Row 1 :

slip knot, ch6, sc in the 2nd ch away from the hook, sc, 2sc in 1 st, 2sc (6)

Info :

Cut the yarn and leave a long tail for stitching

— Claw (Right) :

Using red yarn :

Start with red yarn

Row 1 :

slip knot, ch8, sc in the 2nd ch away from the hook, 2sc, inc, 3sc (8)

Info :

Then ch7, sc in the 2nd ch away from the hook, hdc dec, hdc dec, sc (4), sl st in the claw. Then ch5, sc in the 2nd ch away from the hook, hdc inc, hdc inc, sc (6). Sl st in the claw and finish off while leaving a long tail for stitching

— Claw (Left) :

Using red yarn :

Start with red yarn

Row 1 :

slip knot, ch11, sc in the 2nd ch away from the hook, 2sc, 2dec, 3sc (8)

Info :

Then ch7, sc in the 2nd ch away from the hook, hdc dec, hdc dec, sc (4), sl st in the claw. Then ch5, sc in the 2nd ch away from the hook, hdc inc, hdc inc, sc (6). Sl st in the claw and finish off while leaving a long tail for stitching

— Assembly :

Face placement :

Place the face components on the square and align them similar to the reference image. Use the tail for stitching

Legs and claws :

You can either stitch the legs/claws completely to the square, or only stitch them at the edge that is closest to the circular base so that they can be moved back and forth

Mouth :

Use the black yarn to stitch a mouth on Round 2

Assembly Instructions

  • Position the two completed eyes on the red crab body, spacing them evenly across the upper portion of the circular section.
  • Stitch the eyes securely to the square using the long tails left from finishing each eye piece.
  • Arrange all six legs along the sides of the crab body, placing three legs on each side for symmetry.
  • Attach the right claw to the upper right area and the left claw to the upper left area of the crab body.
  • Decide whether to fully stitch legs and claws or attach only at the base to allow movement and posability.
  • Using black yarn, embroider a curved smile mouth on Round 2 of the crab body for a cheerful expression.
  • Weave in all remaining yarn tails securely on the back of the square for a neat finish.

Important Notes

  • 💡Maintain consistent tension throughout to ensure your square measures the correct 11cm x 11cm size
  • 💡Use the invisible stitch finishing method for cleaner color transitions and professional-looking results
  • 💡Pin all crab components in place before stitching to ensure proper alignment and symmetry
  • 💡Count your stitches carefully at the end of each round to avoid distortion in the square shape
  • 💡Leave long enough tails when finishing each piece to make assembly easier and more secure
  • 💡Block your finished square if needed to achieve perfectly straight edges and corners

This charming Crab Granny Square pattern combines the beloved tradition of granny squares with playful coastal character. Perfect for beach lovers and ocean enthusiasts, this square adds whimsy to any crochet project from baby blankets to summer throws. The cheerful red crab with its expressive eyes and movable appendages brings personality and charm to your handmade creations. Whether you're making a single square for a pillow or combining multiples into a seaside-themed blanket, this pattern delivers delightful results that will brighten any space. 🦀🧶✨

You ask,

we answer.

FAQs

Can I use different yarn weights for this pattern?

Yes, you can use any yarn weight, but remember that using a different weight will change the final size of your square. If you use thinner yarn with a smaller hook, your square will be smaller than 11cm x 11cm, and thicker yarn with a larger hook will create a bigger square. Just ensure your hook size matches your yarn weight for best results.

What's the difference between Method 1 and Method 2 for color changes?

Method 1 involves changing color directly at the last double crochet of the round by working the final yarn over with the new color. Method 2 uses an invisible finish where you cut the yarn and use a needle to create a seamless joining stitch before attaching the new color. Method 2 provides the cleanest finish, but both methods work well depending on your preference.

Should I make the legs and claws movable or permanently attached?

This depends on your intended use. For decorative items like wall hangings or pillows, you can stitch the appendages only at the edge closest to the crab body, allowing them to move. For items that will be washed frequently or used by children, it's better to stitch them completely flat against the square for durability.

How many squares do I need to make a baby blanket?

For a standard baby blanket measuring approximately 75cm x 90cm, you would need about 42-48 squares (6-7 squares wide by 7-8 squares long). However, you can adjust the number based on your desired finished size and whether you want to add a border around the joined squares.

Can I substitute the lightweight acrylic yarn with cotton?

Absolutely! Cotton yarn works beautifully for this pattern and may even provide better stitch definition. Just make sure to use a comparable weight and adjust your hook size if needed to achieve the correct gauge. Cotton squares are especially nice for items like dishcloths or summer blankets.