🧢 Beautiful ✨ Detailed πŸ’ Adorable

Crochet Puff Quilt Blanket Pattern

Crochet Puff Quilt Blanket Pattern
4.4β˜… Rating
40-60 Hours Time Needed
2.3K Made This
βœ‚οΈ

Beginner Friendly Level

Perfect for those just starting their sewing journey, with clear instructions and simple techniques

⏱️

Slow & Steady

A 10-12 hour projectβ€”great for savoring the process over several sessions.

🏑

Cozy Accent

A warm touch for your space that transforms ordinary corners into inviting nooks filled with handmade charm.

About This Crochet Puff Quilt Blanket Pattern

Crochet Puff Quilt Blanket Pattern crochet pattern - detailed view of completed project

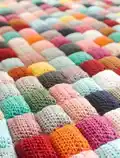
Each 3-inch square works up quickly, and you can customize your blanket size by simply adding or removing squares. The pattern includes detailed photo tutorials for all seaming techniques.

Why You'll Love This Crochet Puff Quilt Blanket Pattern

I absolutely adore this pattern because it turns what could be overwhelming into something manageable and meditative. There's something deeply satisfying about watching your pile of finished squares grow day by day. I love how forgiving this project is since precise gauge doesn't matter much here. Plus, it's the ultimate stash-buster! Every time I finish a square in a new color, it feels like a tiny accomplishment. The finished blanket has this incredible weight and texture that store-bought blankets simply can't match.

Crochet Puff Quilt Blanket Pattern step 1 - construction progress Crochet Puff Quilt Blanket Pattern step 2 - assembly progress Crochet Puff Quilt Blanket Pattern step 3 - details and accessories Crochet Puff Quilt Blanket Pattern step 4 - final assembly and finishing

Switch Things Up

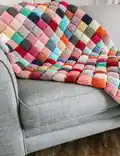
I find myself completely drawn to projects that let me see progress quickly, and this puff quilt delivers that satisfaction in spades. Every finished square feels like a small victory, a colorful little pillow of accomplishment that I can hold in my hands. I love how this pattern turns my chaotic yarn stash into something cohesive and beautiful.

What really gets me excited is the creative freedom here. I can go wild with a rainbow explosion of colors or keep things sophisticated with a curated palette. The simple half double crochet stitch means my hands can work almost on autopilot while I catch up on podcasts or chat with friends. It's meditative in the best way possible.

I appreciate that gauge isn't critical with this pattern. There's no stress about matching exact measurements because the modular design adapts to whatever my hook and yarn want to create. That forgiving nature makes this feel like a project I can pick up anytime without pressure.

Common Mistakes & How to Fix Them

βœ— Overstuffing the squares can make seaming difficult and cause the blanket to look uneven, so use light stuffing as shown in the pattern photos. βœ— Forgetting to leave a long enough tail when fastening off means you won't have enough yarn to properly close and seam your squares together. βœ— Not working in flat rounds can cause your squares to twist, so remember to chain one and turn at the beginning of each round. βœ— Seaming along the very edge of squares instead of picking up stitches just inside creates visible seam lines on the front of your blanket. βœ— Using different yarn weights or fibers throughout can result in inconsistent square sizes, making alignment tricky during assembly.

Crochet Puff Quilt Blanket Pattern

Get ready to create the coziest, most colorful blanket you've ever made! This Crochet Puff Quilt pattern transforms simple yarn scraps into a stunning, heavy-weight masterpiece that looks like a traditional quilt but with that unmistakable handmade charm. Each little stuffed square comes together using just one basic stitch, making this project surprisingly approachable. Whether you're clearing out your yarn stash or picking fresh colors, you'll love watching your blanket grow square by square into something truly special.

Beginner Friendly 40-60 Hours

Materials Needed for Crochet Puff Quilt Blanket Pattern

β€” Main Fabric

  • 01
    Worsted/Medium weight yarn (4-weight)
  • 02
    Approximately 15-20 yards per square
  • 03
    Additional yarn for seaming between squares
  • 04
    100% cotton yarn recommended for consistency
  • 05
    Various colors for scrappy look or coordinated palette

β€” Tools Required

  • 01
    Crochet hook 5.0mm (or hook to meet gauge)
  • 02
    Yarn needle
  • 03
    Scissors
  • 04
    Stuffing/fiberfill
  • 05
    Stitch marker
  • 06
    Flexible tape measure

Progress Tracker

0% Complete

β€” Puff Square :

Setup :

Ch 11

Round 1 :

Starting in the second ch from the hook, hdc in each ch across. Rotate your work to the other side of the ch and hdc in each ch across. Slst to the starting stitch. (20 stitches)

Tip :

When working along the second side of your ch, lay your starting tail down across the row and crochet over top of it to secure this tail without having to weave it in.

Tip :

If needed, use a stitch marker at the beginning of each round to help keep track of your stitch count.

Round 2-8 :

Ch 1 and turn. Hdc in each of the next 20 stitches. Slst to the starting stitch. (20 stitches)

Info :

Fasten off, leaving a long tail (roughly 20"-24").

β€” Stuffing & Closing :

Step 1 :

Begin lightly stuffing your square (see figure 3 for the recommended stuffing amount).

Step 2 :

Attach a yarn needle to the end of your tail and use the whip stitch to begin seaming across the top.

Step 3 :

Finish filling in stuffing if needed, and whip stitch to the end, completely closing off your square.

Info :

If this is your first square of a new row, you may go ahead and weave in this end.

β€” Joining Squares (Side by Side) :

Info :

Repeat the square process for your next square, but don't weave in your final end yet.

Info :

As you seam all of your squares together, you will be looking at the back side of the work. Keep this in mind if you would like your colors in a specific arrangement.

Step 1 :

With your yarn needle still attached, seam this square to your previous square using whip stitch (Tutorial #2).

Step 2 :

Decide how wide you would like your blanket to be, in increments of 3" (or increments of how wide each square is for you).

Step 3 :

Continue repeating this pattern until you have attached enough squares side by side to achieve your desired width. This will be one "row" of squares.

β€” Joining Rows Together :

Step 1 :

Complete a second full row of squares.

Step 2 :

Seam the two rows together using the mattress stitch (Tutorial #3). You will be using a completely separate strand of yarn for this, any color of your choosing.

Step 3 :

Repeat this entire process for your entire project.

Finishing :

Once you achieve your desired width and length, weave in all ends and enjoy!

Assembly Instructions

  • Create all individual puff squares first, stuffing and closing each one with the whip stitch technique before moving on.
  • Join squares side by side using whip stitch with the yarn tail from your most recent square, working from the back of your project.
  • Build complete rows of squares to your desired blanket width before joining rows together.
  • Use the mattress stitch with a separate strand of yarn to connect completed rows, ensuring seam lines stay hidden on the front.
  • When reaching corners where four squares meet, make secure diagonal connections by stitching through all four corner points.
  • Pull all corner connections snug to prevent gaps and ensure a clean, professional finish throughout your blanket.

Important Notes

  • πŸ’‘Use a stitch marker at the beginning of each round to keep accurate stitch counts
  • πŸ’‘Stuff squares lightly to maintain flexibility and make seaming easier
  • πŸ’‘Leave a 20-24 inch tail when fastening off to have enough yarn for closing and joining
  • πŸ’‘Work from the back side when seaming so color placement appears correct on the front
  • πŸ’‘Pick up stitches just inside the edge rather than on the very side to hide seam lines
  • πŸ’‘Using yarn from the same fiber content throughout creates the most consistent results

This Crochet Puff Quilt pattern is the perfect blend of traditional quilting charm and modern crochet techniques. Whether you're using beloved yarn scraps with memories attached or fresh skeins in your favorite palette, every square you make adds personality to your creation. The finished blanket offers that comforting weight we all crave on chilly evenings. 🧢 Happy crocheting and even happier snuggling! ✨

You ask,

we answer.

FAQs

How much yarn do I need for a full-size blanket?

For a 54" x 54" blanket (18x18 squares = 324 squares), you'll need approximately 15-20 yards per square, plus extra for seaming. That works out to roughly 5,000-7,000 yards total. This is a fantastic stash-buster project!

Can I use different yarn weights or fiber types?

While you can mix things up, using yarn from the same weight and fiber content gives the most consistent square sizes. The designer recommends sticking with all worsted weight and preferably the same fiber like 100% cotton throughout.

What size will my finished blanket be?

Each square measures 3" x 3" before stuffing. Simply multiply the number of squares by 3 inches in each direction. For example, 18 squares across gives you a 54" wide blanket.

How do I prevent my seams from showing on the front?

The key is to pick up stitches just inside the edge of each square rather than along the very side. The pattern's mattress stitch tutorial shows exactly how to keep your seam lines invisible.

Is this blanket machine washable?

This depends on your yarn choice and stuffing. If using cotton yarn and polyester fiberfill, most can be machine washed on gentle and tumble dried low. Always check your specific yarn labels first.