🧢 Beautiful ✨ Detailed πŸ’ Adorable

EZ Criss-Cross Baby Blanket Pattern

EZ Criss-Cross Baby Blanket Pattern
4.0β˜… Rating
5-6 Hours Time Needed
1.5K Made This
βœ‚οΈ

Beginner Friendly Level

Perfect for those just starting their sewing journey, with clear instructions and simple techniques

⏱️

Weekend Treat

Takes 5-7 hours, making it an enjoyable project to finish over a couple of days.

🏑

Cozy Accent

A warm touch for your space that transforms ordinary corners into inviting nooks filled with handmade charm.

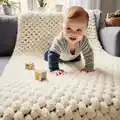
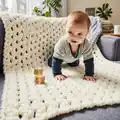
About This EZ Criss-Cross Baby Blanket Pattern

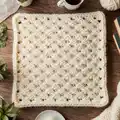
The EZ Criss-Cross Baby Blanket is a delightful project that introduces you to a unique finger-looping technique using Bernat Alize Blanket-EZ yarn. This pattern creates a beautiful textured design with a distinctive criss-cross pattern that looks intricate but is surprisingly simple to master. The blanket works up quickly due to the chunky yarn and innovative construction method, making it an ideal gift for baby showers or a cherished keepsake for your own little one.

EZ Criss-Cross Baby Blanket Pattern crochet pattern - detailed view of completed project

This blanket features a reversible design with the right side always facing you as you work. The special looping technique eliminates the need to turn your work, creating a meditative and enjoyable crafting experience that flows smoothly from start to finish.

Why You'll Love This EZ Criss-Cross Baby Blanket Pattern

I absolutely love this pattern because it introduces a completely different way of working with yarn that feels almost magical. The criss-cross technique creates such a beautiful, dimensional texture that people always think took hours more than it actually did. I appreciate how the pattern keeps the right side facing throughout, which means you can watch your beautiful design develop with every stitch. The chunky Bernat Alize yarn makes this project work up quickly, and there's something incredibly satisfying about the rhythmic motion of crossing loops and pulling through new ones. Plus, the finished blanket is wonderfully soft and squishy, perfect for snuggling a precious baby.

EZ Criss-Cross Baby Blanket Pattern step 1 - construction progress EZ Criss-Cross Baby Blanket Pattern step 2 - assembly progress EZ Criss-Cross Baby Blanket Pattern step 3 - details and accessories EZ Criss-Cross Baby Blanket Pattern step 4 - final assembly and finishing

Switch Things Up

If you want to add your own creative spin to this classic design, there are several fun variations you can try. Consider using different colors of Bernat Alize Blanket-EZ yarn and switching colors every few rows to create bold stripes or a gradient effect that transitions from light to dark shades. You could also experiment with the blanket size by adjusting your foundation row to create anything from a small lovey to a full-sized throw blanket for older children or adults.

For a more personalized touch, try adding a simple border around the finished blanket using traditional crochet stitches with coordinating yarn, or weave ribbon through the loops along the edges for a decorative finish. Some crafters love to add appliquΓ©s, embroidered names, or small crocheted motifs sewn onto the finished blanket to make it truly one-of-a-kind. You could even combine two different colored sections by working them separately and then joining them together for a color-blocked effect.

If you're feeling adventurous, experiment with the crossing direction in certain sections to create subtle pattern variations within the overall design. Remember that the beauty of handmade items lies in their uniqueness, so don't be afraid to make this pattern your own and create something that reflects your personal style and the personality of the little one who will receive it.

Common Mistakes & How to Fix Them

βœ— Pulling loops too tightly which can distort the criss-cross pattern and make subsequent rows difficult to work into properly βœ— Forgetting to skip the first stitch on even-numbered rows which throws off the entire stitch count and pattern alignment βœ— Turning the work between rows when instructions clearly state not to turn, which reverses the pattern direction completely βœ— Losing track of which direction you should be working causing the criss-cross pattern to become inconsistent and uneven βœ— Not counting loops carefully in the foundation row leading to an incorrect stitch count throughout the entire blanket βœ— Crossing stitches in the wrong direction which creates a different texture than intended and disrupts the uniform appearance

EZ Criss-Cross Baby Blanket Pattern

Create a stunning baby blanket with this unique criss-cross technique using Bernat Alize Blanket-EZ yarn. This pattern features a beautiful textured design that works up quickly without turning your work, making it perfect for crafters who want to create something special with minimal effort. The result is a soft, cozy blanket measuring approximately 32 by 40 inches, ideal for keeping little ones warm and comfortable.

Beginner Friendly 5-6 Hours

Materials Needed for EZ Criss-Cross Baby Blanket Pattern

β€” Main Fabric

  • 01
    Bernat Alize Blanket-EZ yarn in Cream (37013)
  • 02
    6.4 oz/180 g per ball, 18 yds/16 m per ball
  • 03
    4 balls total required

β€” Tools Required

  • 01
    Yarn needle for weaving in ends
  • 02
    Scissors

Progress Tracker

0% Complete

β€” Foundation Row :

Setup :

Count 50 loops for foundation row, noting yarn end is at far left and all loops are facing upwards

β€” Row 1 :

Direction :

Working from right to left

Step 1 :

Cross 50th loop in front of 49th loop. Pull next loop from working yarn up from behind through 49th loop. Pull next loop from working yarn up from behind 50th loop

Step 2 :

Cross next loop of foundation row in front of 2nd loop of foundation row. Holding crossed loops in position, pull next loop from working yarn up from behind through next loop. Pull next loop from working yarn up from behind through next loop

Repeat :

Repeat Step 2 to end of row. Do not turn work. 50 stitches in row

β€” Row 2 :

Direction :

Working from left to right

Step 1 :

Skip first stitch of row just worked. Cross 2nd stitch in front of 3rd stitch. Holding crossed stitches in position, pull loop from working yarn up from behind through 3rd stitch. Pull next loop from working yarn up from behind 2nd stitch

Step 2 :

Cross next 2 stitches. Holding crossed stitches in position, pull next loop from working yarn up from behind through next stitch. Pull next loop from working yarn up from behind through next stitch

Repeat :

Repeat Step 2 to last stitch. Leave last stitch unworked. Do not turn work. 50 stitches in row

β€” Row 3 :

Direction :

Working from right to left

Step 1 :

Cross unworked stitch in front of 2nd stitch. Holding crossed stitches in position, pull next loop from working yarn up from behind through 2nd stitch. Pull next loop from working yarn up from behind through first stitch

Step 2 :

Cross next 2 stitches. Holding crossed stitches in position, pull next loop from working yarn up from behind through next stitch. Pull next loop from working yarn up from behind through next stitch

Repeat :

Repeat Step 2 to end of row. Do not turn work

β€” Main Body :

Pattern Repeat :

Repeat Row 2 and Row 3 until Blanket measures approximately 40 inches [101.5 cm], ending on a Row 2

β€” Bind Off Row :

Direction :

Working in same direction as last row

Binding Off :

Pull 2nd stitch through 1st stitch. Pull 3rd stitch through 2nd stitch. Pull 4th stitch through 3rd stitch. Continue in this manner to end of row

Finishing :

Cut thread at base of loop (thread used to create the loop) to create a yarn tail. Tie to secure and weave in ends

Assembly Instructions

  • This blanket requires no assembly as it is worked as one continuous piece from start to finish.

Important Notes

  • πŸ’‘Keep the right side of work facing at all times throughout the entire project
  • πŸ’‘The working yarn should always be held behind stitches as you work each row
  • πŸ’‘Always pull loops from working yarn through stitches from back to front of work
  • πŸ’‘Do not turn your work between rows, even though this may feel unnatural at first
  • πŸ’‘Count your stitches regularly to ensure you maintain 50 stitches throughout the blanket
  • πŸ’‘When binding off, work carefully to maintain even tension for a neat finished edge
  • πŸ’‘Weave in all yarn ends securely to prevent unraveling with use and washing

This beautiful EZ Criss-Cross Baby Blanket pattern offers a unique approach to creating a textured, cozy blanket using innovative finger-looping techniques. The result is a stunning piece with dimensional criss-cross texture that looks far more complex than it actually is to create. With its generous size and soft, chunky yarn, this blanket will become a treasured item for any nursery. The reversible design and quick-working nature make it perfect for gift-giving or creating a special heirloom for your own family. Happy crafting and enjoy watching this beautiful blanket come to life! 🧢✨

You ask,

we answer.

FAQs

What is Bernat Alize Blanket-EZ yarn and why is it special for this pattern?

Bernat Alize Blanket-EZ is a unique chunky yarn that comes with pre-formed loops built right into the yarn structure. This innovative design eliminates the need for traditional crochet hooks or knitting needles, allowing you to work directly with the loops using just your hands. It's perfect for this criss-cross pattern because the loops are already formed and consistent in size, making the technique easier to master and resulting in even, professional-looking stitches throughout your blanket.

Why do I need to keep the right side facing and not turn my work?

The criss-cross technique in this pattern creates a specific directional texture that needs to be consistent throughout. By keeping the right side facing and alternating your working direction without turning, you maintain the proper orientation of the crossed stitches. Turning your work would reverse the direction of the crosses and create an inconsistent pattern. This method also allows you to watch your beautiful design develop continuously, which is both satisfying and helps you catch any mistakes early.

How do I fix it if I lose track of my stitch count?

If you realize your stitch count is off, carefully count all the loops on your current row. If you have too many or too few stitches, you'll need to carefully unwork back to where the error occurred. Since this pattern uses loops, you can gently pull them out backwards until you reach the mistake. To prevent this issue, place a stitch marker or safety pin at the beginning and end of each row, and count your stitches every few rows to catch errors early before they compound.

Can I make this blanket larger or smaller?

Absolutely! To adjust the size, change the number of loops in your foundation row. Each pair of loops adds width to your blanket. For a smaller blanket, start with fewer loops (make sure it's an even number), and for a larger blanket, add more loops to your foundation row. Remember that you'll need to adjust your yarn quantity accordingly. Keep in mind that the criss-cross pattern works in pairs, so always use an even number of foundation loops for the pattern to work correctly.

What should I do if the loops feel too tight or too loose?

Loop tension is crucial for this pattern. If loops are too tight, the blanket will be stiff and difficult to work. If they're too loose, the blanket will look sloppy and have large gaps. To adjust tension, focus on how firmly you pull each new loop through the existing stitches. Practice on a small swatch first to find your comfortable tension sweet spot. Remember that Blanket-EZ yarn is quite forgiving, so slight tension variations won't be as noticeable as with traditional yarn. The key is maintaining consistency throughout your project.