๐Ÿงถ Beautiful โœจ Detailed ๐Ÿ’ Adorable

Felted Bowl Trio Pattern

Felted Bowl Trio Pattern
4.1โ˜… Rating
4-6 Hours Time Needed
3.3K Made This
โœ‚๏ธ

Beginner Friendly Level

Perfect for those just starting their sewing journey, with clear instructions and simple techniques

โฑ๏ธ

Weekend Treat

Takes 5-7 hours, making it an enjoyable project to finish over a couple of days.

๐Ÿก

Cozy Accent

A warm touch for your space that transforms ordinary corners into inviting nooks filled with handmade charm.

About This Felted Bowl Trio Pattern

Felted Bowl Trio Pattern crochet pattern - detailed view of completed project

This pattern uses non-superwash wool in three coordinating colors to create visual interest. The decreases at the top edge prevent stretching, while a pen-style felting tool allows you to add personalized decorative details after felting is complete.

Why You'll Love This Felted Bowl Trio Pattern

I absolutely love this pattern because it's incredibly forgiving and perfect for exploring the magical transformation of felting. There's something so satisfying about watching your crocheted pieces shrink and become dense, functional bowls in the washing machine. I appreciate that exact gauge doesn't matter here, which takes the pressure off and lets you focus on enjoying the process. The nesting design is both practical and beautiful, and the option to add needle-felted decorations means you can make each bowl truly unique. It's a wonderful way to create handmade organizational tools that add warmth and personality to any space.

Felted Bowl Trio Pattern step 1 - construction progress Felted Bowl Trio Pattern step 2 - assembly progress Felted Bowl Trio Pattern step 3 - details and accessories Felted Bowl Trio Pattern step 4 - final assembly and finishing

Switch Things Up

I love experimenting with color combinations for these felted bowls to match different decor styles or seasonal themes. Try using rich jewel tones like deep purple, emerald green, and burgundy for a luxurious feel, or go with soft pastels in pink, mint, and cream for a cottage-core aesthetic. You could even work all three bowls in different shades of the same color family for an ombrรฉ effect that's absolutely stunning when nested together.

I've also found that adding textural interest through the needle felting stage really makes these bowls special. Instead of just adding random yarn strands, try creating patterns like dots, stripes, or even simple geometric designs. I particularly love adding a contrasting color rim around the top edge or creating a spiral pattern that radiates from the center bottom.

For a more functional twist, I recommend making the bowls in sturdier, thicker wool if you plan to use them for heavier items like keys or remote controls. The denser the felt, the more structural integrity your bowls will have. You can also experiment with bowl depth by adding more even rounds in the middle section before starting your decrease rounds.

Consider making these as gifts and personalizing them with needle-felted initials or small motifs that reflect the recipient's interests. I've made sets with little felted flowers, stars, or even tiny hearts that add such a personal touch. The beauty of this pattern is its versatility and forgiving nature, so don't be afraid to make it your own!

Common Mistakes & How to Fix Them

โœ— Using superwash wool by mistake which will not felt properly in the washing machine resulting in loose bowls โœ— Forgetting to mark the beginning of rounds causing confusion about stitch placement and pattern progression throughout the project โœ— Over-stuffing or checking bowls too frequently during felting process which interrupts the necessary agitation for proper felting โœ— Skipping the decrease rounds at the top edge leading to bowls that stretch out of shape and lose their structured form

Felted Bowl Trio Pattern

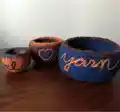
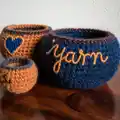
Create three beautifully nested felted bowls perfect for organizing your space with handmade charm. These versatile bowls are worked in coordinating colors and then felted in the washing machine for a sturdy, functional result. Ideal for beginners exploring felting techniques, this pattern allows creative freedom since exact sizing isn't critical. Customize with needle-felted yarn details to make each bowl uniquely yours and add artisanal touches to your home decor.

Beginner Friendly 4-6 Hours

Materials Needed for Felted Bowl Trio Pattern

โ€” Main Fabric

  • 01
    Non-superwash worsted weight 100% wool yarn in blue (Color A) - 115 yards
  • 02
    Non-superwash worsted weight 100% wool yarn in dark brown (Color B) - 85 yards
  • 03
    Non-superwash worsted weight 100% wool yarn in light golden brown (Color C) - 50 yards

โ€” Tools Required

  • 01
    Size L (8.0 mm) crochet hook
  • 02
    Locking stitch markers
  • 03
    Tapestry needle
  • 04
    Pen-style felting tool
  • 05
    Washing machine for felting

Progress Tracker

0% Complete

โ€” For Large Bowl:

Rnd 1:

Using A, make an adjustable ring, 6 sc in ring, pull on beg yarn tail to close hole โ€“ 6 sts, do not join, but work in the rnd. Use stitch marker to keep track of beg of rnds.

Rnd 2:

2 sc in each st around โ€“ 12 sts.

Rnd 3:

[Sc in next st, 2 sc in next st] 6 times โ€“ 18 sts.

Rnd 4:

[2 sc in next st, sc in next 2 sts] 6 times โ€“ 24 sts.

Rnd 5:

[1 sc in next 2 sts, 2 sc in next st, sc in next st] 6 times โ€“ 30 sts.

Rnd 6:

[1 sc in next 4 sts, 2 sc in next st] 6 times โ€“ 36 sts.

Rnd 7:

[1 sc in next 2 sts, 2 sc in next st, sc in next 3 sts] 6 times โ€“ 42 sts.

Rnd 8:

[1 sc in next 5 sts, 2 sc in next st, sc in next st] 6 times โ€“ 48 sts.

Rnd 9:

[1 sc in next 1 sts, 2 sc in next st, sc in next 5 sts] 6 times โ€“ 54 sts.

Rnd 10:

Sc around.

Rnd 11:

[1 sc in next 3 sts, 2 sc in next st, sc in next 5 sts] 6 times โ€“ 60 sts.

Rnd 12:

Sc around.

Rnd 13:

[1 sc in next 9 sts, 2 sc in next st] 6 times โ€“ 66 sts.

Rnds 14 โ€“ 21:

Sc around. Use contrasting st marker to mark post of first st of Rnd 14. This will help keep track of how many rnds have been worked even.

Rnd 22:

[1 sc in next 9 sts, sc2tog] 6 times โ€“ 60 sts.

Rnd 23:

[1 sc in next 3 sts, sc2tog, sc in next 5 sts] 6 times, sl st in first st of rnd โ€“ 54 sts.

Rnd 24:

Yo with B and pull up loop, pull on A yarn tail until last A loop disappears, ch 1 (does not count as a stitch), sc around, sl st in first sc to fasten off.

Info:

Weave in ends.

โ€” For Medium Bowl:

Info:

Using B, work Rnds 1 โ€“ 6 of Large Bowl directions.

Rnd 7:

Sc around.

Rnd 8:

[1 sc in next 2 sts, 2 sc in next st, sc in next 3 sts] 6 times โ€“ 42 sts.

Rnd 9:

Sc around.

Rnd 10:

[1 sc in next 5 sts, 2 sc in next st, sc in next st] 6 times โ€“ 48 sts.

Rnds 11 โ€“ 15:

Sc around. Use contrasting st marker to mark post of first st of Rnd 11. This will help keep track of how many rnds have been worked even.

Rnd 16:

[1 sc in next 6 sts, sc2tog] 6 times โ€“ 42 sts.

Rnd 17:

[1 sc in next 3 sts, sc2tog, sc in next 2 sts] 6 times, sl st in first st of rnd โ€“ 36 sts.

Rnd 18:

Yo with C and pull up loop, pull on B yarn tail until last B loop disappears, ch 1 (does not count as a stitch), sc around, sl st in first sc to fasten off.

Info:

Weave in ends.

โ€” For Small Bowl:

Info:

Using C, work Rnds 1 โ€“ 3 of Large Bowl directions.

Rnd 4:

Sc around.

Rnd 5:

[2 sc in next st, sc in next 2 sts] 6 times โ€“ 24 sts.

Rnd 6:

Sc around.

Rnd 7:

[1 sc in next 2 sts, 2 sc in next st, sc in next st] 6 times โ€“ 30 sts.

Rnds 8 โ€“ 10:

Sc around. Use contrasting st marker to mark post of first st of Rnd 8. This will help keep track of how many rnds have been worked even.

Rnd 11:

[1 sc in next 4 sts, sc2tog] 6 times- 24 sts.

Rnd 12:

Yo with A and pull up loop, pull on C yarn tail until last C loop disappears, ch 1 (does not count as a stitch), sc around, sl st in first sc to fasten off.

Info:

Weave in ends.

โ€” Finishing:

Info:

Felt bowls in washing machine. Shape with hands and air dry after felting is complete. Add strands of yarn to bowls with needle felting tool to decorate.

Assembly Instructions

  • After completing all three bowls, weave in all yarn ends securely before felting to prevent them from working loose during the washing process.
  • Place all three bowls in a washing machine with hot water and a small amount of detergent for the felting process.
  • Add towels or jeans to the wash load to increase agitation, which helps the felting process work more effectively.
  • Check bowls periodically during the wash cycle to monitor the felting progress, but avoid checking too frequently as this disrupts the process.
  • Once bowls have shrunk to desired size and texture, remove from machine and shape by hand while still damp, forming the desired bowl curves.
  • Allow bowls to air dry completely in their shaped form, which may take 24-48 hours depending on humidity levels.
  • Once dry, use a pen-style felting tool to add decorative yarn strands by needling them into the felted surface for personalized embellishments.

Important Notes

  • ๐Ÿ’กAlways use non-superwash wool as superwash-treated wool will not felt properly and your bowls will remain loose and floppy
  • ๐Ÿ’กSome white or off-white wool yarns do not felt well, so test a small swatch first if using light colors
  • ๐Ÿ’กUse locking stitch markers to track your rounds, especially important during the even rounds where it's easy to lose count
  • ๐Ÿ’กExact gauge is not critical for this project since the bowls will shrink during felting and don't need specific measurements
  • ๐Ÿ’กThe decreases at the top edge are essential to prevent the bowls from stretching out of shape during and after felting
  • ๐Ÿ’กHot water and agitation are key to successful felting, so use a hot wash cycle rather than cold or warm water

This charming Felted Bowl Trio pattern combines practical organization with handmade beauty, creating nesting bowls that are both functional and decorative. The felting process transforms your crocheted work into sturdy, structured vessels perfect for any room in your home. With beginner-friendly instructions and room for creative customization through needle felting, these bowls make wonderful gifts or personal treasures. The coordinating color scheme creates visual harmony while the nesting design maximizes storage efficiency. ๐Ÿงถ Happy felting and may your bowls bring organized beauty to your space! ๐Ÿกโœจ

You ask,

we answer.

FAQs

What happens if I accidentally use superwash wool?

Superwash wool has been treated to prevent felting, so your bowls will not shrink or become dense if you use it. The bowls will remain loose and floppy after washing. Always check your yarn label to ensure it's regular (non-superwash) 100% wool for successful felting.

How much will the bowls shrink during felting?

The pattern indicates bowls shrink from approximately 11, 18, and 26 inches in circumference before felting to 9, 12.75, and 17 inches after felting. This represents about 18-35% shrinkage, though exact results vary depending on wool type, water temperature, and agitation time.

Can I make the bowls in different sizes than the pattern provides?

Absolutely! Since the bowls will be felted and exact sizing isn't critical, you can easily adjust by working more or fewer rounds. Just maintain the general shaping principles with increases at the bottom, even rounds for sides, and decreases at the top edge.

Do I need a pen-style felting tool or can I skip the decorative details?

The pen-style felting tool is optional and only used for adding decorative yarn strands after felting is complete. Your bowls will be fully functional without these embellishments, so you can skip this step if you prefer a simpler look or don't have the tool.

How long should I run the washing machine for felting?

Start by running a full hot water cycle and then check your bowls. If they haven't felted enough, run another cycle. The process typically takes one to three wash cycles depending on your machine's agitation power and the wool you're using.