🧢 Beautiful ✨ Detailed πŸ’ Adorable

Garden Snail Amigurumi Pattern

Garden Snail Amigurumi Pattern
4.8β˜… Rating
2-3 Hours Time Needed
2.4K Made This
βœ‚οΈ

Intermediate Level

Ideal for those with basic knitting experience, featuring slightly more advanced stitches and techniques to expand your skills.

⏱️

Bite-Sized Project

Complete in under 2 hoursβ€”quick, fun, and perfect for a little creative escape.

🐾

Pocket Pal

A mini friend to carry anywhere, providing comfort and companionship in a perfectly portable size.

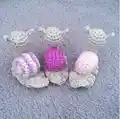
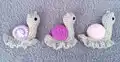
About This Garden Snail Amigurumi Pattern

This Garden Snail pattern brings nature's gentle creature to life with careful attention to detail. The distinctive ridge pattern on the shell is created using a special back loop only technique that gives the snail its characteristic spiral texture. The pattern includes options for creating either a solid-colored shell or a fun multi-colored lollipop swirl design. With its sweet antennae and charming body skirt detail, this snail captures the peaceful essence of garden life in miniature form.

Garden Snail Amigurumi Pattern crochet pattern - detailed view of completed project

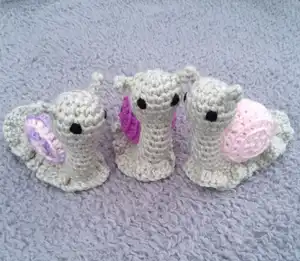
The pattern uses Scheepjes Chunky Monkey yarn which works up quickly and creates a sturdy finished piece. The special stitching technique for the shell creates beautiful texture while the body features an adorable elongated shape with cute little antennae.

Why You'll Love This Garden Snail Amigurumi Pattern

I absolutely love this garden snail pattern because it teaches you a unique texturing technique that you can use in so many other projects! The way the shell comes together with that beautiful ridge pattern is so satisfying to create, and watching the spiral take shape as you work is truly magical. I appreciate how the pattern offers creative freedom with the color-changing option, letting you make each snail completely unique. The finished piece has such personality and charm, and the size makes it perfect for gift-giving or adding a touch of nature to any space. Plus, those little antennae are just impossibly cute!

Garden Snail Amigurumi Pattern step 1 - construction progress Garden Snail Amigurumi Pattern step 2 - assembly progress Garden Snail Amigurumi Pattern step 3 - details and accessories Garden Snail Amigurumi Pattern step 4 - final assembly and finishing

Switch Things Up

I love experimenting with this garden snail pattern to create unique variations! One of my favorite modifications is playing with the shell colors to create stunning ombre or rainbow effects by changing yarn shades every two rows instead of every row. You could also try using sparkly or metallic yarn for a magical fairy garden snail that catches the light beautifully.

For a more realistic approach, I sometimes use variegated yarn in natural browns and tans for the shell, which creates gorgeous organic color variations without any effort. Another fun twist is making the body in bright, unexpected colors like turquoise or purple while keeping the shell neutral, or vice versa for a pop of surprise.

I've also experimented with adding small embroidered flowers or leaves to the shell using surface crochet or embroidery techniques, turning the snail into a tiny mobile garden. For texture variation, try using a fluffy or boucle yarn for the body to create a fuzzy, moss-like effect. You could even make a whole snail family in graduated sizes by adjusting your hook size! The possibilities are endless, and each variation brings its own special charm to this already adorable pattern.

Common Mistakes & How to Fix Them

βœ— Not picking up the third loop when working back loops only on the shell, which creates the distinctive ridge pattern texture βœ— Overstuffing the body or shell causing the stitches to stretch and show through the finished piece unattractivly βœ— Changing colors mid-stitch instead of at the beginning of a row when creating the lollipop swirl shell effect βœ— Forgetting to stuff the shell before closing it up completely, making it difficult to achieve proper shaping later βœ— Not securing the antennae centrally at the top of the head before attaching the shell, resulting in a lopsided appearance

Garden Snail Amigurumi Pattern

Create your own adorable garden snail with this charming crochet pattern! This delightful project features a textured spiral shell with distinctive ridge details and a sweet little body complete with antennae. Perfect for nature lovers and amigurumi enthusiasts, this snail makes a wonderful decorative piece or gift. The pattern includes detailed instructions for creating the signature shell design with optional color-changing techniques for a whimsical lollipop swirl effect.

Intermediate 2-3 Hours

Materials Needed for Garden Snail Amigurumi Pattern

β€” Main Fabric

  • 01
    Scheepjes Chunky Monkey Main color in Stone 2017 (20g)
  • 02
    Scheepjes Chunky Monkey Contrast color in Wild Orchid, Amethyst, or Baby Pink (10g)
  • 03
    Scheepjes Chunky Monkey Black 1002 for eyes (small amount)
  • 04
    Hi-Loft Quality Toy Stuffing

β€” Tools Required

  • 01
    4.5mm crochet hook
  • 02
    Wool needle for sewing
  • 03
    Stitch markers
  • 04
    Scissors

Progress Tracker

0% Complete

β€” Shell :

Info :

Using Contrast color

Row 1 :

ch2, hdc6 into 2nd st from hook (alternatively hdc 6sts into magic ring) (6)

Infos :

From this point on the shell is worked through the BLO and 3rd LOOP of the st below in order to create the distinctive ridge pattern. If you wish to make the shell as a lollipop type swirl change colour after every row, swapping colours up behind work with no sl st joins. Do not change colour mid stitch.

Row 2 :

hdcinc x6 (12)

Row 3 :

(hdc into next st, hdcinc) x6 (18)

Row 4 :

(hdc into next 2sts, hdcinc) x6 (24)

Rows 5-6 :

sc (24) (2 rows)

Row 7 :

(hdc into next 2sts, hdcdec) x6 (18)

Row 8 :

(hdc into next st, hdcdec) x6 (12)

Info :

Stuff shell

Row 9 :

hdcdec x6 (6)

Info :

F/O leaving a 25cm end. Using 25cm end, and running sts, thread through front loops of last 6sts and gather tightly. Secure end with a couple of small sts.

β€” Body :

Info :

Using Main color

Row 1 :

ch2, sc6 into 2nd st from hook (alternatively sc 6sts into magic ring) (6)

Row 2 :

inc x2, 1st Antennae: ch6, sl st into 5th and 6th ch from hook, inc x3, 2nd Antennae: ch6, sl st into 5th and 6th ch from hook, inc into last st (12)

Row 3 :

(sc into next st, inc) x6 (18)

Rows 4-6 :

sc (18) (3 rows)

Row 7 :

(sc into next st, dec) x6 (12)

Row 8 :

(sc into next 2sts, dec) x3 (9)

Info :

Stuffing throughout, as you work on the next section

Rows 9-26 :

sc (9) (18 rows)

Row 27 :

(sc into next st, dec) x3 (6)

Row 28 :

sc (6)

Info :

Stuff remainder of body. F/O leaving a 60cm end. Using 60cm end, and running sts, thread through front loops of last 6sts and gather tightly. Secure end with a couple of small sts.

β€” Body Skirt :

Info :

Place a stitch marker at centre front of body, 8 rows down from the neck. Using Main color

Row 1 :

leaving a 10cm end, sl st into the base of body 1 row down from bottom of shell on the furthest side from you, the base should be facing towards you and the head should be facing left, 1st Side: ch3 and then 3dcinc into 1st in every row up to the stitch marker, 2nd Side: turn so you are working down the opposite side and 3dcinc into every row, keeping in line with the 1st st down from shell 3dcinc until you get to point of tail, 1st Side: turn and 3dcinc in every row down 1st side until you are back at the start, sl st to join at top of ch3 to finish.

Info :

F/O leaving a 10cm end. Secure both ends with a couple of small sts before weaving through frill and body. Cut flush to finish.

β€” Features :

Eyes :

Using black oddment, thread through head 2sts from the centre of face and 1 row down from the antennae. Do 5 small back sts 1 row in depth. Thread through to opposite side of face and repeat. Weave through head and cut flush to finish.

Assembly Instructions

  • Making sure that the antennae are central to top of head, thread through body and come out 4 rows in front of the tail end, securing with small stitches.
  • Pick up the shell and thread through the middle of the outer edge of shell, between the 2 central ridges, coming out at the opposite side.
  • Thread end into body at the centre back of neck, 2 rows down from the base of the head, catch in a single stitch and pull tight to create the iconic snail body shape.
  • Ensure the antennae remain central at top of head and the shell shape has not been distorted, then secure with small stitches.
  • Attach the shell to the body along BLO ridge, 1 row out from the centre, securing with small stitches.
  • Weave end through shell and body, then cut flush to finish for a neat appearance.

Important Notes

  • πŸ’‘Work in continuous rounds marking last stitch of each row with a stitch marker before proceeding with the next round
  • πŸ’‘Do not overstuff parts as you don't want the stuffing to show through when complete, each part should be easily squeezed when pinched
  • πŸ’‘When working the shell, remember to pick up the third loop along with back loops only to create the distinctive ridge pattern
  • πŸ’‘To change colors for the lollipop swirl effect, slip stitch to join and change color by threading up from the back of work
  • πŸ’‘Use the 60cm tail from the body to both close the body and attach the shell securely in the correct position

This charming Garden Snail pattern combines simple amigurumi techniques with a unique texturing method to create something truly special. The distinctive ridge pattern on the shell is achieved through a clever back loop technique that adds wonderful dimension and character. Whether you choose a solid shell or opt for the playful lollipop swirl design, your finished snail will have personality and charm. Perfect for nature enthusiasts, this little creature brings a touch of the garden indoors and makes a thoughtful handmade gift. Happy crocheting! 🐌🧢✨

You ask,

we answer.

FAQs

What does BLO with the third loop mean in this pattern?

When working the shell, you work through the back loops only while also picking up the third loop at the back of the previous hdc row. This special technique creates the distinctive ridge pattern that gives the shell its beautiful texture and spiral appearance.

Can I use different yarn weights for this pattern?

While the pattern is designed for Scheepjes Chunky Monkey yarn with a 4.5mm hook, you can adapt it to other yarn weights. Just remember to adjust your hook size accordingly and be aware that your finished snail will be a different size than specified in the pattern.

How do I create the lollipop swirl effect on the shell?

To create the lollipop swirl, change colors after every row by swapping colors up behind your work with no slip stitch joins. Make sure not to change color mid-stitch, only at the beginning of each new row for clean color transitions.

How much stuffing should I use?

The pattern emphasizes not overstuffing. Each part should be filled just enough that it can be easily squeezed when pinched firmly. This prevents the stuffing from showing through the stitches and maintains the proper shape of your snail.

Why is there such a long tail left on the body?

The 60cm tail from the body serves multiple purposes - it's used to close the body, position and attach the shell correctly, and create the iconic curved shape of the snail's body. This long tail gives you plenty of length to work with for secure assembly.