🧢 Beautiful ✨ Detailed πŸ’ Adorable

Wallace and Wanda Whale Amigurumi Pattern

Wallace and Wanda Whale Amigurumi Pattern
4.7β˜… Rating
4-5 Hours Time Needed
1.2K Made This
βœ‚οΈ

Intermediate Level

Ideal for those with basic knitting experience, featuring slightly more advanced stitches and techniques to expand your skills.

⏱️

Weekend Treat

Takes 5-7 hours, making it an enjoyable project to finish over a couple of days.

🧸

Cute Companion

An adorable friend to cherish, handcrafted with love to bring comfort and joy for years to come.

About This Wallace and Wanda Whale Amigurumi Pattern

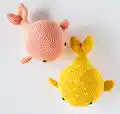
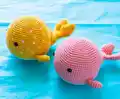
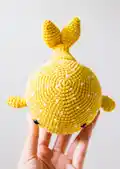
The Wallace and Wanda Whale pattern brings the magic of the ocean into your hands with these charming 6.5-inch companions. Wallace features an enchanting Fair Isle color dot pattern that adds playful personality, while Wanda showcases elegant simplicity in solid colors. Both whales are constructed from top to bottom with separately crafted fins and tail for authentic shape and movement, creating perfectly huggable marine friends.

Wallace and Wanda Whale Amigurumi Pattern crochet pattern - detailed view of completed project

This pattern uses continuous rounds and invisible decrease techniques to create smooth, professional finishes. The detailed instructions guide you through color changes and Fair Isle techniques, making it perfect for crafters ready to expand their amigurumi skills.

Why You'll Love This Wallace and Wanda Whale Amigurumi Pattern

I absolutely love this whale pattern because it offers two distinct personalities in one design! The Fair Isle color dot technique for Wallace adds such a fun challenge without being overwhelming, and watching those little polka dots emerge as you crochet is incredibly satisfying. I appreciate how the pattern teaches you to carry yarn on the wrong side, a technique that opens up so many creative possibilities for future projects. The separately constructed tail and fins give these whales such realistic proportions and adorable character. Whether you choose Wallace's playful spots or Wanda's classic elegance, you'll end up with a perfectly huggable ocean friend that makes an incredible gift or display piece.

Wallace and Wanda Whale Amigurumi Pattern step 1 - construction progress Wallace and Wanda Whale Amigurumi Pattern step 2 - assembly progress Wallace and Wanda Whale Amigurumi Pattern step 3 - details and accessories Wallace and Wanda Whale Amigurumi Pattern step 4 - final assembly and finishing

Switch Things Up

I love experimenting with this whale pattern to create unique ocean friends! One of my favorite variations is making a blue ombre whale by gradually transitioning from dark navy at the top to light sky blue at the belly - it creates such a stunning gradient effect that mimics real ocean depths.

For a baby shower gift, I've made pastel versions in soft pink, mint green, and lavender that look absolutely precious in a nursery. You could even add a small embroidered name on the white belly section to personalize it further.

I've also tried making Wallace's dots in multiple colors instead of just one contrasting shade - imagine rainbow polka dots or alternating between two complementary colors for a more playful look! Another fun twist is adding a small water spout on top of the head using white or light blue yarn with a few strategic stitches to create that classic whale fountain effect.

For texture variation, try using a fuzzy or chenille yarn for the belly section to create an extra soft, touchable contrast against smooth cotton body. I've even made seasonal versions - a red and green Christmas whale with festive dots, or orange and black Halloween whale that kids absolutely adore. The possibilities are endless with this versatile pattern!

Common Mistakes & How to Fix Them

βœ— Forgetting to use stitch markers when working in continuous rounds can cause you to lose track of round beginnings and throw off your stitch count completely βœ— Not carrying the contrasting color yarn properly on the wrong side during Fair Isle work creates loose floats or puckers that distort the whale's shape βœ— Understuffing the body before closing creates a floppy whale that loses its adorable rounded shape and can't stand or display properly βœ— Placing safety eyes unevenly or at wrong rounds results in a wonky expression so always count carefully between rounds seventeen and eighteen with thirteen stitches apart βœ— Skipping the back loop only instruction in round twenty six disrupts the clean color transition line between the body and belly sections

Wallace and Wanda Whale Amigurumi Pattern

Dive into the world of adorable ocean friends with this charming whale amigurumi pattern! Create Wallace with his playful polka dots or Wanda in a classic solid design. These sweet whales measure approximately 6.5 inches long and feature detailed construction with separately made fins and tail for perfect shaping. The pattern includes Fair Isle color dot techniques for Wallace's spotted design, making it a delightful project that combines basic amigurumi skills with creative color work to bring these lovable marine creatures to life.

Intermediate 4-5 Hours

Materials Needed for Wallace and Wanda Whale Amigurumi Pattern

β€” Main Fabric

  • 01
    Rico Creative Ricorumi DK cotton yarn in Tangerine (2 x 0.9 oz balls)
  • 02
    Rico Creative Ricorumi DK cotton yarn in White (1 x 0.9 oz ball)
  • 03
    Any DK or worsted weight yarn can be substituted

β€” Tools Required

  • 01
    2.75 mm crochet hook (US size C)
  • 02
    Fiberfill for stuffing
  • 03
    Safety eyes (8mm)
  • 04
    Tapestry needle
  • 05
    Stitch marker
  • 06
    Scissors

Progress Tracker

0% Complete

β€” BODY (Head and Body):

Info:

For Wallace (color dot whale), follow Fair Isle pattern: Round 1-2 sc in color A, Round 3 (5 sc in A, 1 sc in B) around, Round 4-5 sc in A, Round 6: 2 sc in A, (1 sc in B, 5 sc in A) around until last four stitches, end 1 sc in B, 3 sc in A. Repeat rounds 1-6 for color dot pattern.

Round 1:

Using color A (Tangerine), 6 sc in MR [6]

Round 2:

(inc in each st) x 6 [12]

Round 3:

(sc, inc) x 6 [18]

Round 4:

(2 sc, inc) x 6 [24]

Round 5:

(3 sc, inc) x 6 [30]

Round 6:

(4 sc, inc) x 6 [36]

Round 7:

(5 sc, inc) x 6 [42]

Round 8:

(6 sc, inc) x 6 [48]

Round 9:

(7 sc, inc) x 6 [54]

Round 10:

(8 sc, inc) x 6 [60]

Round 11:

sc in each st around [60]

Round 12:

(9 sc, inc) x 6 [66]

Round 13:

(10 sc, inc) x 6 [72]

Round 14-24:

sc in each st around [72]

Info:

Insert safety eyes between rounds 17 and 18, approximately 13 sts apart. Stuff and shape the body as you work.

Round 25:

(10 sc, dec) x 6 [66]

Info:

F/O color A (Tangerine) yarn, join and continue in color B (White) yarn.

Round 26:

sc in each st through BLO around [66]

Round 27:

(9 sc, dec) x 6 [60]

Round 28:

(8 sc, dec) x 6 [54]

Round 29:

(7 sc, dec) x 6 [48]

Round 30:

(6 sc, dec) x 6 [42]

Round 31:

(5 sc, dec) x 6 [36]

Round 32:

(4 sc, dec) x 6 [30]

Round 33:

(3 sc, dec) x 6 [24]

Round 34:

(2 sc, dec) x 6 [18]

Round 35:

(1 sc, dec) x 6 [12]

Round 36:

(dec) x 6 [6]

Info:

Fill body with fiberfill firmly. F/O and thread tail end of yarn onto tapestry needle, insert needle in and out of remaining sts, pull tight to close, and weave in end.

β€” TAIL:

Info:

Make two fins (these will be joined together later to complete the tail). Using color A (Tangerine), begin with MR.

Round 1:

6 sc in MR [6]

Round 2:

(sc, inc) x 3 [9]

Round 3:

sc in each st around [9]

Round 4:

(2 sc, inc) x 3 [12]

Round 5:

(3 sc, inc) x 3 [15]

Round 6:

(4 sc, inc) x 3 [18]

Round 7:

sc in each st around [18]

Round 8:

(4 sc, dec) x 3 [15]

Round 9:

(3 sc, dec) x 3 [12]

Round 10:

(1 sc, dec) x 4 [8]

Info:

For first fin, F/O and cut yarn. For second fin, stop after round 10 and follow joining instructions.

Round 11 (Joining round):

Insert hook into st next to closing st of first fin and draw up loop and yarn through as for sc stitch. Mark as first sc of round and continue crocheting around through both fins. [16]

Round 12:

(2 sc, dec) around [12]

Round 13:

sc in each st around [12]

Round 14:

(inc) x 2; sc in next 9 sts; inc around [15]

Round 15:

(1 sc, inc) x 2; sc in next 10 sts; inc around [18]

Round 16:

(2 sc, inc) around [24]

Round 17:

sc in each st around [24]

Round 18:

(inc) x 6 times; sc in next 18 sts around [30]

Round 19:

(inc, 2 sc) x 4; sc in next 4 sts; hdc in next 10 sts; sc in next 4 sts around [34]

Round 20:

sc in next 20 sts; hdc in next 10 sts; sc in next 4 sts around [34]

Info:

Sl st into next stitch and F/O leaving long tail for sewing.

β€” SIDE FINS (Make 2):

Round 1:

Using color A (Tangerine), 6 sc in MR [6]

Round 2:

(1 sc; inc) x 3 [9]

Round 3:

(2 sc, inc) x 3 [12]

Round 4:

(3 sc, inc) x 3 [15]

Round 5:

sc in each st around [15]

Round 6:

(3 sc, dec) x 3 [12]

Round 7:

(1 sc, dec) x 4 [8]

Round 8:

sc in each st around [8]

Info:

Sl st into next stitch and F/O leaving long tail for sewing. Do not stuff the fins.

Assembly Instructions

  • Position the side fins evenly on each side of the body, placing them on rounds 24 and 25 beginning from the top.
  • Before sewing fins on, ensure they are symmetrically placed and parallel to the safety eyes for balanced appearance.
  • The side with half double crochet stitches is the bottom side of the tail for proper orientation.
  • Use fiberfill to stuff the front portion of the tail but do not stuff the fin sections to maintain shape.
  • Using the side fins as a guide, pin the tail centrally to the back of the body before sewing.
  • Sew the tail neatly and carefully to the body, ensuring secure attachment for durability.

Important Notes

  • πŸ’‘Use a stitch marker to keep track of the beginning of each round especially during color changes
  • πŸ’‘Work in continuous rounds without joining with slip stitch unless specifically directed to do so
  • πŸ’‘Use invisible decrease technique to avoid gaps in stitches for professional finish
  • πŸ’‘Stuff firmly as you work and overstuff slightly before finishing each section for best shape
  • πŸ’‘For Wallace's color dots, carry yarn on wrong side by working over unused strand every few stitches
  • πŸ’‘Insert safety eyes between rounds 17 and 18 with approximately 13 stitches apart before stuffing head
  • πŸ’‘Do not stuff the side fins to allow them to lay flat and maintain natural appearance

This delightful Wallace and Wanda Whale pattern brings ocean magic to your amigurumi collection with two charming design options in one! Whether you choose Wallace's playful Fair Isle polka dots or Wanda's elegant solid coloring, you'll create an adorable 6.5-inch companion perfect for cuddles or display. The pattern teaches valuable techniques like color carrying and invisible decreases while guiding you through separate fin and tail construction for authentic whale proportions. These sweet marine friends make wonderful gifts for ocean lovers of all ages! πŸ‹πŸ§Άβœ¨

You ask,

we answer.

FAQs

Can I make this whale in different colors besides tangerine and white?

Absolutely! While the pattern suggests tangerine and white for classic whale coloring, you can use any DK or worsted weight yarn colors you prefer. Try blues and whites for a more traditional whale look, or get creative with rainbow colors for a fantasy whale friend.

Is the Fair Isle color dot pattern difficult for beginners?

The Fair Isle technique requires some practice but the pattern provides clear instructions for carrying yarn on the wrong side. If you're new to color work, try making Wanda first in solid colors, then tackle Wallace once you're comfortable with the basic construction. The color pattern repeats every six rounds making it easy to follow.

What size will my whale be if I use a different yarn weight?

The pattern creates a whale approximately 6.5 inches long with DK weight yarn and a 2.75mm hook. Using worsted weight yarn with a larger hook will create a bigger whale, while lighter yarn and smaller hooks will make a miniature version. Always make a test swatch to estimate your final size.

Do I need to stuff the fins and tail?

No, the side fins should not be stuffed so they lay flat against the body. However, you should stuff the front portion of the tail where it connects to the body, but leave the fin sections unstuffed for proper shape and movement.

When should I insert the safety eyes?

Insert the safety eyes between rounds 17 and 18 with approximately 13 stitches separating them. It's crucial to place them before you finish stuffing the head, as you won't be able to secure the backing washers once the opening is closed. Pin them in place first to check positioning.