🧢 Beautiful ✨ Detailed πŸ’ Adorable

Voodoo Doll Amigurumi Pattern

Voodoo Doll Amigurumi Pattern
4.9β˜… Rating
4-5 Hours Time Needed
4.1K Made This
βœ‚οΈ

Intermediate Level

Ideal for those with basic knitting experience, featuring slightly more advanced stitches and techniques to expand your skills.

⏱️

Weekend Treat

Takes 5-7 hours, making it an enjoyable project to finish over a couple of days.

🧸

Whimsical Buddy

Playful characters full of personality, designed to spark imagination and become cherished playtime favorites.

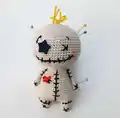
About This Voodoo Doll Amigurumi Pattern

Voodoo Doll Amigurumi Pattern crochet pattern - detailed view of completed project

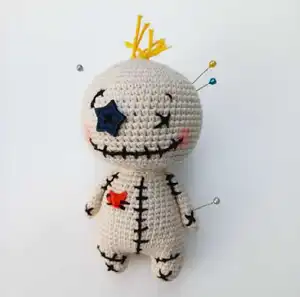
Perfect for Halloween crafting or year-round spooky decor, this doll doubles as an adorable pincushion. Add colorful pins sticking out of the head for that authentic voodoo aesthetic.

Why You'll Love This Voodoo Doll Amigurumi Pattern

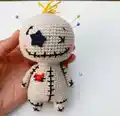
I absolutely adore this pattern because it strikes the perfect balance between cute and creepy. There is something so satisfying about watching this little character come together, especially when you add those final embroidery details that really bring it to life. I love how customizable it is too. You can change up the yarn colors, add different facial expressions, or even embroider a tiny heart in different colors to match someone's personality. The construction is straightforward enough that you will not get frustrated, but interesting enough to keep you engaged throughout the project.

Voodoo Doll Amigurumi Pattern step 1 - construction progress Voodoo Doll Amigurumi Pattern step 2 - assembly progress Voodoo Doll Amigurumi Pattern step 3 - details and accessories Voodoo Doll Amigurumi Pattern step 4 - final assembly and finishing

Switch Things Up

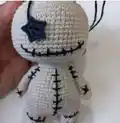
I find myself completely captivated by this little Voodoo Doll pattern every time I work on it. There is something wonderfully therapeutic about crocheting those simple rounds and watching this quirky character take shape in my hands. I love that it walks the line between adorable and slightly spooky without ever feeling too creepy for everyday display.

What really gets me excited about this design is all the customization possibilities. I have made versions with different colored hearts, experimented with various eye patch shapes, and even tried adding tiny felt patches for extra texture. Each one turns out with its own unique personality, which makes gifting them so much fun.

I appreciate that the construction is straightforward enough to be relaxing but engaging enough to hold my attention. The embroidery at the end is where I really get to be creative, and honestly, that is my favorite part of the whole project. Those little stitched details transform a basic amigurumi into something with real character and charm.

Common Mistakes & How to Fix Them
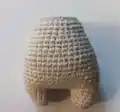
βœ— Forgetting to stuff the body firmly before closing can result in a floppy doll that will not stand properly on display. βœ— Skipping stitch markers when joining the legs to the body often leads to misalignment and an uneven finished piece. βœ— Cutting the thread after the first leg instead of continuing to the body creates extra seaming work and visible join lines. βœ— Embroidering the stitch marks too tightly can pucker the fabric and distort the shape of your finished doll. βœ— Not leaving a long enough tail for sewing makes attaching the head to body difficult and may require starting over.

Voodoo Doll Amigurumi Pattern

Ready to create something delightfully spooky? This adorable Voodoo Doll amigurumi brings a touch of mystical charm to your crochet collection. With its signature stitched smile, button eye patch, and little heart detail, this quirky companion is perfect for Halloween decorations or as a unique handmade gift. The pattern guides you through creating a wonderfully textured doll complete with embroidered details that give it loads of personality. Whether you display it on a shelf or gift it to a friend who appreciates the unconventional, this little creature is sure to cast a spell on everyone who sees it.

Intermediate 4-5 Hours

Materials Needed for Voodoo Doll Amigurumi Pattern

β€” Main Fabric

  • 01
    Alize Cotton Gold 599 (beige/cream main color)
  • 02
    Alize Cotton Gold 110 (black for embroidery details)
  • 03
    Alize Cotton Gold 60 (red/orange for heart detail)
  • 04
    Yellow yarn for hair strands
  • 05
    Blue yarn for star eye patch

β€” Tools Required

  • 01
    Crochet hook 2.00mm or size appropriate for your yarn
  • 02
    Polyester fiberfill stuffing
  • 03
    Tapestry needle for sewing and embroidery
  • 04
    Scissors
  • 05
    Stitch markers
  • 06
    Pins for assembly
  • 07
    Optional: Pink blush or chalk for cheek details

Progress Tracker

0% Complete

β€” Head :

Rnd 1 :

6 sc in magic ring (6)

Rnd 2 :

(inc) x6 (12)

Rnd 3 :

(sc, inc) x6 (18)

Rnd 4 :

(inc, 2 sc) x6 (24)

Rnd 5 :

(3 sc, inc) x6 (30)

Rnd 6 :

2 sc, inc, (4 sc, inc) x5, 2 sc (36)

Rnd 7 :

(5 sc, inc) x6 (42)

Rnd 8 :

3 sc, inc, (6 sc, inc) x5, 3 sc (48)

Rnd 9 :

(7 sc, inc) x6 (54)

Rnd 10 :

4 sc, inc, (8 sc, inc) x5, 4 sc (60)

Rnd 11-23 :

sc around (60) - 13 rounds

Rnd 24 :

(3 sc, dec) x12 (48)

Rnd 25 :

(2 sc, dec) x12 (36)

Rnd 26 :

2 sc, dec, (4 sc, dec) x5, 2 sc (30)

Rnd 27 :

(3 sc, dec) x6 (24)

Rnd 28 :

sc around (24)

β€” Leg :

Info :

Make 2 pieces

Rnd 1 :

7 sc in magic ring (7)

Rnd 2 :

(inc) x7 (14)

Rnd 3-5 :

sc around (14)

Info :

After making the first leg, cut the thread. When making the second leg, do not cut the thread and continue to the body.

β€” Body :

Rnd 6 :

ch4, join the first leg with sc. Crochet on the first leg: 2 sc, (inc, 5 sc) x2, working on the chain: inc, 2 sc, inc, crochet on the second leg: (5 sc, inc) x2, 2 sc, working on the chain: 4 sc (42)

Rnd 7 :

(13 sc, inc) x3 (45)

Rnd 8-12 :

sc around (45) - 5 rounds

Rnd 13 :

(13 sc, dec) x3 (42)

Rnd 14-16 :

sc around (42) - 3 rounds

Rnd 17 :

(5 sc, dec) x6 (36)

Rnd 18-20 :

sc around (36) - 3 rounds

Rnd 21 :

(4 sc, dec) x6 (30)

Rnd 22-24 :

sc around (30)

Rnd 25 :

(3 sc, dec) x6, sl st (24)

Info :

Fasten off and leave a long tail for sewing. Stuff the body. Sew the Head with the Body.

β€” Arm :

Info :

Make 2 pieces. Do not stuff the arms.

Rnd 1 :

6 sc in magic ring (6)

Rnd 2 :

(sc, inc) x3 (9)

Rnd 3-11 :

sc around (9) - 9 rounds

β€” Embroidery Details :

Stitch Marks :

Using black yarn, embroider vertical and horizontal stitch lines across the head, body, arms, and legs to create the patchwork voodoo doll appearance

Mouth :

Embroider a curved stitched smile using black yarn across the lower portion of the face

Eye Patch :

Create a small star shape using blue yarn and attach to one side of the face

X Eye :

Embroider an X shape using black yarn on the opposite side of the face from the star patch

Heart :

Using red or orange yarn, embroider or create a small heart shape on the chest area of the body

Hair :

Attach yellow yarn strands to the top of the head, leaving them sticking up in different directions

Cheeks :

Optional: Add pink blush or chalk to create rosy cheeks

Assembly Instructions

  • Stuff the head firmly before closing, leaving the neck opening ready for attachment to the body.
  • Sew the head securely to the body opening, ensuring it sits centered and stable.
  • Position the arms on either side of the body at shoulder height and sew them in place without stuffing.
  • Embroider all the black stitch marks across the head, body, arms, and legs before adding other details.
  • Attach the star-shaped eye patch and embroider the X-shaped eye on the opposite side.
  • Add the stitched smile, heart detail on the chest, and yellow hair strands on top of the head.
  • Insert decorative pins into the head and body for the authentic voodoo doll look.

Important Notes

  • πŸ’‘Use stitch markers to track your rounds, especially during the body construction when joining the legs
  • πŸ’‘Stuff the head and body firmly for a nice rounded shape, but leave the arms unstuffed as noted in the pattern
  • πŸ’‘Leave long tails when fastening off pieces that need to be sewn together for easier assembly
  • πŸ’‘Pin all embroidery placement before stitching to ensure symmetrical and well-positioned details
  • πŸ’‘The embroidery details are what give this doll its character, so take your time with this step
  • πŸ’‘If making for young children, consider omitting the pins or using sewn-on alternatives for safety

This charming Voodoo Doll pattern brings together simple amigurumi techniques with creative embroidery to create something truly unique. Whether you are crafting for Halloween, making a quirky gift, or just want a fun conversation piece, this little doll delivers personality in spades. The combination of the patchwork stitches, mismatched eyes, and wild hair makes every finished doll feel like it has its own story to tell. Grab your hook and some yarn, and let the magic begin! 🧢✨

You ask,

we answer.

FAQs

What size will the finished Voodoo Doll be?

Using the recommended Alize Cotton Gold yarn with a 2.00mm hook, your finished doll will be approximately 15cm (6 inches) tall. Using thicker yarn and a larger hook will result in a bigger doll.

Can I use different yarn than what is recommended?

Absolutely! The pattern works with any yarn weight you prefer. Just remember to adjust your hook size accordingly. Cotton yarns work great for crisp stitch definition, while acrylic gives a softer finish.

How do I join the two legs to create the body?

After completing both legs, you will chain 4 stitches to bridge them together, then crochet around both legs and the chain to form the body. The pattern provides detailed instructions for this joining round.

Should I stuff the arms of the Voodoo Doll?

No, the designer recommends leaving the arms unstuffed. This gives them a floppy, ragdoll-like appearance that suits the voodoo doll aesthetic perfectly.

What creates the patchwork appearance on the doll?

The signature voodoo doll look comes from embroidering black yarn stitches across the entire body after assembly. These decorative stitches mimic the appearance of a sewn-together ragdoll.

Is this pattern suitable for beginners?

This pattern is best suited for intermediate crocheters who are comfortable with basic amigurumi techniques. The joining of the legs and embroidery details require some experience, but determined beginners can definitely tackle it.