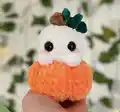
About This Ghost in Pumpkin Amigurumi Pattern
This Ghost in Pumpkin pattern combines two beloved seasonal icons into one irresistibly cute amigurumi design. The pumpkin features a clever ribbing technique that creates authentic texture and dimension, while the little ghost peeks out with an adorable personality. The pattern is worked in continuous rounds with simple color changes, making it accessible for crocheters who want to create something special without complex techniques. Optional details like blush cheeks and a curly tendril add extra charm and personality to your finished piece.

Using basic stitches and standard worsted weight yarn, this pattern works up quickly and creates a sturdy finished piece perfect for display. The bobble stitch detail on the pumpkin adds wonderful texture that makes your creation truly special.
Why You'll Love This Ghost in Pumpkin Amigurumi Pattern
I absolutely adore this ghost in pumpkin pattern because it captures the perfect balance of spooky and sweet that makes Halloween crafting so much fun! The way the little ghost peeks out from the pumpkin is just impossibly charming, and I love how the ribbing technique creates such authentic pumpkin texture without any complicated stitches. What really gets me excited is how customizable this pattern is—you can add blush for extra cuteness, create the optional tendril for more detail, or keep it simple and sweet. The fact that it works up so quickly means you can make a whole pumpkin patch of these cuties in different expressions! It's the perfect project when you want something festive and fun without a huge time commitment, and the finished result always brings joy to everyone who sees it.
Switch Things Up
I love experimenting with this ghost in pumpkin pattern to create unique seasonal variations! One of my favorite modifications is changing the pumpkin color to white or cream to create a 'boo-pkin' ghost pumpkin, which looks absolutely stunning with a white ghost peeking out. You could also try making mini versions using finer yarn and a smaller hook to create adorable keychains or ornaments.
For a fun twist, I sometimes add different facial expressions to the ghost by positioning the eyes differently or adding a little smile with embroidery thread. You could create a whole family of ghost-in-pumpkin friends with varying expressions! Another idea I adore is using variegated orange yarn for the pumpkin body, which creates beautiful natural shading without any extra effort.
I've also experimented with adding tiny crocheted arms coming out from under the pumpkin using the same white yarn, making it look like the ghost is hugging the pumpkin from inside. For a more elegant look, try using metallic or sparkly yarn for the pumpkin to create a glamorous Halloween decoration. You could even make larger versions for door decorations or smaller ones as party favors. The ribbing technique can be adjusted to create more or fewer sections depending on the look you want—I sometimes do just 5 ribs for a simpler, more stylized pumpkin appearance!
Common Mistakes & How to Fix Them
✗ Forgetting to leave a long tail when finishing off the pumpkin for sewing the ribbing, which makes assembly much more difficult
✗ Not stuffing the pumpkin head firmly enough before creating the ribbing indentations, resulting in a floppy or misshapen pumpkin
✗ Pulling the ribbing stitches too tight or too loose when creating the indentations, affecting the pumpkin's characteristic sectioned appearance
✗ Placing the safety eyes too far apart or too close together on the ghost, which changes the entire expression and cuteness factor
✗ Cutting the other yarn colors too short before completing all color sections, making it impossible to weave in ends properly