๐Ÿงถ Beautiful โœจ Detailed ๐Ÿ’ Adorable

Globe Penguin Christmas Amigurumi Pattern

Globe Penguin Christmas Amigurumi Pattern
4.0โ˜… Rating
6-8 Hours Time Needed
1.1K Made This
โœ‚๏ธ

Intermediate Level

Ideal for those with basic knitting experience, featuring slightly more advanced stitches and techniques to expand your skills.

โฑ๏ธ

Weekend Treat

Takes 5-7 hours, making it an enjoyable project to finish over a couple of days.

๐ŸŽ„

Holiday Cheer

Festive fun for the season, bringing handmade magic to celebrations and creating new family traditions.

About This Globe Penguin Christmas Amigurumi Pattern

This delightful globe penguin pattern combines classic amigurumi techniques with a creative twist by incorporating a clear plastic ornament ball as part of the design. The penguin's body wraps around an 80mm fillable ball, creating a stunning three-dimensional effect perfect for Christmas decorating. With detailed instructions for creating realistic features like wings, feet, a tail, and adorable accessories including headphones and a striped scarf, this pattern offers both a technical challenge and a rewarding finished product.

Globe Penguin Christmas Amigurumi Pattern crochet pattern - detailed view of completed project

The pattern includes precise gauge requirements to ensure proper fit around the ornament ball, making density checks essential before starting. You'll love how the combination of black, white, orange, red, and green yarns creates a festive color palette that captures the holiday spirit.

Why You'll Love This Globe Penguin Christmas Amigurumi Pattern

I absolutely love this pattern because it transforms traditional amigurumi into an interactive holiday ornament that doubles as home decor. The creativity of incorporating a fillable globe means you can customize the inside with sequins, tinsel, or other festive fillers to make each penguin truly unique. I'm obsessed with how the little details like the red headphones and striped scarf give this penguin so much personality, making it feel modern and classic at the same time. The satisfaction of watching all the separate pieces come together into a free-standing decoration is incredibly rewarding, and knowing it can become a treasured family keepsake makes every stitch worthwhile.

Globe Penguin Christmas Amigurumi Pattern step 1 - construction progress Globe Penguin Christmas Amigurumi Pattern step 2 - assembly progress Globe Penguin Christmas Amigurumi Pattern step 3 - details and accessories Globe Penguin Christmas Amigurumi Pattern step 4 - final assembly and finishing

Switch Things Up

I absolutely love experimenting with color variations on this globe penguin pattern to make each one uniquely special. Instead of the traditional black and white penguin coloring, I've created versions in soft pastels like baby blue and cream for a winter wonderland vibe, or even bold purples and teals for a more whimsical fantasy look.

For the scarf and headphones, I often switch up the stripe patterns using three or four colors instead of just two, creating rainbow effects or ombre gradients that make the accessories really pop. Sometimes I'll add tiny bows or flowers to the headphones for female penguin versions, or create little bow ties instead of scarves for a dapper gentleman penguin.

The fillable ball interior is where I really let my creativity shine - I've done themed versions with beach sand and tiny shells for summer, autumn leaves and acorns for fall, and even created Valentine's versions filled with red and pink heart confetti. For kids' rooms, I fill them with glow-in-the-dark stars or small jingle bells that make a gentle sound when moved.

I also love personalizing the facial expressions by adjusting the eye embroidery placement to create happy, sleepy, or surprised looks, and sometimes I add little felt accessories like Santa hats, witch hats for Halloween, or even tiny eyeglasses for extra character. The possibilities are truly endless with this versatile pattern!

Common Mistakes & How to Fix Them

โœ— Skipping the gauge swatch can result in a penguin that doesn't fit properly around the 80mm ornament ball โœ— Not stuffing the head firmly enough before decreasing rounds causes the shape to become floppy and distorted โœ— Forgetting to leave long tails when finishing each piece makes assembly difficult and creates weak attachment points โœ— Rushing through the double chain technique for feet without watching the video tutorial leads to uneven foundations

Globe Penguin Christmas Amigurumi Pattern

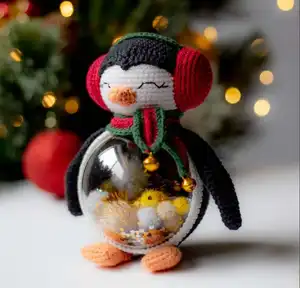
Create an adorable penguin nestled inside a clear ornament ball with this charming Christmas amigurumi pattern. This festive design features a detailed penguin with a white belly, black body, bright orange feet and beak, plus cute red headphones and a striped scarf. Standing at 14cm tall, this globe penguin makes a perfect holiday decoration or unique handmade gift that combines traditional crochet techniques with modern holiday styling.

Intermediate 6-8 Hours

Materials Needed for Globe Penguin Christmas Amigurumi Pattern

โ€” Main Fabric

  • 01
    Friends Cotton 8/4 (100% cotton, 50g/160m) in red color 41 and black color 124
  • 02
    Cotton King 8/4 (100% cotton, 50g/170m) in green color 25, white color 01, and orange color 14
  • 03
    Alternative yarns: Gazzal Baby Cotton, Yarn Art Cotton Baby, or DMC Natura Just Cotton

โ€” Tools Required

  • 01
    Crochet hook 2.0mm
  • 02
    Stitching needle
  • 03
    Fiberfill or toy stuffing
  • 04
    Clear plastic fillable ornament ball 80mm
  • 05
    Sequins and Christmas fillers
  • 06
    Stitch markers and pins
  • 07
    Black embroidery thread floss for eyes
  • 08
    Bells for scarf (optional)
  • 09
    Scissors

Progress Tracker

0% Complete

โ€” Body :

Info :

Use black yarn. Crochet a hemisphere shape to insert the Christmas tree plastic ball

Rnd 1 :

6 sc in the amigurumi ring

Rnd 2 :

6 inc (12)

Rnd 3 :

(1 sc, inc) x 6 (18)

Rnd 4 :

1 sc, (inc, 2 sc) x 5, inc, 1 sc (24)

Rnd 5 :

(3 sc, inc) x 6 (30)

Rnd 6 :

2 sc, (inc, 4 sc) x 5, inc, 2 sc (36)

Rnd 7 :

(5 sc, inc) x 6 (42)

Rnd 8 :

3 sc, (inc, 6 sc) x 5, inc, 3 sc (48)

Rnd 9 :

(7 sc, inc) x 6 (54)

Rnd 10 :

4 sc, (inc, 8 sc) x 5, inc, 4 sc (60)

Rnd 11 :

60 sc

Rnd 12 :

(9 sc, inc) x 6 (66)

Rnd 13 :

5 sc, (inc, 10 sc) x 5, inc, 5 sc (72)

Rnds 14-23 :

72 sc (10 rounds)

Rnd 24 :

Crochet a chain of 5 ch and attach it to the main fabric, skipping 3 sc, crochet another 69 sc to the end of the round (74)

Rnd 25 :

74 sc

Info :

Change color to white, cut the black yarn

Rnds 26-28 :

74 sc

Info :

Finish with sl st, fix thread and cut leaving a long tail for sewing head to body

โ€” Feet (make 2) :

Info :

Use orange yarn. Slightly fill with fiberfill as you work. Crochet in a circle around the chain using double chain technique

Rnd 1 :

Double chain with 7 ch

Rnd 2 :

Starting with the second loop from the hook, 5 sc, inc of 3 sc, 5 sc, inc of 3 sc (16)

Rnds 3-6 :

16 sc (4 rounds)

Rnd 7 :

(6 sc, dec) x 2 (14)

Rnds 8-10 :

14 sc

Rnd 11 :

(5 sc, dec) x 2 (12)

Rnd 12 :

12 sc

Rnd 13 :

6 dec

Info :

Tighten the hole and hide the thread

โ€” Tail :

Info :

Use black yarn

Rnd 1 :

6 sc in the amigurumi ring

Rnd 2 :

(1 sc, inc) x 3 (9)

Rnd 3 :

(2 sc, inc) x 3 (12)

Rnd 4 :

12 sc

Rnd 5 :

(3 sc, inc) x 3 (15)

Info :

Crochet sl st, fix thread and cut leaving a long tail for sewing

โ€” Wings (make 2) :

Info :

Use black yarn

Rnd 1 :

6 sc in the amigurumi ring

Rnd 2 :

6 inc (12)

Rnd 3-5 :

12 sc

Rnd 6 :

(1 sc, inc) x 6 (18)

Rnd 7-9 :

18 sc

Rnd 10 :

(2 sc, inc) x 6 (24)

Rnds 11-13 :

24 sc

Rnd 14 :

(2 sc, dec) x 6 (18)

Rnds 15-21 :

18 sc (7 rounds)

Rnd 22 :

(1 sc, dec) x 6 (12)

Rnds 23-24 :

12 sc

Info :

Fold the wing in half and close the hole with 6 sc. Fix thread and cut leaving a long tail for sewing

โ€” Head :

Infos :

Head consists of two elements: white and black. First element uses white yarn. Fill with fiberfill as you work

First Element :

Rnd 1 :

6 sc in the amigurumi ring

Rnd 2 :

6 inc (12)

Rnd 3 :

(1 sc, inc) x 6 (18)

Rnd 4 :

1 sc, (inc, 2 sc) x 5, inc, 1 sc (24)

Rnd 5 :

(3 sc, inc) x 6 (30)

Rnd 6 :

2 sc, (inc, 4 sc) x 5, inc, 2 sc (36)

Rnd 7 :

(5 sc, inc) x 6 (42)

Rnd 8 :

3 sc, (inc, 6 sc) x 5, inc, 3 sc (48)

Rnd 9 :

(7 sc, inc) x 6 (54)

Rnds 10-19 :

54 sc (10 rounds)

Rnd 20 :

(7 sc, dec) x 6 (48)

Rnd 21 :

3 sc, (dec, 6 sc) x 5, dec, 3 sc (42)

Rnd 22 :

(5 sc, dec) x 6 (36)

Rnd 23 :

2 sc, (dec, 4 sc) x 5, dec, 2 sc (30)

Rnd 24 :

(3 sc, dec) x 6 (24)

Rnd 25 :

1 sc, (dec, 2 sc) x 5, dec, 1 sc (18)

Rnd 26 :

(1 sc, dec) x 6 (12)

Rnd 27-28 :

12 sc

Rnd 29 :

6 dec

Info :

Tighten and close the hole. Pass thread through closed loops through entire head and bring it opposite in the amigurumi ring to create a small depression for proper attachment to body. Fix and cut thread

Second Element :

Info :

Use black yarn

Rnd 1 :

6 sc in the amigurumi ring

Rnd 2 :

6 inc (12)

Rnd 3 :

(1 sc, inc) x 6 (18)

Rnd 4 :

1 sc, (inc, 2 sc) x 5, inc, 1 sc (24)

Rnd 5 :

(3 sc, inc) x 6 (30)

Rnd 6 :

2 sc, (inc, 4 sc) x 5, inc, 2 sc (36)

Rnd 7 :

(5 sc, inc) x 6 (42)

Rnd 8 :

3 sc, (inc, 6 sc) x 5, inc, 3 sc (48)

Rnd 9 :

(7 sc, inc) x 6 (54)

Rnds 10-18 :

54 sc (9 rounds)

Rnd 19 :

13 sc, 5 hdc, 7 dc, 1 tr, 1 dtr, 1 tr, 7 dc, 5 hdc, 14 sc (54)

Rnd 20 :

20 sc, 5 hdc, 1 dc, 1 tr, 1 dc, 5 hdc, 21 sc (54)

Info :

Crochet sl st, fix and cut thread. Place second element on top of first and sew in a circle with black sewing thread

โ€” Beak :

Info :

Use orange yarn

Rnd 1 :

6 sc in the amigurumi ring

Rnd 2 :

(1 sc, inc) x 3 (9)

Rnd 3 :

(2 sc, inc) x 3 (12)

Rnd 4 :

12 sc

Info :

Crochet sl st, fix and cut thread leaving a long tail for sewing to head

โ€” Headphones (make 2) :

Info :

Use red yarn

Rnd 1 :

6 sc in the amigurumi ring

Rnd 2 :

6 inc (12)

Rnd 3 :

(1 sc, inc) x 6 (18)

Rnd 4 :

1 sc, (inc, 2 sc) x 5, inc, 1 sc (24)

Rnd 5 :

(3 sc, inc) x 6 (30)

Rnd 6 :

2 sc, (inc, 4 sc) x 5, inc, 2 sc (36)

Rnds 7-9 :

36 sc

Info :

Crochet sl st, fix and cut thread leaving a long tail for sewing to head

Connecting Element :

Info :

Use green yarn. Crochet a chain of 20 ch, starting from second loop from hook crochet one row of hdc. Fix and cut thread

โ€” Scarf :

Infos :

Crochet back-and-forth rows using hdc. Crochet each row only for one wall of chain closest to you. Use red and green yarn alternating. Start with green yarn

Row 1 :

Crochet a chain with 71 ch

Row 2 :

Starting from second loop from hook, crochet 70 hdc

Info :

Change color to red

Rows 3-4 :

1 ch, 70 hdc

Info :

Change color to green

Row 5 :

1 ch, 70 hdc

Info :

Fix all threads and hide them. On both sides tighten edges and attach bells or thread pompons

Assembly Instructions

  • Outline the location of the beak and sew it securely to the white part of the head
  • Embroider the eyes using black embroidery floss in two folds on the white face area
  • Sew the green connecting strip to the head first, then stuff the red headphone spheres with fiberfill and attach them to both sides
  • Insert the Christmas ornament ball into the crocheted body for proper fit reference during assembly
  • Use pins to mark the exact placement of wings, tail, and feet before sewing to ensure symmetry
  • Attach the tail so it serves as an additional support allowing the penguin to stand independently
  • Sew all parts (wings, tail, feet) to the body, then attach the completed head using the long tail left from body construction
  • Remove the ball temporarily, fill it with sequins and Christmas fillers, then insert it back into the finished penguin and tie the scarf around the neck

Important Notes

  • ๐Ÿ’กComplete a gauge swatch before starting to ensure proper fit around the 80mm ornament ball
  • ๐Ÿ’กThe crocheting density should be 16 sc for 18 rows over 5 cm for correct sizing
  • ๐Ÿ’กAlways leave long tails when finishing pieces to make assembly easier and more secure
  • ๐Ÿ’กUse pins to temporarily position all parts before final sewing to check symmetry and placement
  • ๐Ÿ’กStuff the head and headphones firmly but not overly tight to maintain proper shape
  • ๐Ÿ’กThe tail should be positioned to provide stability so the finished penguin can stand on its own

This enchanting Globe Penguin pattern brings together the magic of amigurumi with the sparkle of Christmas ornaments to create a truly unique holiday decoration. The clever design incorporates a fillable plastic ball that becomes part of the penguin's body, allowing you to customize the interior with your favorite festive fillers. With adorable details like tiny red headphones, a striped scarf, and carefully shaped wings and feet, this pattern showcases both technical skill and creative charm. Perfect for gifting or adding handmade warmth to your holiday decor, this little penguin is sure to become a cherished seasonal treasure.

You ask,

we answer.

FAQs

What size will my finished penguin be?

When using the original yarn and 2.0mm hook as specified, your penguin will measure approximately 14cm tall. The size may vary if you use different yarn weight or hook size, so completing a gauge swatch is essential.

Can I use different yarn than what's listed in the pattern?

Yes! The pattern recommends several alternatives including Gazzal Baby Cotton, Yarn Art Cotton Baby, or DMC Natura Just Cotton. Any 100% cotton yarn with similar weight will work, but remember to check your gauge to ensure proper fit around the ornament ball.

Where can I find an 80mm clear fillable ornament ball?

Clear fillable plastic ornament balls are widely available at craft stores, especially during the holiday season. You can also find them year-round online through craft retailers or Amazon. Make sure it's exactly 80mm for proper fit.

What should I fill the ornament ball with?

The pattern suggests sequins and Christmas fillers like tinsel, but you can get creative! Try fake snow, small beads, confetti, mini pom-poms, or even LED fairy lights for a magical glow.

Do I need to know the double chain technique?

Yes, the double chain technique is used for creating the penguin's feet. The pattern includes a video link for instructions, and it's an important technique to learn for achieving the correct oval foundation shape.

Can this penguin stand on its own?

Yes! The pattern specifically designs the tail to serve as additional support, allowing the finished penguin to stand independently without tipping over.