🧢 Beautiful ✨ Detailed πŸ’ Adorable

Goth Victorian Neck Skull Crochet Pattern

Goth Victorian Neck Skull Crochet Pattern
4.9β˜… Rating
4-5 Hours Time Needed
3.8K Made This
βœ‚οΈ

Intermediate Level

Ideal for those with basic knitting experience, featuring slightly more advanced stitches and techniques to expand your skills.

⏱️

Weekend Treat

Takes 5-7 hours, making it an enjoyable project to finish over a couple of days.

✨

Stylish Touch

An elegant detail to elevate any look, combining traditional techniques with contemporary design sensibilities.

About This Goth Victorian Neck Skull Crochet Pattern

Goth Victorian Neck Skull Crochet Pattern crochet pattern - detailed view of completed project

Using sport weight thread and a 2mm hook, this collar creates fine, detailed work that drapes beautifully. The combination of shells, chains, and strategic decreases forms the skull faces, while the adjustable choker band ensures comfortable wear for any occasion.

Why You'll Love This Goth Victorian Neck Skull Crochet Pattern

I absolutely love how this pattern merges Victorian elegance with Gothic edge to create something truly special. The way the skull motifs emerge from the delicate lacework never fails to amaze me, and I'm always impressed by how such a dramatic piece can be so wearable. I love that you can adjust the fit to your exact measurements, making it comfortable enough for all-day wear at festivals, photoshoots, or special events. The satisfaction of watching those tiny skull faces take shape row by row is incredibly rewarding, and the finished piece always gets compliments. What I appreciate most is how this pattern lets you create high-fashion Gothic jewelry that looks store-bought but carries that irreplaceable handmade charm.

Goth Victorian Neck Skull Crochet Pattern step 1 - construction progress Goth Victorian Neck Skull Crochet Pattern step 2 - assembly progress Goth Victorian Neck Skull Crochet Pattern step 3 - details and accessories Goth Victorian Neck Skull Crochet Pattern step 4 - final assembly and finishing

Switch Things Up

I love experimenting with this Gothic collar pattern by trying different thread colors to create completely new moods. While classic black creates that traditional Victorian Gothic aesthetic, I've found that deep burgundy or midnight purple gives it a romantic vampire vibe that's absolutely stunning. Metallic silver or gold thread transforms it into something almost elvish and magical, perfect for fantasy costumes.

I sometimes add small black beads to the eye sockets of the skulls for extra dimension and sparkle, or outline the skull features with embroidery floss in a contrasting color to make them pop. Playing with the lacing cord offers another customization opportunityβ€”I've used velvet ribbon, leather cord, and even chain for different effects. For a softer look, I occasionally work the skull rows in white or cream while keeping the rest in black, creating a beautiful contrast.

If you want to make it more wearable for everyday Gothic fashion, try working it in charcoal gray for something subtle that pairs with everything. I've even created versions with colored glass beads sewn along the bottom edge for added weight and movement. The beauty of this pattern is that once you master the basic structure, you can really make it your own with color choices, embellishments, and finishing details that reflect your personal dark aesthetic.

Common Mistakes & How to Fix Them

βœ— Skipping the gauge swatch with fine thread can result in a collar that's too tight or loose around the neck βœ— Losing track of shell placement in rows two through twelve leads to misaligned skull motifs and uneven spacing throughout βœ— Not adjusting the choker band width in row one results in an uncomfortable fit that's either too tight or gaps awkwardly βœ— Forgetting to maintain consistent tension with sport weight thread creates uneven lacework that doesn't drape properly around the collar βœ— Rushing through the skull face rows eight and nine causes misshapen features that don't align with the eye and nose openings

Goth Victorian Neck Skull Crochet Pattern

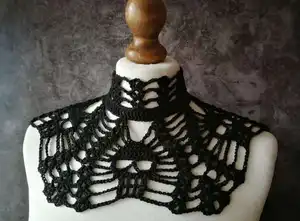
Create a hauntingly beautiful Gothic Victorian skull collar that combines delicate lacework with edgy skull motifs. This intricate neck piece features detailed skull designs woven into an elegant collar base, finished with corset-style lacing for an adjustable fit. Perfect for adding a touch of dark romance to your wardrobe, this pattern transforms fine thread into wearable art that captures the essence of Victorian Gothic fashion. The collar drapes beautifully around the neck and can be customized to your preferred width for ultimate comfort and style.

Intermediate 4-5 Hours

Materials Needed for Goth Victorian Neck Skull Crochet Pattern

β€” Main Fabric

  • 01
    Sport weight thread suitable for 2mm crochet hook
  • 02
    DROPS Safran yarn recommended (approximately half a ball needed)
  • 03
    Any fine crochet thread in your preferred color

β€” Tools Required

  • 01
    2mm crochet hook
  • 02
    Scissors
  • 03
    Yarn needle for weaving in ends
  • 04
    Stitch markers (optional but helpful)
  • 05
    Measuring tape

Progress Tracker

0% Complete

β€” Collar Part :

Start :

Crochet a chain of 76 + 2 (counts as the 1st dc)

Row 1 :

Dc in the 3rd from the hook and continue crocheting dc until the end of the row. Ch 1, turn

Row 2 :

Sshell, ch14, sk 7 st, shell, *ch7, sk 8 st, shell, ch14, sk 7 st, shell (from * repeat 3 times more), ch1, turn

Row 3 :

Sl st to shell sp, sshell, ch5, sk 5 ch, 4sc in each of the following ch, ch5, shell in the shell sp, *ch7, sk ch, shell in the shell sp, ch5, sk 5 ch, 4sc in each of the following ch, ch5, shell in the shell sp (from * repeat 3 times more), ch1, turn

Row 4 :

Sl st to shell sp, sshell, ch4, sc on ch, 4sc in each of the following ch, sc on ch, (6 sc in total), ch4, shell in the shell sp, *ch5, sk ch, shell in the shell sp, ch4, sc on ch, 4sc in each of the following ch, sc on ch, ch4, shell in the shell sp (from * repeat 3 times more), ch1, turn

Row 5 :

Sl st to shell sp, sshell, ch3, sc on ch, 6sc in each of the following ch, sc on ch, (8 sc in total), ch3, shell in the shell sp, *ch3, sk ch, shell in the shell sp, ch3, sc on ch, 6sc in each of the following ch, sc on ch, ch3, shell in the shell sp (from * repeat 3 times more), ch1, turn

Row 6 :

Sl st to shell sp, sshell, ch3, sc on ch, 8sc in each of the following ch, sc on ch, (10 sc in total), ch3, shell in the shell sp, *ch1, sk ch, shell in the shell sp, ch3, sc on ch, 8sc in each of the following ch, sc on ch, ch3, shell in the shell sp (from * repeat 3 times more), ch1, turn

Row 7 :

Sl st to shell sp, sshell, ch3, sc on ch, 10sc in each of the following ch, sc on ch, (12 sc in total), ch3, shell in the shell sp, *sk ch, shell in the shell sp, ch3, sc on ch, 10sc in each of the following ch, sc on ch, ch3, shell in the shell sp (from * repeat 3 times more), ch1, turn

Row 8 :

Sl st to shell sp, sshell, ch5, sk ch, dc2tog in the 1st sc of pr, ch6, sk 4 st, sc, ch6, sk 5 st, dc2tog, ch5, sk ch, shell in the shell sp, *ch3, shell in the shell sp, ch5, sk ch, dc2tog in the 1st sc of pr, ch6, sk 4 st, sc, ch6, sk 5 st, dc2tog, ch5, sk ch, shell in the shell sp (from * repeat 3 times more), ch1, turn

Info :

Here you will be making the eyes and the nose of the skull

Row 9 :

Sl st to shell sp, sshell, ch6, sk ch, sc in dc2tog, 3 sc on ch, ch3, 3 sc on ch, sc in dc2tog, ch6, sk ch, shell in the shell sp, *ch5, shell in the shell sp, ch6, sk ch, sc in dc2tog, 3 sc on ch, ch3, 3 sc on ch, sc in dc2tog, ch6, sk ch, shell in the shell sp (from * repeat 3 times more), ch1, turn

Row 10 :

Sl st to shell sp, sshell, ch7, sk ch and 1 sc, 3 sc in each of the following st, 3 sc on ch, 3 sc in each of the following st (9 sc in total), ch7, sk 1 sc and ch, shell in the shell sp, *ch3, sk 2 ch, shell in the 3rd ch, ch3, shell in the shell sp, ch7, sk ch and 1 sc, 3 sc in each of the following st, 3 sc on ch, 3 sc in each of the following st (9 sc in total), ch7, sk 1 sc and ch, shell in the shell sp (from * repeat 3 times more), ch1, turn

Row 11 :

Sl st to shell sp, sshell, ch7, sk ch and 1 sc, dc2tog, ch1, sk st, dc, ch1, sk st, dc, ch1, sk st, dc2tog, sk st and ch, ch7, shell in the shell sp, *ch3, 2 dc in the shell sp, ch2, 2 dc in the same shell sp, ch2, 2 dc in the same shell sp, ch3, sk ch, shell in the next shell sp, ch7, sk ch and 1 sc, dc2tog, ch1, sk st, dc, ch1, sk st, dc, ch1, sk st, dc2tog, sk st and ch, ch7, shell in the shell sp (from * repeat 3 times more), ch1, turn

Row 12 :

Sl st to shell sp, sshell, ch7, sk ch, dc2tog, ch1, sk st, dc, ch1, sk st, dc, ch1, sk st, dc2tog, sk ch, ch7, shell in the shell sp, *ch3, sk ch and 2 dc, shell in the ch sp, ch3, sk 2 dc, shell in the next ch sp, ch3, shell in the shell sp, ch7, sk ch, dc2tog, ch1, sk st, dc, ch1, sk st, dc, ch1, sk st, dc2tog, sk ch, ch7, shell in the shell sp (from * repeat 3 times more). Cut thread, fasten off

β€” Choker Part :

Info :

Before working at the choker part, please check if the collar is not too wide for you

Row 1 :

Join thread to the 1st dc of the pr and work a row in sc. If the collar is too wide for your neck, make it narrower by skipping some dc of pr instead of crocheting sc in each dc until you feel comfortable. Turn

Rows 2-4 :

Ch5 (counts as 1st dc and ch2), sk 2 st, dc, ch4, sk 7 st, shell in the next st, *ch4, sk 7 st, shell in the next st (from * repeat 8 times more), dc, ch2, sk 2 st, dc. Fasten off

Note :

If you had to narrow your collar part, counting of Rows 2-4 may not be accurate for you. The key is to crochet your shells as evenly spaced as possible. You must not forget to crochet stitches marked in blue at the beginning and at the end of your rows. These stitches mark loops where you will insert your laces

β€” Laces :

Laces :

Ch300 (longer or shorter) and insert it into loops in a corset-like manner

Assembly Instructions

  • After completing row 12 of the collar, cut thread and weave in all ends securely to prevent unraveling.
  • Try on the collar before starting the choker portion to determine if you need to adjust the width for your neck size.
  • When working row 1 of the choker part, join thread to the first double crochet of the previous row and work single crochets across.
  • If the collar feels too wide, skip some double crochets from the previous row instead of working a single crochet in each stitch until comfortable.
  • Complete rows 2-4 of the choker band, ensuring shells are evenly spaced and you maintain the beginning and ending stitches for lace loops.
  • Create the lacing cord by chaining 300 stitches or adjust length as needed for your preferred lacing style.
  • Thread the lacing cord through the loops at the back of the choker in a corset-style pattern, starting from bottom and working upward for secure closure.

Important Notes

  • πŸ’‘Use sport weight thread that works well with a 2mm hook for the best drape and definition in the skull details
  • πŸ’‘Maintain consistent tension throughout the project as fine thread shows tension variations more noticeably than thicker yarn
  • πŸ’‘Count your stitches carefully in rows 8-12 where the skull motifs are formed to ensure proper facial feature placement
  • πŸ’‘Try on the collar after completing the main section before starting the choker band to check fit and adjust if necessary
  • πŸ’‘Keep stitch markers handy to mark shell spaces and important stitch counts as you work through the complex pattern repeats
  • πŸ’‘Block the finished collar gently with steam or water to help the lacework open up and the skulls take proper shape
  • πŸ’‘Store flat or rolled gently to prevent the delicate threadwork from stretching or distorting between wears

This hauntingly elegant Gothic Victorian skull collar pattern brings together the romance of Victorian lacework with edgy skull imagery for a truly unique wearable art piece. The delicate threadwork creates stunning detail while remaining comfortable for all-day wear, and the adjustable corset lacing ensures a perfect custom fit. Whether you're attending a Gothic festival, creating a costume, or simply expressing your dark romantic style, this collar makes a bold statement that's surprisingly versatile. The intermediate-level techniques will expand your crochet skills while creating something genuinely eye-catching. πŸ–€ Happy crocheting and embrace your dark side! βœ¨πŸ’€

You ask,

we answer.

FAQs

Can I use regular yarn instead of sport weight thread for this collar?

While you can experiment with different yarn weights, using sport weight thread with a 2mm hook creates the delicate, lacy appearance that makes this collar so elegant. Heavier yarn will result in a bulkier, less refined look and may not drape as beautifully around the neck. If you want to try thicker yarn, increase your hook size accordingly and expect a larger, less intricate finished piece.

How do I adjust the collar if it's too wide or too narrow for my neck?

The pattern includes adjustment instructions in the choker section. After completing the collar portion, try it on before starting row 1 of the choker band. If it's too wide, skip some double crochets from the previous row when working your single crochets instead of working into every stitch. This narrows the band while maintaining the structure. The corset lacing also provides additional adjustability for the perfect fit.

What's the best way to keep track of the shell stitches and pattern repeats?

Use stitch markers to mark each shell space as you complete it, especially in rows 2-12 where the skull motifs develop. Keep a row counter or make tick marks on paper as you complete each repeat of the starred sections. The pattern repeats four times in most rows, so marking after each complete repeat helps ensure you don't lose your place in the intricate lacework.

How should I care for and wash this delicate collar?

Hand wash the collar gently in cool water with mild soap designed for delicate fibers, then lay flat to dry on a towel. Avoid wringing or twisting the threadwork. Once dry, you can lightly steam block it to refresh the shape and open up the lacework. Store it flat or rolled loosely in acid-free tissue paper to maintain its shape between wears.

Can I make the skull motifs more or less prominent?

The skull prominence is built into the pattern structure, but you can enhance visibility by using high-contrast thread or adding embroidery details after completion. Some crocheters outline the eye and nose areas with black thread or add small beads for eye details. You could also work the entire collar in black thread for a more subtle, monochromatic skull design that reveals itself up close.