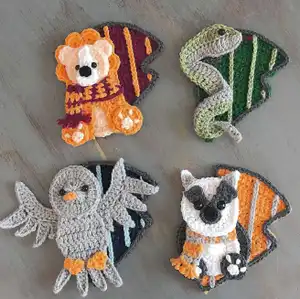
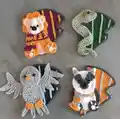
Bring the magic of four legendary wizarding houses to life with this enchanting crochet pattern collection! Create adorable house crests and mascot appliques featuring a loyal badger, brave lion, cunning snake, and wise raven. Each design includes detailed house colors and optional striped scarves to showcase your house pride. Perfect for embellishing blankets, bags, or displaying as standalone decorations, these 6-7 inch appliques combine simple stitches with charming details that any wizard or witch would be proud to wear.
Progress Tracker
0% Complete
— Crests (All 4 Houses):
Info:
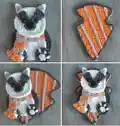
Use this same pattern for all 4 crests. Change colors: Raven (Navy/Light Blue), Lion (Burgundy/Gold), Badger (Gold/Light Grey), Snake (Hunter Green/Light Green). All have charcoal outline.
Row 1:
CH 18. DC in 3rd from hook and across (16). CH 2, turn.
Row 2:
DC2TG. DC in next 12. DC2TG. (14). CH 2, turn.
Row 3:
DC2TG. DC in next 10. DC2TG. (12). CH 2, turn.
Row 4:
DC2TG. DC in next 8. DC2TG. (10). CH 2, turn.
Row 5:
DC2TG. DC in next 6. DC2TG. (8). CH 2, turn.
Row 6:
DC2TG. DC in next 4. DC2TG. (6). CH 2, turn.
Row 7:
DC2TG. DC in next 2. DC2TG. (4). CH 2, turn.
Row 8:
DC2TG twice. (2). Tie off.
Info:
Reattach yarn at bottom of original chain, skipping 3 stitches in.
Row 9:
DC in 10. CH 2, turn.
Row 10:
2DC in first 2. DC in next 6. 2DC in last 2 (14). CH 2, turn.
Row 11:
2DC in first. DC in next 12. 2DC in last. (16). CH 1, turn.
Row 12:
SC in first 2, HDC in next 2, DC in next 3, TC in next 2, DC in next 3, HDC in next 2, SC in last 2. SS in same stitch. Tie off.
Outline:
Using Charcoal, make a chain of 85. Tie off. Attach it all the way around the crest.
Stripes:
Using house stripe colors, make chains: CH 15, CH 21, CH 16, CH 1, CH 4. Tie off each. Arrange on crest as shown in picture.
— Badger:
Head Round 1:
Using white, make a magic circle, CH 2, and DC 12. SS to join. CH 2, do not turn.
Round 2:
2DC in each stitch around. SS to join. CH 2, do not turn.
Round 3:
2HDC in first. 1HDC in next. Repeat all the way around. SS to join. Tie off.
Eyes (Make 2):
Using charcoal, CH 5. HDC in 2nd from hook and across (4). CH 1, turn. HDC2TG twice. (2). CH 1, turn. HDC across (2). CH 1, turn. HDC across (2). Tie off.
Nose:
Using black, make a magic circle, CH 1, and SC 4. SS to join. Tie off. Using charcoal, make a CH of 10 for outline on bottom of nose.
Ears (Make 2):
Using white, CH 5. SC in 2nd from hook. HDC in next. DC in next. TC in last. Tie off. Using light grey, CH 3. SC in 2nd from hook, and HDC in last. Tie off.
Body Round 1:
Using white, make a magic circle, CH 2, and DC 16. SS to join. CH 2, do not turn.
Round 2:
2DC in each stitch around. SS to join. Tie off.
Arms (Make 2):
Using charcoal, CH 12. DC in 3rd from hook and in next 3. 2DC in next. DC in remaining 5. Tie off.
Scarf:
Using Color 1, CH 4. HDC in 2nd from hook and across (3). Attach Color 2. HDC across. (3). Switch to Color 1. HDC across (3). Repeat 3 more times for 7 rows total. Tie off. For hanging piece, repeat for 5 rows total. Make fringe with 6 cuts of yarn, 4 inches long, using 2 pieces at a time tied around bottom.
Feet (Make 2):
Using charcoal, make a magic circle, CH 2 and DC 12. SS to join. Tie off. Using white, CH 2. SC 3 times in last CH from hook and pull tight. Tie off. Using white, make 3 chains of 1. Tie off.
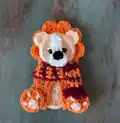
— Lion:
Head Round 1:
Using gold, make a magic circle, CH 2 and DC 14. SS to join. CH 2, do not turn.
Round 2:
2DC in each stitch around. SS to join. CH 1, do not turn.
Round 3:
4HDC in next stitch, SS in next. Skip next. Repeat 7 more times. The last 2 stitches will be skipped. SS to join. Tie off.
Face Round 1:
Using light yellow, make a magic circle, CH 2, and DC 12. SS to join. CH 2, do not turn.
Round 2:
2DC in each stitch around. SS to join. Tie off.
Muzzle Round 1:
Using white, make a magic circle, CH 1, and HDC 10. SS to join. CH 1, do not turn.
Round 2:
HDC in first 2. CH 1, turn. HDC across (2). CH 1, turn. HDC across. Tie off.
Nose:
Using black, make a magic circle, CH 1 and SC4. SS to join. Tie off.
Ears (Make 2):
Using light yellow, CH 3. 5HDC in last CH from hook. SS in same CH. Tie off.
Belly Round 1:
Using light yellow, make a magic circle, CH 2, and DC 12. SS to join. CH 2, do not turn.
Round 2:
2DC around. SS to join. Tie off.
Body Row 1:
Using gold, CH 9. HDC in 2nd hook and across (8). CH 1, turn.
Row 2:
2HDC in first. HDC in next 6. 2HDC in last. CH 1, turn.
Leg:
HDC in the first 4. CH 1, turn. HDC across. CH 1, turn. Repeat last row 3 more times, but do not CH 1. Just tie off. Skip 1 stitch on body and re-attach yarn to make second leg. Repeat Leg instructions. Tie off.
Feet (Make 2):
Using gold, make a magic circle, CH 2 and DC 12. SS to join. Tie off. Using white, CH 2. SC 3 times in last CH from hook and pull tight. Tie off. Using white, make 3 chains of 1. Tie off.
Scarf:
Follow Scarf instructions from Badger section. Use burgundy and gold for the colors.
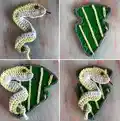
— Snake:
Body:
Using light grey, CH 40. SS in the 2nd from hook and in next 2. SC in next 3. HDC in next 3. 3DC in next. DC in next 5. SKIP next. DC in next 5. 3DC in next. DC in next 5. SKIP next. DC in next 5. TC in next 6. SS in last. Tie off.
Info:
Attach light green yarn to the end where you started with the SS (skinniest end of snake).
Second Layer:
SS in the first 4. SC in the next 2. HDC in next. DC in next 10. SKIP next. DC in next 12. SKIP next. DC in next 5. TC in next 4. HDC in next. SS in last. Tie off.
Tongue:
Using red, cut a small piece of string and attach it to the back of the head, so it sticks out like a tongue.
Scarf (Optional):
Follow directions from Badger section.
— Raven:
Head Round 1:
Using light grey, make a magic circle, CH 2 and DC 16. SS to join. CH 2, do not turn.
Round 2:
2DC in each stitch around. SS to join. Tie off.
Wings:
Using light grey, CH 35. SS in 2nd from hook. SC in next. HDC in next. DC in the next 28. HDC in next. SC in next. SS in last. Tie off.
Info:
Re-attach yarn skipping 13 stitches in from the left.
Wing Feathers:
CH 5. SS in 2nd from hook, SC in next. HDC in next, DC in last, skip one stitch on main wing part, and SS to join. CH 7. SS in 2nd from hook. SC in next. HDC in next. DC in next 3. Skip one stitch on main wing part, and SS to join. Repeat 1 more time. CH 9. SS in 2nd from hook. SC in next. HDC in next. DC in next 5. Skip one stitch on main wing part and SS to join. Tie off.
Info:
Skip 7 stitches on main wing part and re-attach yarn. Then repeat Wing instructions.
Body Row 1:
Using light grey, CH 8. DC in 3rd from hook and across (6). CH 2, turn.
Row 2:
2DC in first. DC in next 4. 2DC in last. CH 2, turn.
Row 3:
2DC in first. DC in next 6. 2DC in last. CH 2, turn.
Row 4:
DC across. CH 2, turn.
Row 5:
DC2TG. DC in next 6. DC2TG. CH 2, turn.
Row 6:
DC2TG. DC in next 4. DC2TG. Tie off.
Beak:
Using gold, CH 3. SS in 2nd from hook. SC in last. Tie off.
Feet (Make 2):
Using gold, CH 3. In last CH from hook, DC, SS, CH 2, and repeat 2 more times, but do not CH 2 on the last one. Just SS and tie off.
Tail (Make 4):
Using light grey, CH 9. SS in 2nd from hook, SC in next, and HDC the rest of the way down. Tie off.
Scarf (Optional):
Follow directions from Badger section.
This enchanting Houses of Wizardry pattern brings beloved magical house mascots to life in adorable crochet form! Each design celebrates the unique characteristics and colors of its house while remaining accessible to crocheters with basic skills. The combination of elegant shield crests with charming animal companions creates versatile appliques perfect for gifts, decorations, or personal projects. Whether you're team Raven, Lion, Badger, or Snake, these patterns let you proudly display your house allegiance in handmade style. 🧙♀️✨ Happy crocheting and may your stitches be ever magical! 🦡🦁🐍🦅