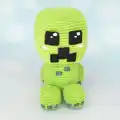
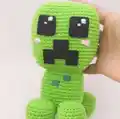
Create your own adorable Kawaii-style Creeper with this detailed crochet pattern! Standing at 15 cm tall when made with 2.5mm cotton yarn, this charming character features a cube-shaped head and body with cute embroidered details. The pattern includes clear round-by-round instructions for the head, body, and four feet, plus decorative touches like embroidered squares, felt eyes with kawaii reflections, and sweet pink blushes. Perfect for gaming fans and amigurumi lovers alike, this pattern lets you customize with different yarn weights and add your own creative touches to make it uniquely yours.
Progress Tracker
0% Complete
— HEAD :
Round 1 :
8 sc in a magic ring (8)
Round 3 :
2 inc, 2 sc (24)
Round 4 :
1 sc, 2 inc, (4 sc, 2 inc) x3, 3 sc (32)
Round 5 :
2 sc, 2 inc, (6 sc, 2 inc) x3, 4 sc (40)
Round 6 :
3 sc, 2 inc, (8 sc, 2 inc) x3, 5 sc (48)
Round 7 :
4 sc, 2 inc, (10 sc, 2 inc) x3, 6 sc (56)
Round 8 :
5 sc, 2 inc, (12 sc, 2 inc) x3, 7 sc (64)
Round 27 :
7 sc, 2 dec, (12 sc, 2 dec) x3, 5 sc BLO (56)
Round 28 :
6 sc, 2 dec, (10 sc, 2 dec) x3, 4 sc (48)
Round 29 :
5 sc, 2 dec, (8 sc, 2 dec) x3, 3 sc (40)
Round 30 :
4 sc, 2 dec, (6 sc, 2 dec) x3, 2 sc (32)
Round 31 :
3 sc, 2 dec, (4 sc, 2 dec) x3, 1 sc (24)
Round 32 :
2 sc, 2 dec (16)
Info :
Fasten off with sl st, cut and hide the strand
— BODY :
Round 1 :
8 sc in a magic ring (8)
Round 3 :
2 inc, 2 sc (24)
Round 4 :
1 sc, 2 inc, (4 sc, 2 inc) x3, 3 sc (32)
Round 5 :
2 sc, 2 inc, (6 sc, 2 inc) x3, 4 sc (40)
Round 19 :
2 sc, 2 dec, (6 sc, 2 dec) x3, 4 sc BLO (32)
Round 20 :
1 sc, 2 dec, (4 sc, 2 inc) x3, 3 sc (24)
Round 21 :
2 sc, 2 dec (16)
Info :
Fasten off with sl st and leave a long strand to sew to the head. Sew with a yarn needle joining R.19 of the body to R.29 of the head
— FEET :
Round 1 :
8 sc in a magic ring (8)
Round 3 :
2 inc, 2 sc (24)
Round 11 :
2 sc, 2 dec (16)
Info :
Fasten off with sl st and leave a long strand to sew to the body. Join R.4-R.6 of the feet to R.6-R.8 of the body. Sew two feet to the front and two feet to the back
— DETAILS :
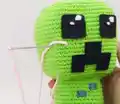
Embroidery :
With 2.5mm dark green cotton yarn and a yarn needle embroidery three squares in front of each foot in R.9
Embroidery :
With 2.5mm dark green cotton yarn and a yarn needle embroidery two squares in the front part of the body, one square in R.14 and another in R.16
— FACE :
Eyes :
Cut out two 2.5cm eyes with black felt and embroidery two reflections with white cotton yarn and a yarn needle to give it a kawaii touch. Glue the eyes between R.13 and R.17 of the head
Mouth :
With black felt, cut out a mouth 4.5cm long and 3cm high. Glue the mouth between R.19 and R.25 of the head
Blushes :
With pink cotton yarn and a yarn needle make two blushes in R.19 on the head
This adorable Kawaii Creeper pattern brings gaming nostalgia into the world of soft, cuddly amigurumi! With its distinctive cubic shape, embroidered pixelated details, and sweet kawaii facial features, this pattern perfectly balances iconic character design with handmade charm. The clear round-by-round instructions make it accessible while the embroidery and assembly add engaging detail work. Whether you're crafting for a gaming enthusiast or simply love cute amigurumi, this pattern delivers a delightful result that's both recognizable and uniquely huggable. 🧶 Happy crocheting! 🎮✨