🧢 Beautiful ✨ Detailed πŸ’ Adorable

Keychain Cow Amigurumi Pattern

Keychain Cow Amigurumi Pattern
3.9β˜… Rating
2-3 Hours Time Needed
3.5K Made This
βœ‚οΈ

Beginner Friendly Level

Perfect for those just starting their sewing journey, with clear instructions and simple techniques

⏱️

Bite-Sized Project

Complete in under 2 hoursβ€”quick, fun, and perfect for a little creative escape.

πŸ„

Pocket Pal

A mini friend to carry anywhere, providing comfort and companionship in a perfectly portable size.

About This Keychain Cow Amigurumi Pattern

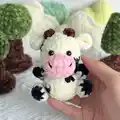
This adorable Keychain Cow pattern brings farmyard charm to your crochet collection! Designed with beginners in mind, this pattern uses simple stitches and basic techniques to create a delightful miniature cow complete with spotted markings, perky ears, and tiny horns. The use of soft chenille yarn gives your cow a plush, huggable texture that's perfect for keychains or decorative charms. Each component is worked separately and then assembled, making it easy to follow along and see your progress with every piece you complete.

Keychain Cow Amigurumi Pattern crochet pattern - detailed view of completed project

The pattern includes color-changing techniques to create authentic cow spots, and safety eyes bring personality to your creation. With clear row-by-row instructions and helpful stuffing reminders, you'll have everything you need to craft your own herd of adorable cow companions.

Why You'll Love This Keychain Cow Amigurumi Pattern

I absolutely love this pattern because it's the perfect quick project when you want to create something adorable without a huge time commitment! The chenille yarn makes the finished cow incredibly soft and cuddly, which makes it irresistible as a keychain or gift. I find the color-changing technique for the spots really satisfying to work, and watching each little component come together is so rewarding. The small size means you can experiment with different color combinations and create a whole collection of unique cows. Plus, there's something incredibly charming about miniature farm animals that just makes me smile every time I make one!

Keychain Cow Amigurumi Pattern step 1 - construction progress Keychain Cow Amigurumi Pattern step 2 - assembly progress Keychain Cow Amigurumi Pattern step 3 - details and accessories Keychain Cow Amigurumi Pattern step 4 - final assembly and finishing

Switch Things Up

I love experimenting with different variations of this adorable cow pattern! One of my favorite modifications is creating a whole rainbow herd by using unexpected color combinations like pastel pink and lavender, or mint green and cream for a dreamy aesthetic. You could also make seasonal versions - imagine a cow with red and white spots for Christmas, or orange and brown for autumn!

For a more personalized touch, I sometimes embroider tiny flowers on the body or add a small bow between the ears using ribbon. If you're making these as gifts, consider adding initials or a heart shape using duplicate stitch embroidery on the body. Another fun variation is making the cow slightly larger by using a 4mm or 4.5mm hook with bulkier yarn - this creates a perfect cuddle-sized version instead of a keychain.

I've also experimented with different facial expressions by changing the eye placement or adding embroidered details like closed happy eyes or long eyelashes for a feminine touch. Some crafters even add a tiny bell inside (make sure it's securely enclosed) so the keychain jingles softly. The possibilities are endless, and each little modification makes your cow uniquely yours!

Common Mistakes & How to Fix Them

βœ— Forgetting to stuff the head and body before closing can make it difficult to achieve proper shape later βœ— Not using stitch markers to track the beginning of rounds often leads to uneven shaping and miscounts βœ— Placing safety eyes too close together or at the wrong row creates an odd expression for your cow βœ— Pulling too tightly when sewing pieces together can distort the shape and create puckering on the surface βœ— Overstuffing the small limbs and horns makes them stiff and difficult to position naturally on the body

Keychain Cow Amigurumi Pattern

Create an adorable miniature cow keychain with this delightful crochet pattern! This charming design features a sweet cow with spotted details, tiny horns, and cute little hooves that make it perfect for keychains, bag charms, or gift giving. Using soft chenille yarn in classic cow colors, you'll craft a lovable companion that's small enough to take anywhere. The pattern includes detailed instructions for the head, body, ears, horns, legs, and that signature cow nose, making it a fun and rewarding project for crochet enthusiasts.

Beginner Friendly 2-3 Hours

Materials Needed for Keychain Cow Amigurumi Pattern

β€” Main Fabric

  • 01
    100g Soft Chenille Yarn in Brown and Black colors
  • 02
    100g Soft Chenille Yarn in Pink and White colors

β€” Tools Required

  • 01
    Crochet hook size 3.5mm
  • 02
    Stitch markers
  • 03
    Sewing needle
  • 04
    Scissors
  • 05
    Plastic safety eyes (8mm)
  • 06
    Hot glue gun
  • 07
    Fiberfill stuffing

Progress Tracker

0% Complete

β€” HEAD :

Info :

Begin with White Yarn and change the yarn color according to the font color

Row 1 :

8 SC in an MR (8)

Row 2 :

8 INC (16)

Row 3 :

(SC, INC) 6 times, (SC, INC) 2 times (24)

Row 4 :

18 SC, 6SC (24)

Row 5 :

19 SC, 4 SC, SC (24)

Row 6 :

24 SC (24)

Row 7 :

8 SC, 3 SC, 13 SC (24)

Row 8 :

(2 SC, DEC) 2 times, 2 SC, DEC, (2 SC, DEC) 3 times (18)

Row 9 :

(SC, DEC) 6 times (12)

Info :

Stuffing

Info :

Cut the yarn, leaving a long tail for sewing

β€” BODY :

Row 1 :

Make chain 4, start in second chain from the hook. Working on both sides of a chain (working on a foundation chain), 2 SC, 3SC in one st, SC, INC (8)

Row 2 :

INC, SC, 3 INC, SC, 2 INC (14)

Row 3 :

SC, INC, SC, (SC, INC) 3 times, 2 SC, INC, SC, INC (20)

Row 4 :

16 SC, 4 SC (20)

Row 5-6 :

20 SC (20)

Row 7 :

8 SC, DEC, SC, 2 SC, 5 SC, DEC (18)

Row 8 :

(SC, DEC) 3 times, SC, DEC, (SC, DEC) 2 times (12)

Info :

Stuffing

Info :

Cut the yarn

Info :

Join the rounds with a slip stitch

β€” EARS (Make 2) :

Row 1 :

6 SC into MR (6)

Row 2 :

6 INC (12)

Info :

Cut the yarn, leaving a long tail for sewing

β€” HORNS (Make 2) :

Row 1 :

6 SC into MR, slst (6)

β€” HANDS (Make 2) :

Info :

Begin with black yarn

Row 1 :

6 SC into MR (6)

Info :

Change to white yarn

Row 2 :

6 SC (6)

Row 3 :

(SC, DEC) 2 times (4)

Info :

Cut the yarn, leaving a long tail for sewing

β€” LEGS (Make 2) :

Info :

Begin with black yarn

Row 1 :

8 SC into MR (8)

Info :

Change to white yarn

Row 2-3 :

8 SC (8)

Row 4 :

4 DEC (4)

Info :

Cut the yarn, leaving a long tail for sewing

β€” NOSE :

Row 1 :

Make chain 4, start in the second chain from the hook, 3 SC, (3 SC), 2 SC, INC (10)

Row 2 :

INC, 2 SC, 3 INC, 2 SC, 2 INC (16)

Row 3 :

16 SC (16)

Info :

Cut the yarn, leaving a long tail for sewing

Info :

Use eye size 8mm and attach to row 6

Assembly Instructions

  • Attach the head to the body by aligning them and sewing securely with a sewing needle
  • Sew the nose onto the front of the head below the safety eyes using the long yarn tail
  • Position the horns on top of the head slightly behind the ears and sew them in place
  • Attach the ears to the sides of the head at an angle for a realistic look
  • Sew the hands to the upper sides of the body as shown in the reference photo
  • Attach the legs to the bottom of the body ensuring they're evenly spaced for stability
  • Add a keychain ring through the top of the head or add a small loop for hanging

Important Notes

  • πŸ’‘Use stitch markers to keep track of your rounds and prevent losing your place
  • πŸ’‘Change yarn colors smoothly by completing the last stitch of the old color with the new color
  • πŸ’‘Place safety eyes between rows 6 and 7 before stuffing the head completely
  • πŸ’‘Don't overstuff the small pieces like hands and legs to maintain their delicate shape
  • πŸ’‘Pin all components in place before final sewing to ensure proper positioning and balance
  • πŸ’‘Keep yarn tails long enough for sewing as they'll be your primary assembly tool
  • πŸ’‘Work with consistent tension throughout to maintain uniform sizing across all pieces

This delightful Keychain Cow pattern is perfect for bringing a touch of farmyard charm to your everyday accessories! The pattern combines simple amigurumi techniques with adorable design elements to create a miniature cow that's full of personality. Whether you're making one for yourself or creating handmade gifts for friends and family, this quick project delivers maximum cuteness in minimal time. The soft chenille yarn and tiny proportions make it an irresistible addition to keys, bags, or as a decorative charm. πŸ„ Happy crocheting and enjoy creating your adorable cow companion! 🧢✨

You ask,

we answer.

FAQs

Can I use regular yarn instead of chenille yarn for this pattern?

Yes, you can use regular worsted weight yarn with a 3.5mm hook, though the finished cow will have a different texture and may be slightly smaller than the chenille version.

How do I create the spotted pattern on the cow?

The pattern indicates color changes throughout the rows. Simply change to the appropriate color (brown/black) when the pattern text shows those colors, and carry the unused yarn inside your work.

What size will the finished cow keychain be?

When made with chenille yarn and a 3.5mm hook, the finished cow will be approximately 2-3 inches tall, making it perfect for a keychain or small charm.

Do I need to know how to do color changes for this pattern?

Basic color changing is helpful but not essential. The pattern provides guidance on when to switch colors, and you can find simple tutorials online if you're new to this technique.

Can I make multiple cows in different color combinations?

Absolutely! Feel free to experiment with different color combinations like all white, all brown, or even fun colors like pink and purple for creative variations.

How do I attach the keychain ring to the finished cow?

You can either create a small chain loop at the top of the head before finishing or use a jump ring and attach it between stitches at the top of the cow's head.