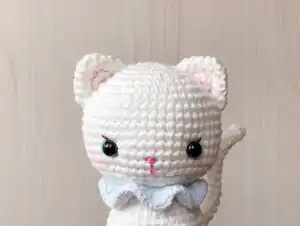
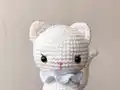
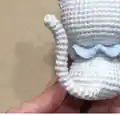
Create your own adorable Kitty, a charming little white kitten that stands approximately 3.5 inches tall. This delightful amigurumi pattern features a precious feline friend with expressive blue eyes, a delicate lace collar, and sweet pink accents. Perfect for cat lovers and crochet enthusiasts alike, this pattern guides you through crafting a chubby, huggable companion with detailed facial features including embroidered eyelashes and a tiny pink nose. The finished kitten includes poseable elements like a wire-supported tail that curves into an elegant S-shape, making this project both decorative and endearing.
Progress Tracker
0% Complete
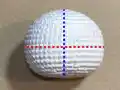
— HEAD :
Rnd 1 :
Make magic ring 6 sc (6)
Rnd 2 :
Sc 2 in each st around (12)
Rnd 3 :
(Sc 1, inc) x 6 (18)
Rnd 4 :
Sc 1, inc, (sc 2, inc) x 5, sc 1 (24)
Rnd 5 :
(Sc 3, inc) x 6 (30)
Rnd 6 :
Sc 2, inc, (sc 4, inc) x 5, sc 2 (36)
Rnd 7 :
(Sc 5, inc) x 6 (42)
Rnd 8 :
Sc 3, inc, (sc 6, inc) x 5, sc 3 (48)
Rnd 9-15 :
Sc in each st around (48)
Rnd 16 :
Sc 3, inv dec, (sc 6, inv dec) x 5, sc 3 (42)
Rnd 17 :
(Sc 5, inv dec) x 6 (36)
Rnd 18 :
Sc 2, inv dec, (sc 4, inv dec) x 5, sc 2 (30)
Rnd 19 :
(Sc 3, inv dec) x 6 (24)
Info :
Stuff the head with fiberfill
Rnd 20 :
Sc 1, inv dec, (sc 2, inv dec) x 5, sc 1 (18)
Rnd 21 :
(Sc 1, inv dec) x 6 (12)
Info :
Finish stuffing the head firmly. Fasten off and leaving a long tail for sewing. Using a yarn needle weave the yarn tail through the front loop of each remaining st and pull tight to close.
— EAR :
Info :
Make 2 ears, begin with white yarn
Rnd 1 :
Make magic ring 6 sc (6)
Rnd 2 :
(Sc 1, inc) x 3 (9)
Rnd 3 :
Sc 1, inc, (sc 2, inc) x 2, sc 1 (12)
Rnd 4 :
(Sc 3, inc) x 3 (15)
Rnd 5 :
Sc 2, inc, (sc 4, inc) x 2, sc 2 (18)
Info :
Fasten off and leaving a long tail for sewing
— INNER EAR :
Info :
Make 2 inner ears and use light pink yarn to make 2 chains
Rnd 1 :
Start in the 2nd chain from hook, then crochet [(sc 1, hdc 1, sc 1) in same st] (3)
Info :
Fasten off and weave in the yarn end
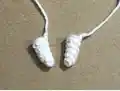
— FRONT LEGS :
Info :
Make 2 front legs, begin with white yarn
Rnd 1 :
Make magic ring 4 sc (4)
Rnd 2 :
(Sc 1, inc) x 2 (6)
Rnd 4 :
Inc, inv dec, sc 4 (7)
Info :
Fasten off and leave a long tail for sewing. Using a yarn needle weave the yarn tail through the front loop of each remaining st and pull tight to close.
— BACK LEGS :
Info :
Make 2 back legs and use white yarn to make 2 chains
Rnd 1 :
Start in the 2nd chain from hook, then crochet [(sc 1, dc 2, sc 1) in same st] (4)
Info :
Fasten off and leaving a long tail for sewing
— BODY :
Info :
Begin with white yarn
Rnd 1 :
Make magic ring 6 sc (6)
Rnd 2 :
Sc 2 in each st around (12)
Rnd 3 :
(Sc 1, inc) x 6 (18)
Rnd 4 :
Sc 1, inc, (sc 2, inc) x 5, sc 1 (24)
Rnd 5 :
(Sc 3, inc) x 6 (30)
Rnd 6 :
Sc 2, inc, (sc 4, inc) x 5, sc 2 (36)
Rnd 7-8 :
Sc in each st around (36)
Info :
Join both legs onto the body
Rnd 9 :
Sc 1, (inv dec, sc 5) x 2, (the 1st leg) sc 7, (skip last 2 sts on the 1st leg), (skip 2 sts on the body), (the body) sc 1, (the 2nd leg) sc 7, (skip last 2 sts on the 2nd leg), (skip 2 sts on the body), (sc 5, inv dec) x 2, sc 2 (42)
Rnd 10 :
(Sc 5, inv dec) x 6 (36)
Rnd 11 :
Sc in each st around (36)
Rnd 12 :
Sc 2, inv dec, (sc 4, inv dec) x 5, sc 2 (30)
Info :
Stuff both legs slightly with fiberfill
Rnd 13 :
Sc in each st around (30)
Rnd 14 :
(Sc 3, inv dec) x 6 (24)
Rnd 15 :
Sc in each st around (24)
Rnd 16 :
Sc 1, inv dec, (sc 2, inv dec) x 5, sc 1 (18)
Info :
Finish stuffing the body firmly. Fasten off and leaving a long tail for sewing. Sew the remaining yarn under the front legs to close the gap between the leg and the body. Sew both front legs onto the body on round 6 and pull them tight together.
— LACE COLLAR :
Info :
Use light blue yarn to make 28 chains
Rnd 1 :
Start in the 3rd chain from hook, then crochet (dc 1, dc inc) x 13 (39)
Rnd 2 :
(Sc 1, inc, 3-sc inc, inc) x 9, sc 1, inc, 3-sc inc (78)
Info :
Fasten off and leaving a long tail for sewing
— TAIL :
Info :
Begin with white yarn
Rnd 1 :
Make magic ring 6 sc (6)
Rnd 2-22 :
Sc in each st around (6)
Info :
Fasten off and leave a long tail for sewing
This precious Kitty the Little White Kitten pattern combines delicate details with classic amigurumi techniques to create an irresistibly charming companion. The pattern's thoughtful design includes dimensional eye sockets for expressive depth, a decorative lace collar that adds elegance, and a poseable wire tail that curves beautifully. Every stitch works together to bring this sweet feline friend to life, from her embroidered eyelashes to her rosy blushed cheeks. Whether displayed on a shelf or gifted to a cat lover, this miniature masterpiece showcases your crochet skills while creating a timeless treasure. 🐱 Happy crocheting! 🧶✨