🧢 Beautiful ✨ Detailed πŸ’ Adorable

Little Frog Amigurumi Pattern

Little Frog Amigurumi Pattern
4.8β˜… Rating
3-4 Hours Time Needed
1.7K Made This
βœ‚οΈ

Beginner Friendly Level

Perfect for those just starting their sewing journey, with clear instructions and simple techniques

⏱️

Bite-Sized Project

Complete in under 2 hoursβ€”quick, fun, and perfect for a little creative escape.

🐸

Cute Companion

An adorable friend to cherish, handcrafted with love to bring comfort and joy for years to come.

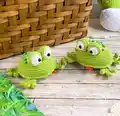
About This Little Frog Amigurumi Pattern

This Little Frog pattern is a delightful amigurumi project that combines simplicity with charming details. The pattern uses basic crochet techniques worked in a spiral to create a sweet frog with a distinctive two-piece body construction. What makes this pattern special is the attention to detail - from the dimensional eyes with green eyelids to the tiny three-fingered paws and decorative spots on the back. The finished piece is small enough to fit in your palm but detailed enough to showcase your crafting skills.

Little Frog Amigurumi Pattern crochet pattern - detailed view of completed project

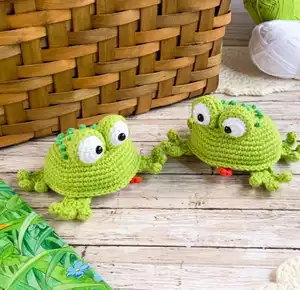
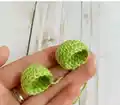
Working with cotton yarn and a small hook creates a tight, professional finish that keeps stuffing hidden inside. The spiral construction method means no visible seams, giving your frog a smooth, polished appearance that looks professionally made.

Why You'll Love This Little Frog Amigurumi Pattern

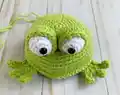
I absolutely love this pattern because it's the perfect introduction to creating dimensional amigurumi features! The way the eyes are constructed separately and then placed into eyelids gives the frog such an expressive, lifelike quality. I find the assembly process really satisfying - watching all the separate pieces come together into this adorable little creature is incredibly rewarding. The small size makes it a quick project that you can complete in one sitting, and the French knot details on the back add that extra touch of handmade charm. Plus, the paws with their individual fingers are surprisingly easy to make but look so impressive!

Little Frog Amigurumi Pattern step 1 - construction progress Little Frog Amigurumi Pattern step 2 - assembly progress Little Frog Amigurumi Pattern step 3 - details and accessories Little Frog Amigurumi Pattern step 4 - final assembly and finishing

Switch Things Up

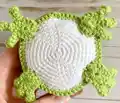
I love experimenting with this pattern to create different frog personalities! One of my favorite variations is making the belly in a light yellow instead of white to create a more realistic tree frog look. You could also try using variegated yarn for the back to create a spotted or mottled effect without having to embroider the French knots.

For a fun twist, I sometimes make the frog in unexpected colors - imagine a pink frog with a purple belly for a whimsical fantasy creature, or use blue tones for a poison dart frog inspired design. You can also adjust the tongue color or even leave it off for a different expression.

Another variation I enjoy is adding tiny wire armature to the paws before stuffing them, which allows you to pose your frog in different positions. The eyelids can be made in a darker or lighter shade of green for more dimension, or try using safety eyes with colored pupils instead of solid black for a more cartoonish appearance. The possibilities are endless with this adorable little pattern!

Common Mistakes & How to Fix Them

βœ— Crocheting too loosely which allows stuffing to show through - switch to a smaller hook size if you see gaps between stitches βœ— Not stuffing the eyes firmly enough before closing which creates flat, lifeless-looking eyes - add more filling for round, expressive eyes βœ— Positioning the eyes unevenly on the head - use pins to mark placement before sewing and count rows carefully for symmetry βœ— Overstuffing the body which distorts the shape and creates lumpy areas - stuff firmly but not so tight that stitches stretch apart βœ— Forgetting to leave long enough tails for sewing pieces together - leave at least 12 inches to make assembly easier

Little Frog Amigurumi Pattern

Create an adorable little frog friend with this charming crochet pattern! This delightful amigurumi design features a sweet two-toned body with a white belly and vibrant green back, complete with expressive eyes, cute little paws, and a tiny red tongue. Perfect for beginners looking to expand their amigurumi skills, this pattern includes detailed instructions for creating all components including the unique eyelid design and decorative French knots on the back. The finished frog measures approximately 7 cm (2.7 inches) and makes a wonderful gift or desk companion.

Beginner Friendly 3-4 Hours

Materials Needed for Little Frog Amigurumi Pattern

β€” Main Fabric

  • 01
    100% cotton yarn for crocheting (PaintBox Yarns Cotton DK 125m, 50g in Lime Green 629)
  • 02
    Paper White yarn (PaintBox Yarns Cotton DK color 601)
  • 03
    Small amount of Pillar Red yarn (color 615)
  • 04
    Small amount of Spearmint Green yarn (color 626)

β€” Tools Required

  • 01
    Crochet hook 2.0 mm (Clover recommended)
  • 02
    Stuffing (hollow fiber)
  • 03
    Safety eyes or black beads 6 mm diameter
  • 04
    Needle with a big eye
  • 05
    Sewing pins
  • 06
    Scissors

Progress Tracker

0% Complete

β€” Back :

Row 1 :

6 sc in magic ring (6)

Row 2 :

2 sc in each sc (12)

Row 3 :

(1 sc, sc inc) x 6 (18)

Row 4 :

(2 sc, sc inc) x 6 (24)

Row 5 :

(3 sc, sc inc) x 6 (30)

Row 6 :

(4 sc, sc inc) x 6 (36)

Row 7 :

(5 sc, sc inc) x 6 (42)

Row 8 :

(6 sc, sc inc) x 6 (48)

Row 9 :

48 sc (48)

Row 10 :

(7 sc, sc inc) x 6 (54)

Row 11 :

54 sc (54)

Row 12 :

(8 sc, sc inc) x 6 (60)

Rows 13-14 :

60 sc for 2 rows (60)

Info :

Don't cut the work thread

β€” Belly :

Row 1 :

6 sc in magic ring (6)

Row 2 :

2 sc in each sc (12)

Row 3 :

(1 sc, sc inc) x 6 (18)

Row 4 :

(2 sc, sc inc) x 6 (24)

Row 5 :

(3 sc, sc inc) x 6 (30)

Row 6 :

(4 sc, sc inc) x 6 (36)

Row 7 :

(5 sc, sc inc) x 6 (42)

Row 8 :

(6 sc, sc inc) x 6 (48)

Row 9 :

(7 sc, sc inc) x 6 (54)

Row 10 :

(8 sc, sc inc) x 6, sl.st (60)

Info :

Tie off the thread and cut it

β€” Eyes (Make 2) :

Row 1 :

6 sc in magic ring (6)

Info :

Close the magic ring, but not too tight so you can insert the safety eyes easily

Row 2 :

2 sc in each sc (12)

Row 3 :

(3 sc, sc inc) x 3 (15)

Rows 4-5 :

15 sc for 2 rows (15)

Info :

Insert the safety eyes into the middle of the magic ring

Row 6 :

(3 sc, sc dec) x 3 (12)

Info :

Stuff the eye

Row 7 :

6 sc dec (6)

Info :

Finish with sl.st, tie off the thread and leave enough for sewing

β€” Eyelids (Make 2) :

Row 1 :

6 sc in magic ring (6)

Row 2 :

2 sc in each sc (12)

Row 3 :

(1 sc, sc inc) x 6 (18)

Rows 4-6 :

18 sc for 3 rows (18)

Info :

Finish with sl.st, tie off and leave enough thread for sewing

β€” Paws (Make 4) :

Row 1 :

2 ch, 12 dc in magic ring, sl.st (12)

Row 2 :

4 sl.st, (6 ch, puff stitch in the 3rd loop from the hook and 1 sc in the 4th, 5th and 6th loops from the hook, 1 sl.st in the next loop of the first row) repeat this pattern two more times, 4 sl.st

Info :

Tie off the thread and leave enough for sewing

β€” Tongue :

Info :

Crochet 4 ch

Row 1 :

Start in the second loop from the hook and crochet 2 sc, 3 sc in last ch, don't turn the work and crochet continuously in circle direction, 1 sc, 1 sc inc (8)

Info :

Finish with sl.st, tie off the thread and leave enough for sewing

Assembly Instructions

  • Join the belly and back together by putting wrong sides together, insert hook through loops of both pieces and crochet sc around the edge, stuffing as you go
  • Place the eyes into the eyelids and sew them together, then tie off the white yarn at the bottom of each eye
  • Sew the eyes onto the head/body between the 4th and 8th rows, ensuring they are positioned symmetrically
  • Sew the front paws onto the bottom of the frog symmetrically to the muzzle area
  • Sew the back paws onto the bottom of the frog in the proper position as shown in pattern images
  • Sew the tongue onto the muzzle area of the frog
  • Embroider French knots on the back of the frog using dark green yarn for decorative spots, or alternatively use green beads

Important Notes

  • πŸ’‘Crochet with tight stitches to ensure no holes appear through which stuffing can be seen
  • πŸ’‘If tiny holes appear in your work, switch to a smaller hook size for tighter tension
  • πŸ’‘The frog's finished size is approximately 7 cm (2.7 inches) when using the recommended materials
  • πŸ’‘Use pins to position all pieces before sewing them permanently to ensure proper placement
  • πŸ’‘Close the magic ring on the eyes loosely enough to insert safety eyes easily through the center
  • πŸ’‘Work in a spiral without joining rounds unless the pattern specifically indicates a slip stitch
  • πŸ’‘Leave long enough tails when finishing pieces to make assembly easier - at least 12 inches recommended

This charming Little Frog pattern brings together simple amigurumi techniques with adorable details to create a tiny companion full of personality! The dimensional eyes with green eyelids give your frog an expressive face, while the detailed paws and decorative spots add character. Perfect for practicing spiral crochet and assembly techniques, this pattern results in a palm-sized friend that's sure to bring smiles. Whether you're making it as a gift or keeping it for yourself, this little frog is ready to hop into your heart! πŸΈπŸ’š Happy crocheting! 🧢✨

You ask,

we answer.

FAQs

What yarn weight works best for this frog pattern?

The pattern recommends DK weight 100% cotton yarn. Using cotton creates a nice tight stitch definition and the finished frog holds its shape well. The pattern specifically uses PaintBox Yarns Cotton DK which has 125m per 50g.

Can I use different sized safety eyes?

While the pattern calls for 6mm safety eyes, you can adjust the size slightly. Just remember that larger eyes will change the frog's expression and may require adjusting the eye placement rows. You can also substitute black beads if preferred.

Why is my stuffing showing through the stitches?

This usually means your tension is too loose. Try using a smaller hook size (1.75mm instead of 2.0mm) to create tighter stitches. Make sure you're pulling each stitch snug as you work to prevent gaps.

How do I make the French knots for the back decoration?

Using dark green yarn, bring your needle up through the back, wrap the yarn around the needle 2-3 times, then insert the needle back down close to where it came up. Pull gently to create a small textured knot. Repeat randomly across the back.

Can I make this frog larger?

Yes! Use a thicker yarn weight (worsted or bulky) with an appropriately sized hook. Keep in mind you'll need larger safety eyes (8-10mm) to maintain the proper proportions, and the finished size will increase accordingly.