🧶 Beautiful ✨ Detailed 💝 Adorable

Mickey and Minnie Mouse Dolls Amigurumi Pattern

Mickey and Minnie Mouse Dolls Amigurumi Pattern
4.3★ Rating
12-15 Hours Time Needed
3.3K Made This
✂️

Intermediate Level

Ideal for those with basic knitting experience, featuring slightly more advanced stitches and techniques to expand your skills.

⏱️

Slow & Steady

A 10-12 hour project—great for savoring the process over several sessions.

🧸

Cute Companion

An adorable friend to cherish, handcrafted with love to bring comfort and joy for years to come.

About This Mickey and Minnie Mouse Dolls Amigurumi Pattern

This classic Mickey and Minnie Mouse pattern brings two of Disney's most beloved characters to life in stunning crocheted form. Created as playful pair dolls, they feature authentic details including Mickey's iconic red shorts with white buttons and yellow shoes, and Minnie's charming red dress with white collar, complete with her signature red bow. The pattern uses worsted weight yarn for the bodies and sport weight yarn for the clothing, creating beautiful texture and authentic proportions. These poseable dolls can stand 18 inches tall or sit at 12 inches, making them perfect display pieces or cherished companions.

Mickey and Minnie Mouse Dolls Amigurumi Pattern crochet pattern - detailed view of completed project

With detailed instructions for facial features including felt eyes with fabric paint highlights, embroidered details, and carefully shaped bodies, this pattern creates professional-looking Disney characters. The pattern includes complete outfits for both characters, from Mickey's classic ensemble to Minnie's dress with underpants and accessories.

Why You'll Love This Mickey and Minnie Mouse Dolls Amigurumi Pattern

I absolutely love this pattern because it brings childhood nostalgia to life through the timeless magic of Mickey and Minnie Mouse. There's something incredibly special about recreating these iconic Disney characters with your own hands, watching them take shape stitch by stitch. The attention to detail in this pattern is remarkable—from the perfectly round ears to the authentic costume details that make these characters instantly recognizable. I appreciate how the pattern offers both Mickey and Minnie, allowing you to create the complete pair and display them together. The use of different yarn weights for the body and clothing adds wonderful dimension and authenticity. What makes this pattern truly special is its versatility—these dolls can be posed to stand or sit, making them perfect for display or play. The finished size is substantial enough to make a real statement piece, yet the technique remains accessible for intermediate crocheters ready to challenge themselves.

Mickey and Minnie Mouse Dolls Amigurumi Pattern step 1 - construction progress Mickey and Minnie Mouse Dolls Amigurumi Pattern step 2 - assembly progress Mickey and Minnie Mouse Dolls Amigurumi Pattern step 3 - details and accessories Mickey and Minnie Mouse Dolls Amigurumi Pattern step 4 - final assembly and finishing

Switch Things Up

I love how versatile this pattern can be with just a few creative modifications. While the classic Mickey and Minnie designs are timeless, you could experiment with different color schemes to create seasonal versions - imagine a pastel spring Mickey or a sparkly holiday Minnie with metallic yarn accents.

Consider adding small accessories like a crocheted purse for Minnie or a miniature hat for Mickey to give them extra personality. You could even create themed outfits for different occasions - Halloween costumes, winter sweaters, or beach attire would all work beautifully with this base pattern.

For a modern twist, try using gradient or self-striping yarns for the clothing pieces to create unique patterns. The shoes could be made in different colors to match specific outfits or coordinate with your décor.

If you're making these as gifts, personalization options are endless - add embroidered initials to the clothing, create custom color combinations for favorite sports teams, or modify the outfits to reflect the recipient's hobbies and interests.

Don't be afraid to adjust the sizing either. By using different hook sizes and yarn weights throughout, you could create a whole family of Mickey and Minnie dolls in various sizes, from tiny keychain versions to large display pieces.

Common Mistakes & How to Fix Them

✗ Losing track of rounds when working in continuous spirals—always use stitch markers at the beginning of each round to maintain accurate stitch counts ✗ Stuffing too firmly or not firmly enough which affects the doll's shape and stability—stuff gradually and test firmness as you go for best results ✗ Incorrectly placing facial features which changes the character's expression—pin all pieces in place before sewing and refer to photos for accurate positioning ✗ Twisting stitches when joining legs to body or attaching limbs—ensure right sides are facing correctly and count stitches carefully before joining pieces together

Mickey and Minnie Mouse Dolls Amigurumi Pattern

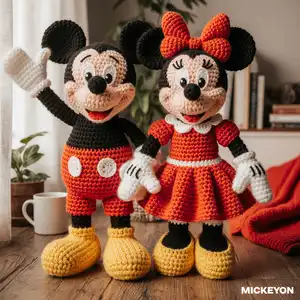
Bring the magic of Disney into your home with this enchanting Mickey and Minnie Mouse crochet pattern. These iconic characters stand 18 inches tall when sitting or 12 inches when sitting, featuring their classic outfits and adorable expressions. Perfect for Disney lovers and crochet enthusiasts alike, this pattern creates timeless dolls that capture the charm of Mickey's signature red shorts with white buttons and Minnie's beautiful red dress with white accents. Each doll is crafted with careful attention to detail, from their iconic round ears to their expressive felt eyes and embroidered features.

Intermediate 12-15 Hours

Materials Needed for Mickey and Minnie Mouse Dolls Amigurumi Pattern

— Main Fabric

  • 01
    Worsted Weight Yarn in Black - 4 ounces (110 grams, 230 yards)
  • 02
    Worsted Weight Yarn in Yellow - 1¼ ounces (40 grams, 70 yards)
  • 03
    Worsted Weight Yarn in Peach - ¾ ounce (20 grams, 45 yards)
  • 04
    Worsted Weight Yarn in White - ½ ounce (15 grams, 30 yards)
  • 05
    Worsted Weight Yarn in Red - 1 yard
  • 06
    Sport Weight Yarn in Red - ½ ounce (45 grams, 130 yards) for Mickey's outfit
  • 07
    Sport Weight Yarn in Red - 2¾ ounces (80 grams, 235 yards) for Minnie's outfit
  • 08
    Sport Weight Yarn in White - 3 yards for Mickey's outfit
  • 09
    Sport Weight Yarn in White - 1½ ounces (45 grams, 130 yards) for Minnie's outfit
  • 10
    Sport Weight Yarn in Peach - 1 yard for Minnie's eyelids

— Tools Required

  • 01
    Crochet hook size F (3.75 mm) or size needed for gauge
  • 02
    Crochet hook size E (3.50 mm) or size needed for gauge
  • 03
    Safety pin
  • 04
    Polyester fiberfill stuffing
  • 05
    Clear drying craft glue
  • 06
    White felt - 2" x 4" piece
  • 07
    Black felt - 2" x 4" and 2" square pieces
  • 08
    Black fabric covered floral wire for Minnie's eyelashes
  • 09
    White dimensional fabric paint
  • 10
    Tapestry needles
  • 11
    Yarn needles
  • 12
    Soft sculpture needle
  • 13
    Wire for ears (optional)
  • 14
    Stitch markers
  • 15
    Red satin ribbon - 3"w x ½ yard for Minnie's bow

Progress Tracker

0% Complete

— BASIC MOUSE :

— HEAD :

FRONT :

Round 1 (Right side) :

With Peach, ch 2, 10 sc in second ch from hook; do not join, place marker (20 sc)

Round 2 :

2 Sc in each sc around (20 sc)

Round 3 :

(Sc in next sc, 2 sc in next sc) around (30 sc)

Round 4 :

(Sc in next 2 sc, 2 sc in next sc) around (40 sc)

Round 5 :

(Sc in next 3 sc, 2 sc in next sc) around (50 sc)

Round 6 :

Sc in each sc around

Round 7 :

Sc in next 8 sc, 2 hdc in each of next 5 sc, sc in next 24 sc, 2 hdc in each of next 5 sc, sc in last 8 sc (60 sts)

Round 8 :

Sc in next 8 sc, hdc in next 10 hdc, sc in next 24 sc, hdc in next 10 hdc, sc in last 8 sc

Round 9 :

Sc in next 26 sts, † hdc in next st, 2 hdc in next st, hdc in next sc †, sc in next 2 sts, repeat from † to † once, sc in last 26 sc (62 sts)

Round 10 :

Sc in next 28 sts, 2 hdc in next hdc, hdc in next hdc, slip st in next 2 sc, hdc in next hdc, 2 hdc in next hdc, sc in next 28 sts (64 sts)

Round 11 :

(Sc decrease) twice, sc in next 27 sts, slip st in next 2 slip sts (top of forehead), sc in next 31 sts, slip st in next sc, finish off (62 sts)

BACK :

Round 1 (Right side) :

With Black, ch 2, 10 sc in second ch from hook; do not join, place marker

Info :

Mark Rnd 1 as right side

Round 2 :

2 Sc in each sc around (20 sc)

Round 3 :

(Sc in next sc, 2 sc in next sc) around (30 sc)

Round 4 :

(Sc in next 2 sc, 2 sc in next sc) around (40 sc)

Round 5 :

Sc in each sc around

Round 6 :

(Sc in next 3 sc, 2 sc in next sc) around (50 sc)

Round 7 :

Sc in each sc around

Round 8 :

(Sc in next 4 sc, 2 sc in next sc) around (60 sc)

Rounds 9-13 :

Sc in each sc around

Round 14 :

Sc in next 29 sc, (hdc, dc) in next sc, (dc, hdc) in next sc, slip st in next sc, sc in next 28 sc (62 sts)

Round 15 :

Sc in next 30 sts, (hdc, dc) in next dc, (dc, hdc) in next dc, sc in next 30 sts (64 sts)

Round 16 :

Hdc in next 32 sts, 2 hdc in next dc, hdc in next 31 sts; slip st in next hdc, finish off (65 sts)

— SIDEBURNS :

Info :

Make 2 pieces

Instructions :

With Black, ch 7; sc in second ch from hook, hdc in next ch, dc in next ch, ch 3, leave remaining 3 chs unworked; finish off leaving a long end for sewing

— NOSE AND MOUTH :

Round 1 (Right side) :

With Black, ch 2, 8 sc in second ch from hook; do not join, place marker

Round 2 :

2 Sc in each sc around (16 sc)

Rounds 3 and 4 :

Sc in each sc around

Round 5 :

(Skip next sc, sc in next sc) around (8 sc)

Round 6 :

Sc in each sc around; finish off

Round 7 :

With right side facing, join Peach with sc in last sc made (End & Page 2); ch 1, 2 sc in next sc, (sc in next sc, 2 sc in next sc) around; do not join, place marker (12 sc)

Round 8 :

(Sc in next 2 sc, 2 sc in next sc) around (16 sc)

Round 9 :

(Sc in next sc, 2 sc in next sc) around (24 sc)

Rounds 10 and 11 :

Sc in each sc around

Round 12 :

Hdc in next 12 sc, sc in last 12 sc (24 sts)

Round 13 :

Sc in next hdc, hdc in next 10 hdc, sc in next hdc; place loop from hook onto safety pin to keep piece from unraveling, do not finish off; join Red with sc in third hdc of Rnd 13; sc in next hdc, 2 dc in each of next 2 hdc, sc in next hdc, slip st in next hdc (Mouth made); finish off Red

Round 14 :

Place loop from safety pin onto hook; slip st in next 12 sc on Rnd 12, sc in next sc on Rnd 13, hdc in next 2 hdc, hdc in Back Loop Only of next 8 sts, working in both loops, hdc in next 2 hdc, sc in next sc, slip st in next slip st; finish off leaving a long end for sewing

Info :

Stuff Nose and Mouth firmly

— ASSEMBLY (Head) :

Infos :

Thread yarn needle with an 18" length of Black. With wrong sides of Head Front and Head Back together, matching hdc at point on Back to slip sts on Front (center of forehead) and working through both loops of each st on both pieces, whipstitch Front and Back together starting at point on forehead and leaving a long end at beginning to whipstitch opposite side of Head. Whipstitch across 27 sts on one side of Head toward neck; remove needle. Thread yarn needle with beginning end and whipstitch across 27 sts on opposite side of Head toward neck. Stuff Head firmly, defining cheek area. Sew opening closed; secure ends. To attach Nose and Mouth, thread yarn needle with long end. Sew to Front of Head with top of Nose across beginning ch of Rnd 1; secure end. Thread soft-sculpture needle with a 12" length of Peach. To make the cheek indentations, insert needle from side of chin to point 5 sts out from and even with top of Nose. Pull needle through, insert it over one stitch and then back to chin, pulling tightly. Skip next 5 sts beneath Mouth and repeat for second cheek indentation. To attach Sideburn, thread yarn needle with long end. Sew to side of Head with point in center of cheek indentation. Stitch 3 chs on each side even with last rnd of Head Back, covering joining sts between Front and Back of Head; secure ends. Repeat for second Sideburn on opposite side

— EAR :

Info :

Make 2 Outer Ears and 2 Inner Ears

OUTER EAR :

Round 1 (Right side) :

With Black, ch 2, 10 sc in second ch from hook; do not join, place marker

Info :

Mark Rnd 1 as right side

Round 2 :

2 Sc in each sc around (20 sc)

Round 3 :

(Sc in next sc, 2 sc in next sc) around (30 sc)

Rounds 4 and 5 :

Sc in each sc around

Round 6 :

(Sc in next 2 sc, 2 sc in next sc) around (40 sc)

Round 7 :

(Sc in next 3 sc, 2 sc in next sc) around; finish off (50 sc)

INNER EAR :

Rounds 1-7 :

Work same as Outer Ear; at end of Rnd 7, do not finish off

Joining Rnd :

Hold Inner and Outer Ear with wrong sides together and Inner Ear facing you, and matching stitches. Working through both thicknesses, sc in each sc around; finish off leaving a long end for sewing

— ASSEMBLY (Ears) :

Info :

Thread yarn needle with long end. Using cover photo as a guide, sew Ears to Head; secure ends. Optional: To keep Ears in place, a piece of wire can be run through the Ear, then back into the Head

— BODY :

Round 1 :

With Black, ch 2, 10 sc in second ch from hook; do not join, place marker

Round 2 :

2 Sc in each sc around (20 sc)

Round 3 :

(Sc in next sc, 2 sc in next sc) around (30 sc)

Round 4 :

Sc in each sc around

Round 5 :

(Sc in next 2 sc, 2 sc in next sc) around (40 sc)

Round 6 :

(Sc in next 3 sc, 2 sc in next sc) around (50 sc)

Rounds 7-30 :

Sc in each sc around

Round 31 :

(Sc in next 3 sc, sc decrease) around (40 sc)

Round 32 :

(Sc in next 2 sc, sc decrease) around (30 sc)

Round 33 :

Sc in each sc around; slip st in next sc, finish off leaving a long end for sewing

Info :

Stuff Body firmly

— ASSEMBLY (Body to Head) :

Instructions :

Thread yarn needle with long end, sew Head to Body; secure end

— ARM :

Info :

Make 2 pieces

HAND :

Round 1 (Right side) :

With White, ch 7, 2 sc in second ch from hook, sc in next 4 chs, 4 sc in last ch; working in free loops of beginning ch (Fig. 3, page 2), sc in next 4 chs, 2 sc in last ch; do not join, place marker (16 sc)

Round 2 :

2 Sc in next sc, sc in next 6 sc, 2 sc in next 2 sc, sc in next 6 sc, 2 sc in last sc (20 sc)

Rounds 3-5 :

Sc in each sc around

Round 6 :

Ch 2, skip first 2 sc (thumb opening), sc in last 18 sc (2 chs and 18 sc)

Round 7 :

Sc in each ch and in each sc around (20 sc)

Round 8 :

(Sc in next 3 sc, sc decrease) around (16 sc)

Round 9 :

(Sc in next 2 sc, sc decrease) around (12 sc)

Rounds 10-12 :

Sc in each sc around

Instructions :

Finish off

THUMBS :

Round 1 :

With right side facing and working in free loops of ch-2 and in skipped sc of thumb opening, join White with slip st in first ch; hdc in same st and in next ch, hdc in side of first sc, hdc in same st and in next st, hdc in side of same st; do not join, place marker (6 hdc)

Round 2 :

Sc in each hdc around

Round 3 :

(Skip next sc, slip st in next sc) around; finish off

Info :

Stuff Hand firmly

BODY (of Arm) :

Round 1 :

With right side facing and working in Back Loops Only, join Black with sc in last sc made; sc in each sc around (12 sc)

Round 2 :

(Sc in next 2 sc, 2 sc in next sc) around (16 sc)

Rounds 3-12 :

Sc in each sc around

FOR LEFT ARM :

Round 13 :

Hdc in next 8 sc, sc in last 8 sc

Rounds 14 and 15 :

Sc in each st around

Round 16 :

(Sc in next sc, 2 sc in next sc) 4 times, (hdc in next sc, 2 hdc in next sc) 4 times; slip st in next sc, finish off leaving a long end for sewing

Info :

Stuff Arm firmly

FOR RIGHT ARM :

Round 13 :

Hdc in next 8 sc, sc in last 8 sc

Rounds 14 and 15 :

Sc in each st around

Round 16 :

(2 Hdc in next sc, hdc in next sc) 4 times, (2 sc in next sc, sc in next sc) 4 times; slip st in next hdc, finish off leaving a long end for sewing

Info :

Stuff Arm firmly

HAND SHAPING :

Instructions :

Using cover photo as a guide for placement: Thread tapestry needle with an 18" length of White, add straight stitches to form fingers on each Hand (Fig. 5, page 2). Thread yarn needle with an 18" length of Black, add three straight stitches on back of each Hand for accent lines

— ASSEMBLY (Arms to Body) :

Instructions :

Thread yarn needle with yarn end. Using cover photo as guide for placement, sew Arms to Body at sides just below neck edge, making sure Thumbs point toward center; secure ends

— LEG :

Info :

Make 2 pieces

FOOT :

Round 1 (Right side) :

With Yellow, ch 2, 10 sc in second ch from hook; do not join, place marker

Round 2 :

2 Sc in each sc around (20 sc)

Round 3 :

(Sc in next sc, 2 sc in next sc) around (30 sc)

Rounds 4-11 :

Sc in each sc around

Info :

Begin working in rows

Row 1 :

Sc in next 10 sc, slip st in next sc

Row 2 :

Ch 1, turn; skip first slip st, sc in next 10 sc, slip st in next sc

Row 3 :

Ch 1, turn; skip first slip st, sc in next 10 sc, sc in next sc on Rnd 11, slip st in next sc

Row 4 :

Ch 1, turn; skip first slip st, sc in next 11 sc, sc in next sc on Rnd 11, slip st in next sc

Row 5 :

Ch 1, turn; skip first slip st, sc in next 12 sc, sc in next sc on Rnd 11, slip st in next sc

Row 6 :

Ch 1, turn; skip first slip st, sc in next 13 sc, sc in next sc on Rnd 11, slip st in next sc

Info :

Begin working in rounds

Round 1 :

Ch 1, turn; skip first slip st, sc in next 14 sc, sc in next 10 sc on Row 5; do not join, place marker (24 sc)

Round 2 :

Skip first ch, sc in each sc around

Round 3 :

Sc decrease, sc in next 12 sc, (sc decrease) 5 times (18 sc)

Round 4 :

Sc in each sc around

Round 5 :

Sc in next 5 sc, (sc decrease) twice, sc in next 9 sc (16 sc)

Rounds 6-8 :

Sc in each sc around

Instructions :

Finish off

Info :

Stuff Foot firmly

BODY (of Leg) :

Round 1 :

With right side facing, join Black with sc in last sc made; sc in each sc around; do not join, place marker (16 sc)

Round 2 :

(Sc in next 3 sc, 2 sc in next sc) around (20 sc)

Rounds 3-15 :

Sc in each sc around

Round 16 :

Sc in next 18 sc, leave remaining 2 sc unworked

Info :

Stuff Body firmly

Joining Row :

Ch 1, with Foot toward you and ch-1 at edge, fold Leg in half, matching sts, and working through both thicknesses, sc in each sc across; finish off leaving a long end for sewing (10 sc)

— ASSEMBLY (Legs to Body) :

Instructions :

Thread yarn needle with long end, sew Legs to Rnd 6 along front of Body; secure ends

— FINISHING :

EYES :

Instructions :

Thoroughly cover each 2" x 4" piece of white felt and black felt with fabric glue and place glued sides of both pieces together; set aside to dry. Trace pattern; when dry, cut two Outer Eye pieces. Trace pattern, cut two Inner Eye pieces from 2" square piece of black felt. Using cover photo as guide for placement: Glue one Inner Eye piece to white side of each Outer Eye piece. Allow to dry. Glue each Eye to Head

MICKEY'S EYEBROWS :

Instructions :

Thread yarn needle with a 12" length of Black, working between Rnds 9 and 10 on Head, and leaving the width of 5 sc between Eyebrows; add Eyebrows using 3 backstitches for each Eyebrow (Fig. 4, page 2)

MINNIE'S EYELIDS :

Instructions :

With Peach, ch 3; finish off. Pin each Eyelid to top of Outer Eye to secure while adding Eyelashes

MINNIE'S EYELASHES :

Instructions :

Using cover photo as a guide for placement and black fabric covered floral wire, add 3 Eyelashes to each Eye. Glue Eyelids and Eyelashes in place. Allow to dry. Remove pins. Using cover photo as a guide for placement, add one dot of white dimensional fabric paint to each Inner Eye

— MICKEY'S OUTFIT :

SHORTS - BODY :

Instructions :

With Red, ch 67

Row 1 :

Sc in second ch from hook and in each ch across (66 sc)

Info :

Begin working in rounds

Round 1 (Right side) :

Ch 3 (counts as first dc, now and throughout), turn; dc in next 4 sc, 2 dc in next sc, (dc in next 5 sc, 2 dc in next sc) across; being careful not to twist sts, join with slip st to first dc (77 dc)

Info :

Loop a short piece of yarn around any stitch to mark Rnd 1 as right side

Round 2 :

Ch 3, do not turn; dc in next dc and in each dc around; join with slip st to first dc

Rounds 3-7 :

Ch 3, dc in next dc and in each dc around; join with slip st to first dc

Round 8 :

Ch 3, dc in next 18 dc, sc in next 39 dc, dc in last 19 dc; join with slip st to first dc (38 dc and 39 sc)

Round 9 :

Ch 3, dc in next 18 dc, sc in next 39 sc, dc in last 19 dc; join with slip st to first dc

Round 10 :

Ch 3, dc in next dc, dc decrease, (dc in next 2 dc, dc decrease) 4 times, sc in next 37 sc, (dc decrease, dc in next 2 dc) across; join with slip st to first dc (67 sts)

Round 11 :

Ch 3, dc in next 13 dc, dc decrease, sc in next 35 sc, dc decrease, dc in last 14 dc; join with slip st to first dc (65 sts)

Round 12 :

Ch 2, dc in next 13 dc, place marker around first dc made to mark Second Leg joining, dc decrease, sc in next 18 sc, place marker around last sc made for st placement, sc in next 15 sc, dc decrease, dc in last 14 dc; join with slip st to first dc (62 sts)

FIRST LEG :

Round 1 :

Ch 3 (does not count as first dc), skip first 31 sts, slip st in marked sc, remove marker, ch 2, dc in same st and in next 14 sc, dc decrease, dc in next 14 dc, work Cluster; join with slip st to first dc (31 dc)

Round 2 :

Ch 2, dc in same st and in next 13 dc, dc decrease, dc in next 15 dc; join with slip st to first dc (30 dc)

Round 3 :

Ch 1, sc in same st and in each dc around; join with slip st to first sc, finish off

SECOND LEG :

Round 1 :

With right side facing and working in skipped dc on Rnd 12 of Body, join Red with slip st in marked dc; ch 2, dc in same st and in next 12 dc, dc decrease, dc in next 16 sc; working in free loops of ch-3 on Rnd 1 of First Leg (Fig. 3, page 2), work Cluster; join with slip st to first dc (31 dc)

Round 2 :

Ch 2, dc in same st and in next 12 dc, dc decrease, dc in next 16 dc; join with slip st to first dc (30 dc)

Round 3 :

Ch 1, sc in same st and in each dc around; join with slip st to first sc, finish off

WAIST TIES :

Instructions :

With Red, ch 35, with wrong side of Shorts facing and working in free loops of beginning ch, sc in first ch and in each ch across, ch 35; finish off

BUTTONS :

Info :

Make 2 pieces

Instructions :

With White, ch 2, (1 hdc, 3 dc, 3 hdc, 3 dc, hdc) in second ch from hook; join with slip st to first hdc, finish off leaving a long end for sewing (12 sts). Thread tapestry needle with long end. Weave end through several stitches on back of Button; then using straight stitches (Fig. 5, page 2), add cross stitch to center front of Button; secure end. Using cover photo as guide for placement, glue Buttons to front of Shorts

— MINNIE'S OUTFIT :

DRESS - BODICE :

Instructions :

With Red, ch 46

Row 1 :

Sc in second ch from hook and in each ch across (45 sc)

Row 2 (Right side) :

Ch 3 (counts as first dc, now and throughout), turn; dc in same st, (dc in next sc, 2 dc in next sc) across (68 dc)

Info :

Loop short piece of yarn around any stitch to mark Row 2 as right side

Row 3 :

Ch 1, turn; sc in each dc across

Row 4 :

Ch 3, turn; dc in next 11 sc, 2 dc in next sc, (dc in next sc, 2 dc in next sc) 5 times, dc in next 22 sc, 2 dc in next sc, (dc in next sc, 2 dc in next sc) 5 times, dc in last 12 sc (80 dc)

Row 5 :

Ch 1, turn; sc in next 12 dc, ch 9 (armhole), skip next 17 dc, sc in next 22 dc, ch 9 (armhole), skip next 17 dc, sc in last 12 dc (46 sc)

Row 6 :

Ch 3, turn; dc in each sc and in each ch across (64 dc)

Row 7 :

Ch 1, turn; sc in each dc across

Row 8 :

Ch 3, turn; dc in next sc and in each sc across

Rows 9-11 :

Repeat Rows 7 and 8 once, then repeat Row 7 once more

SKIRT :

Row 1 :

Ch 3, turn; working in Back Loops Only (Fig. 2, page 2), dc in same st, 2 dc in next sc and in each sc across (128 dc)

Row 2 :

Ch 3, turn; working in both loops, dc in next 2 dc, (2 dc in next dc, dc in next 4 dc) across (153 dc)

Info :

Begin working in rounds

Round 1 :

Ch 3, turn; dc in next dc and in each dc across; join with slip st to first dc

Rounds 2-7 :

Ch 3, do not turn; dc in next dc and in each dc around; join with slip st to first dc

Instructions :

Finish off

Round 8 :

With right side facing, join White with sc in same st as joining (Figs. 1a & b, page 2); ch 3, (skip next dc, sc in next dc, ch 3) around; join with slip st to first sc, finish off

SLEEVE :

Info :

Make 2 pieces

Round 1 :

With right side facing and working in free loops of ch-9 (Fig. 3, page 2) and skipped dc at armhole, join Red with slip st in first ch; ch 3, dc in same ch and in next 8 chs, dc in side of next sc on Rnd 5 of Body, 2 dc in each of next 17 skipped dc, dc in side of next sc on Rnd 5 of Body; join with slip st to first dc (46 dc)

Round 2 :

Ch 3, dc in next dc and in each dc around; join with slip st to first dc

Round 3 :

Ch 2, dc in next dc, dc decrease around; join with slip st to first dc; finish off (23 dc)

Round 4 :

With right side facing, join White with sc in same st as joining; sc in each dc around; join with slip st to first sc

Rounds 5 and 6 :

Ch 1, sc in each sc around; join with slip st to first sc

Instructions :

Finish off. Repeat for second Sleeve

COLLAR :

Row 1 :

With right side facing and working in free loops of beginning ch, join White with slip st in ch at base of first sc; ch 3, (2 dc in next ch, dc in next ch) 10 times, (dc in next ch, slip st in next ch, slip st in both loops of next 2 slip sts, ch 3, skip next ch, slip st in both loops of next 2 slip sts, ch 3, skip next ch, slip st in both loops of next dc) across; finish off

TIES :

FIRST SIDE :

Instructions :

With Red, ch 40, with right side facing and working in end of rows on Bodice opening, work 14 sc evenly spaced across, ch 40; finish off

SECOND SIDE :

Instructions :

With Red, ch 40, with right side facing and working in end of rows on Bodice opening, work 14 sc evenly spaced across, ch 40; finish off

— UNDERPANTS - BODY :

Instructions :

With White, ch 67

Row 1 :

Sc in second ch from hook and in each ch across (66 sc)

Info :

Begin working in rounds

Round 1 :

Ch 3 (counts as first dc, now and throughout), turn; dc in next 2 sc, 2 dc in next sc (dc in next 2 sc, 2 dc in next sc) across; being careful not to twist sts, join with slip st to first dc (88 dc)

Info :

Mark Rnd 1 as right side

Round 2 :

Ch 3, do not turn; dc in next dc and in each dc around; join with slip st to first dc

Rounds 3-8 :

Ch 3, place marker around dc just made to mark Second Leg joining, dc in next 44 dc, place marker around last dc made for st placement, dc in each dc around; join with slip st to first dc

FIRST LEG :

Round 1 :

Ch 3 (does not count as first dc), skip next 43 sts, slip st in marked dc, remove marker, ch 3, dc in same st, dc in next 43 dc and in last 3 chs; join with slip st to first dc (48 dc)

Round 2 :

Ch 1, sc in same st and in next dc, skip next dc, (sc in next 2 dc, skip next dc) around; join with slip st to first sc (32 sc)

Round 3 :

Ch 3, (slip st in next sc, ch 3) around; join with slip st to joining slip st, finish off

SECOND LEG :

Round 1 :

With right side facing and working in skipped dc on Rnd 8 of Body, join White with slip st in marked dc; ch 3, dc in same st and in next 43 dc; working in free loops of ch-3 on Rnd 1 of First Leg, dc in each ch across; join with slip st to first dc (48 dc)

Round 2 :

Ch 1, sc in same st and in next dc, skip next dc, (sc in next 2 dc, skip next dc) around; join with slip st to first sc (32 sc)

Round 3 :

Ch 3, (slip st in next sc, ch 3) around; join with slip st to joining slip st, finish off

WAIST TIES :

Instructions :

With White, ch 35, with wrong side of Underpants facing and working in free loops of beginning ch, sc in first ch and in each ch across, ch 35; finish off

— FINISHING :

Instructions :

Tie satin ribbon into a bow; then glue to Minnie's Head between Ears

Assembly Instructions

Important Notes

This enchanting Mickey and Minnie Mouse pattern brings Disney's most iconic couple to life in adorable crocheted form! Standing 18 inches tall or sitting at 12 inches, these classic characters feature authentic details from their signature outfits to their expressive faces. The pattern combines simple techniques with careful assembly to create display-worthy dolls that capture the timeless magic of Disney. Whether you're a Disney collector or making a special gift, these beloved characters will bring smiles for years to come. 🧶✨

You ask,

we answer.

FAQs

What size will the finished Mickey and Minnie dolls be?

The dolls can stand 18 inches tall or sit at 12 inches tall when completed following the gauge specified in the pattern.

Can I use different yarn brands than those specified?

Yes, you can substitute yarns as long as you maintain the correct gauge. Make sure to use worsted weight for the bodies and sport weight for the clothing to achieve proper proportions.

Do I need to make both Mickey and Minnie?

No, the pattern provides separate instructions for each character, so you can choose to make just one or create the complete pair.

Are the dolls poseable or do they need support to stand?

The dolls are designed to both sit and stand. The pattern includes optional wire for the ears to help them stay in place, which also adds stability.

What's the most challenging part of this pattern?

The facial features and assembly require careful attention to detail. Pinning pieces before sewing and following the cover photo for placement will ensure the best results.

Can I make these dolls for children?

Yes, but ensure all pieces are securely attached. Consider embroidering eyes instead of using felt if making for very young children.