🧢 Beautiful ✨ Detailed πŸ’ Adorable

Mini Batman Amigurumi Pattern

Mini Batman Amigurumi Pattern
4.2β˜… Rating
5-6 Hours Time Needed
3.3K Made This
βœ‚οΈ

Intermediate Level

Ideal for those with basic knitting experience, featuring slightly more advanced stitches and techniques to expand your skills.

⏱️

Weekend Treat

Takes 5-7 hours, making it an enjoyable project to finish over a couple of days.

🧸

Cute Companion

An adorable friend to cherish, handcrafted with love to bring comfort and joy for years to come.

About This Mini Batman Amigurumi Pattern

This Mini Batman amigurumi pattern transforms the legendary superhero into an adorable pocket-sized companion that's perfect for display or play. Standing at approximately 12cm tall when crafted with the recommended materials, this pattern features detailed instructions for creating Batman's signature look, including his black mask with pointed ears, gray and black costume with yellow utility belt, and a flowing black raincoat that doubles as his cape. The pattern uses color-changing techniques to create the distinctive facial features and costume details that make this little hero instantly recognizable.

Mini Batman Amigurumi Pattern crochet pattern - detailed view of completed project

Working in continuous spiral rounds, you'll create a sturdy yet cuddly figure using basic amigurumi techniques including magic rings, increases, decreases, and strategic color changes. The pattern includes detailed instructions for all body parts, assembly guidance, and finishing touches like embroidered eyes and the iconic Batman logo.

Why You'll Love This Mini Batman Amigurumi Pattern

I absolutely love how this pattern captures Batman's iconic presence in such an endearing miniature form. The clever use of color changes creates that signature Batman look without requiring complex colorwork techniques, making it achievable yet impressive. What I find most rewarding is watching the character come together piece by piece, especially when adding those distinctive pointed ears and the dramatic raincoat cape that gives him such personality. The compact size makes this project portable and quick enough to complete over a weekend, but detailed enough to feel truly satisfying. Whether you're a DC Comics superfan or simply love creating character amigurumi, this Batman brings that perfect balance of cute and cool that makes every stitch worthwhile.

Mini Batman Amigurumi Pattern step 1 - construction progress Mini Batman Amigurumi Pattern step 2 - assembly progress Mini Batman Amigurumi Pattern step 3 - details and accessories Mini Batman Amigurumi Pattern step 4 - final assembly and finishing

Switch Things Up

I love how versatile this Batman pattern can be once you've mastered the basic structure. You could easily transform this into other DC superheroes by changing the color scheme and adding different accessories. Swap the gray and black for red and blue to create Superman, or use green and add a tiny felt arrow for Green Arrow. The raincoat cape technique works beautifully for any caped crusader you want to bring to life.

For a more personalized touch, consider experimenting with different facial expressions by varying the embroidered eye shapes or adding a small smile to the beige face section for a friendlier Batman. You could also scale up the pattern by using bulkier yarn and a larger hook to create a bigger version that makes an impressive display piece or huggable pillow companion.

If you want to create a whole Justice League collection, this pattern's body structure works as an excellent base template. The proportions and construction method translate well to other characters, so once you've completed Batman, you'll have the skills to design your own superhero variations. Add details like Wonder Woman's golden lasso, Flash's lightning bolt, or Aquaman's trident using embroidery or small crocheted accessories.

Common Mistakes & How to Fix Them

βœ— Not maintaining consistent tension throughout color changes can create visible gaps in the costume stripes and facial features βœ— Overstuffing the head can distort the carefully shaped beige face section and make the mask area bulge unnaturally βœ— Forgetting to use a stitch marker at the beginning of rounds leads to miscounting stitches and misaligned color sections βœ— Sewing the ears too low or too far apart changes Batman's signature silhouette and makes him less recognizable βœ— Rushing through the raincoat decreases without checking symmetry results in an uneven cape that doesn't hang properly on the back

Mini Batman Amigurumi Pattern

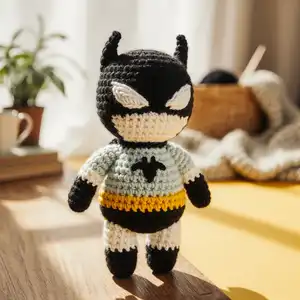
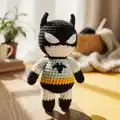
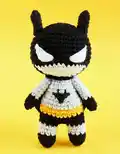
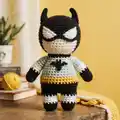
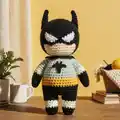
Create your own adorable mini Batman with this charming crochet pattern that brings the Dark Knight to life in pocket-sized form. This intermediate-level pattern guides you through crafting a superhero companion complete with signature black and gray costume, yellow utility belt, and flowing raincoat cape. Perfect for DC Comics fans and amigurumi enthusiasts, this pattern combines classic crochet techniques with fun character details to create an approximately 12cm (4.7 inches) tall figure that captures Batman's iconic look in an irresistibly cute style.

Intermediate 5-6 Hours

Materials Needed for Mini Batman Amigurumi Pattern

β€” Main Fabric

  • 01
    YarnArt Jeans yarn (160m in 50g, 55% cotton/45% polyacryl) in gray, yellow, beige, black, and white colors
  • 02
    Alternatively, any cotton or acrylic yarn in gray, yellow, beige, black, and white colors with appropriate hook size

β€” Tools Required

  • 01
    Crochet hook size 2.00mm (Clover Soft Touch or suitable for your yarn)
  • 02
    Toy stuffing (polyester fiberfill)
  • 03
    Tapestry needle for sewing
  • 04
    Scissors
  • 05
    Stitch marker or contrasting thread
  • 06
    Pins for assembly
  • 07
    Black and yellow felt (optional, for Batman logo)
  • 08
    Embroidery thread in white (for eyes)

Progress Tracker

0% Complete

β€” Leg 1 :

Info :

Start working with black yarn

R1 :

5 sc MR (5)

R2 :

5 inc (10)

R3-R5 :

10 sc (10)

Info :

Continue on with gray

R6-R8 :

10 sc (10)

Info :

Close and break the yarn

β€” Leg 2 + Body :

Info :

Start working with black yarn

R1 :

5 sc MR (5)

R2 :

5 inc (10)

R3-R5 :

10 sc (10)

Info :

Continue on with gray

R6-R8 :

10 sc (10)

Info :

Continue on with black. Crochet 2 sc. Move the marker to the last loop. Stuff the legs

R9 :

2 ch, 10 sc, 2 sc, 10 sc (24)

R10-R11 :

24 sc (24)

Info :

Continue on with yellow

R12-R13 :

24 sc (24)

Info :

Continue on with gray

R14-R15 :

24 sc (24)

Info :

Stuff the body

R16 :

(2 sc, dec)x6 (18)

R17-R19 :

18 sc (18)

R20 :

(1 sc, dec)x6 (12)

R21 :

12 sc (12)

Info :

Stuff the body firmly. Close and break the yarn

β€” Head :

Info :

Crochet with black yarn

R1 :

6 sc MR (6)

R2 :

6 inc (12)

R3 :

(1 sc, inc)x6 (18)

R4 :

(2 sc, inc)x6 (24)

R5 :

(3 sc, inc)x6 (30)

R6 :

(4 sc, inc)x6 (36)

R7 :

(5 sc, inc) x6 (42)

R8-R13 :

42 sc (42)

R14 :

(5 sc, dec)Ρ…2, 2 sc, BEIGE 3 sc, dec, 5 sc, dec, 4 sc, BLACK 1 sc, dec, 5 sc, dec (36)

R15 :

(4 sc, dec)Ρ…2, 2 sc, BEIGE 2 sc, dec, 4 sc, dec,4 sc BLACK dec 4 sc, dec (30)

R16 :

(3 sc, dec)Ρ…2, 2 sc, BEIGE 1 sc, dec, 3 sc, dec,3 sc, BLACK dec, 3 sc, dec (24)

R17 :

(2 sc, dec)x2, 2 sc, BEIGE dec, 2 sc, dec, 2 sc, BLACK dec, 2 sc, dec (18)

Info :

Continue on with gray

R18 :

(sc, dec)x6 (12)

Info :

Add stuffing. Leave the thread for sewing

β€” Arm x 2 :

Info :

Crochet with black yarn

R1 :

6 sc MR (6)

R2-R4 :

6 sc (6)

Info :

Continue on with gray

R5-R11 :

6 sc (6)

Info :

Do not stuff of the arm. Close. Break the yarn and leave a long tail to sew arms to body

β€” Ear x2 :

Info :

Crochet with black yarn

R1 :

4 sc MR (4)

R2 :

4 inc (8)

R3-R4 :

8 sc (8)

R5 :

(1 sc, inc)x4 (12)

R6 :

12 sc (12)

R7 :

6 sc (12)

Info :

Leave the thread for sewing

β€” Raincoat :

Info :

Crochet with black yarn

R1 :

16 ch, starting from second ch from hook, 15 sc (15)

R2-R6 :

ch, turn, 15 hdc (15)

R7 :

ch, turn, dec, 11 hdc, dec (13)

R8 :

ch, turn, dec, 9 hdc, dec (11)

R9 :

ch, turn, dec, 7 hdc, dec (9)

R10 :

ch, turn, dec, 5 hdc, dec (7)

Info :

Using black, SC evenly around the raincoat. Crochet 12 ch to fix a raincoat on a neck. Close and break the yarn, leaving a little tail

Assembly Instructions

  • Sew the head to the body securely, ensuring the beige face section is positioned at the front.
  • Attach the arms to the body symmetrically on each side, positioning them between rounds 17-19 of the body.
  • Embroider the eyes with white thread on the beige face section, creating Batman's signature angular eye shape.
  • Sew the pointed ears to the top of the head, spacing them evenly and angling them slightly outward for the iconic Batman silhouette.
  • Embroider or applique the Batman logo onto the chest using black thread or cut felt pieces in yellow and black.
  • Attach the raincoat cape to the back of the figure, securing it at the neck with the chain strap created in the pattern.
  • Use pins to position all pieces before final sewing to ensure proper alignment and symmetry throughout the figure.

Important Notes

  • πŸ’‘Use stitch markers or contrasting thread to mark the beginning of each round, especially important during color changes
  • πŸ’‘Crochet tightly enough so that the toy stuffing is not visible through the gaps between stitches
  • πŸ’‘Stuff legs and body firmly but gradually as you crochet to maintain the proper shape and proportions
  • πŸ’‘When changing colors, complete the last step of the previous stitch with the new color for clean color transitions
  • πŸ’‘Pin all parts in place before sewing to ensure correct positioning and to visualize the final look
  • πŸ’‘The beige face section requires careful counting to ensure proper placement within the black mask area

This adorable Mini Batman amigurumi pattern brings the legendary Dark Knight to life in the most endearing pocket-sized form imaginable. With its combination of simple techniques and fun character-defining details like the pointed ears, yellow utility belt, and flowing raincoat cape, this pattern creates a superhero companion bursting with personality. Whether you're crafting for a DC Comics fan, building your amigurumi collection, or simply love creating character dolls, this Mini Batman offers the perfect weekend project that balances charm with iconic superhero style. πŸ¦‡ Happy crocheting and may your stitches be as strong as Batman's resolve! 🧢✨

You ask,

we answer.

FAQs

Can I use different yarn weights for this pattern?

Yes, you can use any yarn weight, but remember to adjust your hook size accordingly following the yarn label recommendations. Using thicker yarn will create a larger Batman, while thinner yarn will make a smaller version. The pattern size of approximately 12cm (4.7 inches) is based on using YarnArt Jeans yarn with a 2.00mm hook.

How do I keep track of the color changes in the head section?

The head has multiple color sections that create Batman's mask and face. Use stitch markers at the beginning of each round and count carefully. It helps to refer to the pattern photos to visualize where the beige face section should appear within the black mask area. Work slowly through rounds 14-17 where the colors change mid-round.

Do I need to stuff the arms?

No, the pattern specifically states not to stuff the arms. Leaving them unstuffed keeps them flexible and allows them to hang naturally at Batman's sides, giving the figure better proportions and a more natural pose.

What's the best way to attach the raincoat cape?

The raincoat has a chain strap (12 chains) that wraps around the neck area. Position the raincoat on Batman's back, then bring the chain strap around to the front and secure it. You can tack it down with a few stitches to keep it in place, or leave it loose so the cape can be removed.

How should I create the Batman logo on the chest?

The pattern offers two options: you can embroider the bat symbol directly onto the gray chest using black thread, or you can cut the logo shape from yellow and black felt and sew or glue it on. The felt method tends to be easier for achieving a clean, recognizable bat symbol shape.

Can beginners make this pattern?

This pattern is rated intermediate because it involves multiple color changes, careful shaping for the face area, and several small pieces to assemble. Beginners with solid understanding of basic stitches (single crochet, increases, decreases, magic ring) and some amigurumi experience should be able to complete it successfully by working carefully and following the instructions closely.