🧢 Beautiful ✨ Detailed πŸ’ Adorable

Pixie the Robot Amigurumi Pattern

Pixie the Robot Amigurumi Pattern
4.3β˜… Rating
4-5 Hours Time Needed
3.2K Made This
βœ‚οΈ

Beginner Friendly Level

Perfect for those just starting their sewing journey, with clear instructions and simple techniques

⏱️

Weekend Treat

Takes 5-7 hours, making it an enjoyable project to finish over a couple of days.

πŸ€–

Whimsical Buddy

Playful characters full of personality, designed to spark imagination and become cherished playtime favorites.

About This Pixie the Robot Amigurumi Pattern

This Pixie the Robot pattern brings together multiple crochet techniques to create a unique robotic friend. The pattern features color changes to create a realistic display screen and control panel, giving your robot an authentic tech-inspired look. Each component is worked separately in continuous rounds, then assembled to create the final character. The combination of different colored yarns creates visual interest with striped limbs and colorful details that make this robot truly stand out.

Pixie the Robot Amigurumi Pattern crochet pattern - detailed view of completed project

The pattern includes detailed embroidery instructions to add personality to your robot, including facial features and technical details. Safety eyes give Pixie an expressive face while the stuffed body creates a huggable, durable toy.

Why You'll Love This Pixie the Robot Amigurumi Pattern

I absolutely love this pattern because it combines my passion for technology with the warmth of handmade crafts. The color-blocking technique creates such a professional look without being complicated, making it perfect for building confidence with color changes. I find the construction method really satisfying - watching each separate piece come together into a complete robot character is incredibly rewarding. The small details like the embroidered control panel and antennae add so much personality, and I love how customizable it is. You can easily adjust colors to create your own unique robot friend, making each one truly special.

Pixie the Robot Amigurumi Pattern step 1 - construction progress Pixie the Robot Amigurumi Pattern step 2 - assembly progress Pixie the Robot Amigurumi Pattern step 3 - details and accessories Pixie the Robot Amigurumi Pattern step 4 - final assembly and finishing

Switch Things Up

I love experimenting with color combinations for this robot pattern - swapping out the traditional colors for pastels creates an adorable soft aesthetic, while neon colors give it a futuristic cyber vibe. I've made versions with metallic yarn accents on the antennae and knobs which adds such a fun sparkly touch that catches the light beautifully.

For a more personalized approach, I sometimes embroider names or initials on the display screen area instead of the standard graph design. Adding different facial expressions by varying the mouth embroidery completely changes the robot's personality - I've created happy, surprised, and even sleepy versions.

I've also experimented with making the arms and legs longer by adding extra rounds, which creates a lankier, more cartoonish look that some people prefer. Another fun modification is adding small pockets or pouches to the sides using scrap yarn, perfect for hiding tiny treasures.

The knobs are another area where I love to get creative - making them different sizes or adding extra ones creates unique control panel designs. Sometimes I'll use textured yarn for certain sections to add tactile interest, which kids especially love exploring with their hands.

Common Mistakes & How to Fix Them

βœ— Forgetting to stuff pieces continuously can make it difficult to fill tight spaces later - stuff gradually as you decrease βœ— Not carrying yarn along the wrong side during color changes creates loose strands - carry unused colors inside your work βœ— Placing safety eyes too close together or uneven makes the face look off - count stitches carefully and mark placement first βœ— Pulling magic ring tail too tightly at the beginning can create a hole - leave slight looseness initially then adjust after first round βœ— Overstuffing the body and limbs creates lumpy appearance and stretches stitches - stuff firmly but not too tightly for best shape

Pixie the Robot Amigurumi Pattern

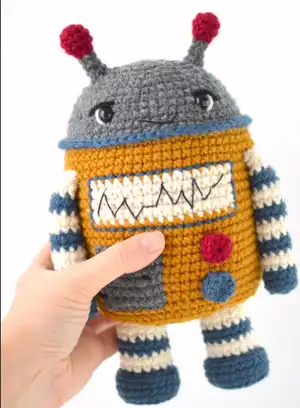
Create your own adorable Pixie the Robot with this delightful crochet pattern! Standing at 9 inches tall, this charming robotic companion features colorful details including a display screen, control flap, striped arms and legs, and cute antennae. Perfect for beginners and experienced crocheters alike, this pattern guides you through creating a whimsical toy that combines technology with handmade charm. The finished robot makes a wonderful gift for tech enthusiasts, children, or anyone who loves unique amigurumi characters.

Beginner Friendly 4-5 Hours

Materials Needed for Pixie the Robot Amigurumi Pattern

β€” Main Fabric

  • 01
    Lion Brand Wool-Ease yarn in Oxford Grey (color #152) - 1 ball
  • 02
    Lion Brand Wool-Ease yarn in Denim (color #114) - 1 ball
  • 03
    Lion Brand Wool-Ease yarn in Arrowwood (color #087) - 1 ball
  • 04
    Lion Brand Wool-Ease yarn in Fisherman (color #099) - 1 ball
  • 05
    Lion Brand Wool-Ease yarn in Cranberry (color #138) - 1 ball
  • 06
    Lion Brand Wool-Ease yarn in Black (color #153) - 1 ball

β€” Tools Required

  • 01
    Crochet hook size F-5 (3.75 mm)
  • 02
    Stitch markers
  • 03
    Large-eyed blunt needle
  • 04
    Embroidery needle
  • 05
    Black embroidery floss
  • 06
    2 plastic safety eyes (10mm diameter)
  • 07
    Fiberfill stuffing
  • 08
    Scissors

Progress Tracker

0% Complete

β€” BODY - Head :

Starting :

With A, make a magic ring

Round 1 (RS) :

Work 8 sc in ring; do not join, work in continuous rnds (spiral) - 8 sc

Info :

Gently but firmly, pull tail to tighten center of ring. Place a marker in last st made to indicate end of rnd. Move marker up as each rnd is completed.

Round 2 :

Work 2 sc in each st around - 16 sc

Round 3 :

* Sc in next st, 2 sc in next st; rep from * around - 24 sc

Round 4 :

* Sc in next 2 sts, 2 sc in next st; rep from * around - 32 sc

Round 5 :

* Sc in next 3 sts, 2 sc in next st; rep from * around - 40 sc

Round 6 :

* Sc in next 4 sts, 2 sc in next st; rep from * around - 48 sc

Round 7 :

Sc in each st around - 48 sc

Round 8 :

* Sc in next 5 sts, 2 sc in next st; rep from * around - 56 sc

Rounds 9 and 10 :

Sc in each st around - 56 sc

Round 11 :

* Sc in next 6 sts, 2 sc in next st; rep from * around - 64 sc

Rounds 12 and 13 :

Sc in each st around and change to B in last st of Rnd 13 - 64 sc

Info :

Fasten off A.

Round 14 :

With B, working in front loops only, sc in each st around; join with sl st in first sc of this rnd - 64 sc

Info :

Fasten off.

β€” BODY - Body Section :

Round 15 :

From RS, join C with sc in back loop of first st of Rnd 13, sc in each st around - 64 sc

Rounds 16-18 :

With C, sc in each st around - 64 sc

β€” Display Screen :

Rounds 19-22 :

With C, sc in next 24 sts; with D, sc in next 16 sts; with C, sc in next 24 sts - 64 sc

Info :

Fasten off D.

Rounds 23-25 :

With C, sc in each st around - 64 sc

β€” Control Flap :

Rounds 26-31 :

With C, sc in next 24 sts; with A, sc in next 8 sts; with C, sc in next 32 sts - 64 sc

Info :

Fasten off A. Work remainder of Body with C only.

Rounds 32 and 33 :

Sc in each st around - 64 sc

Info :

Insert plastic safety eyes on front of Head between Rnds 10 and 13, about 9 sts apart.

Round 34 :

Working in back loops only, * sc in next 6 sts, sc2tog; rep from * around - 56 sc

Info :

Begin stuffing piece and continue stuffing until piece is complete.

Round 35 :

* Sc in next 5 sts, sc2tog; rep from * around - 48 sc

Round 36 :

* Sc in next 4 sts, sc2tog; rep from * around - 40 sc

Round 37 :

* Sc in next 3 sts, sc2tog; rep from * around - 32 sc

Round 38 :

* Sc in next 2 sts, sc2tog; rep from * around - 24 sc

Round 39 :

* Sc in next st, sc2tog; rep from * around - 16 sc

Round 40 :

* Sc2tog; rep from * around - 8 sc

Info :

Fasten off, leaving a long yarn tail. Thread tail through top of sts of last rnd, pull to close opening and knot securely.

β€” KNOBS (make 2) :

Info :

Make 1 each with B and E. Leaving a long beg tail, make a magic ring.

Round 1 :

Work 10 sc in ring; do not join, work in continuous rnds (spiral) - 10 sc

Info :

Gently but firmly, pull tail to tighten center of ring.

Round 2 :

Working in back loops only, sc in next 10 sts; join with sl st in first sc of this rnd - 10 sc

Info :

Fasten off, leaving a long tail for sewing Knob to Body.

β€” ANTENNAE (make 2) :

Starting :

With E, make a magic ring

Round 1 :

Work 6 sc in ring; do not join, work in continuous rnds (spiral) - 6 sc

Info :

Gently but firmly, pull tail to tighten center of ring. Place a marker in last st made to indicate end of rnd. Move marker up as each rnd is completed.

Round 3 :

(Sc in next st, 2 sc in next st) 3 times - 9 sc

Round 4 :

Sc in next 9 sts - 9 sc

Round 5 :

Sc in next st, (sc2tog) 4 times and change to A in last st - 5 sc

Info :

Fasten off E.

Rounds 6 and 7 :

With A, sc in next 5 sts - 5 sc

Round 8 :

With A, sc in next st, 2 sc in next st, sc in next st, 2 sc in next st, sc in next st - 7 sc

Info :

Fasten off, leaving a long tail for sewing Antennae to head.

β€” LEGS (make 2) :

Starting :

With B, make a magic ring

Round 1 :

Work 8 sc in ring; do not join, work in continuous rnds (spiral) - 8 sc

Info :

Gently but firmly, pull tail to tighten center of ring. Place a marker in last st made to indicate end of rnd. Move marker up as each rnd is completed.

Round 2 :

Work 2 sc in each st around - 16 sc

Round 3 :

* Sc in next st, 2 sc in next st; rep from * around - 24 sc

Round 4 :

Working in back loops only, sc in each st around - 24 sc

Rounds 5 and 6 :

Sc in each st around - 24 sc

Info :

When changing yarn color to make stripes, do not fasten off old color until instructed. Carry color not in use along WS of piece.

Round 7 :

Working in back loops only, * sc in next st, sc2tog; rep from * around and change to D in last st - 16 sc

Info :

Begin stuffing piece and continue stuffing until piece is complete.

Round 8 :

With D, working in front loops only, sc in each st around - 16 sc

Round 9 :

With D, sc in each st around and change to B in last st - 16 sc

Rounds 10 and 11 :

With B, sc in each st around and change to D in last st of Rnd 11 - 16 sc

Info :

Fasten off B.

Rounds 12 and 13 :

With D, sc in each st around - 16 sc

Info :

Fasten off, leaving a long tail for sewing Leg to Body.

β€” ARMS (make 2) :

Starting :

With B, make a magic ring

Round 1 :

Work 5 sc in ring; do not join, work in continuous rnds (spiral) - 5 sc

Info :

Gently but firmly, pull tail to tighten center of ring.

Round 2 :

Work 2 sc in each st around - 10 sc

Round 3 :

Working in back loops only, sc in each st around - 10 sc

Info :

When changing yarn color to make stripes, do not fasten off old color until instructed. Carry color not in use along WS of piece.

Round 4 :

Sc in each st around and change to D in last st - 10 sc

Rounds 5 and 6 :

With D, sc in each st around and change to B in last st of Rnd 6 - 10 sc

Rounds 7 and 8 :

With B sc in each st around and change to D in last st of Rnd 8 - 10 sc

Info :

Begin stuffing piece and continue stuffing until piece is complete.

Rounds 9-16 :

rep Rnds 5-8 twice - 10 sc

Info :

Fasten off B.

Round 17 :

With D, sc in each st around - 10 sc

Round 18 :

With D, (sc in next 3 sts, sc2tog) twice - 8 sc

Info :

Fasten off, leaving a long tail for sewing Arm to Body.

β€” FINISHING - Embroidery :

Info :

Use straight or back sts to embroider Robot details, using 2 or more strands of floss as desired.

Eyes Detail :

With D, embroider curves along outer edges of safety eyes for whites of eyes

Eyes Detail :

With F, embroider lines along upper edges of safety eyes

Mouth :

With black embroidery floss, embroider a V-shaped mouth between Rnds 11 and 14, about 5 sts in length

Display Screen :

With black embroidery floss, embroider graphs onto display screen (white section)

Display Screen Border :

With B, embroider a back stitch border around the display screen

Control Flap Border :

With A, embroider a back stitch border around the control flap (gray section)

Control Flap Details :

With F, embroider straight stitch hinges and handle onto control flap

Assembly Instructions

  • Stuff Knobs with beginning yarn tails, then sew them to the Body between Rounds 25 and 29, and between Rounds 30 and 33
  • Using color D yarn, sew Arms to sides of Body between Rounds 18 and 20, positioning them symmetrically
  • With color D yarn, sew Legs to bottom of Body, ensuring they are evenly spaced for stability
  • Using color A yarn, sew Antennae to top of Robot Head between Rounds 4 and 7
  • Use the photograph as a guide when positioning all pieces, and use yarn tails still attached to pieces whenever possible
  • Weave in all remaining yarn ends securely to finish the robot

Important Notes

  • πŸ’‘Robot is worked in 9 separate pieces that are sewn together at the end
  • πŸ’‘Body is worked from the head downwards in continuous rounds (spiral)
  • πŸ’‘Do not join first stitch of rounds to last stitch and do not turn at beginning of rounds
  • πŸ’‘Work tightly with small hook so stuffing does not show through the stitches
  • πŸ’‘If Robot is intended for a baby or child, ensure all pieces are very securely sewn together
  • πŸ’‘Do not leave a baby or child unattended with the Robot for safety reasons
  • πŸ’‘Gauge is 18 sc and 18 rounds equal about 4 inches, but exact gauge is not essential for this project

This adorable Pixie the Robot pattern combines playful colors and clever construction to create a charming robotic companion that's perfect for tech lovers of all ages. The pattern uses simple increases and decreases along with fun color-blocking techniques to bring this little robot to life. With detailed embroidery adding personality and character, each robot becomes a unique handmade treasure. Whether you're making it as a gift or keeping it for yourself, this whimsical project is sure to bring smiles! πŸ€–πŸ§Άβœ¨

You ask,

we answer.

FAQs

What yarn weight is best for this robot pattern?

This pattern uses Lion Brand Wool-Ease which is a medium weight (4) worsted yarn. You can substitute with any similar weight yarn, but make sure to work tightly so the stuffing doesn't show through.

Can I make the robot larger or smaller?

Yes! To make it larger, use a bigger hook and bulkier yarn. To make it smaller, use a smaller hook and thinner yarn. The finished size will change proportionally, but the construction method remains the same.

Do I need to know how to change colors for this pattern?

Yes, this pattern requires basic color changing skills for the display screen and control flap sections. The pattern includes instructions on how to carry colors along the work without cutting them.

Is this pattern suitable for children's toys?

Yes, but with important safety considerations. Make sure all pieces are very securely sewn together, and never leave babies or young children unattended with the toy. The safety eyes should be firmly attached or replaced with embroidered eyes for very young children.

What is a magic ring and do I have to use it?

A magic ring is a technique for starting amigurumi pieces with no hole in the center. The pattern includes instructions for making one. Alternatively, you can chain 2 and work the stitches into the second chain from hook, though this may leave a small hole.

How do I keep track of my rounds?

Use a stitch marker in the last stitch of each round and move it up as you complete each round. This is especially important since you're working in continuous spirals without joining.