🧢 Beautiful ✨ Detailed πŸ’ Adorable

Plush Backpack Frog Amigurumi Pattern

Plush Backpack Frog Amigurumi Pattern
4.5β˜… Rating
6-7 Hours Time Needed
2.7K Made This
βœ‚οΈ

Intermediate Level

Ideal for those with basic knitting experience, featuring slightly more advanced stitches and techniques to expand your skills.

⏱️

Weekend Treat

Takes 5-7 hours, making it an enjoyable project to finish over a couple of days.

🧸

Cute Companion

An adorable friend to cherish, handcrafted with love to bring comfort and joy for years to come.

About This Plush Backpack Frog Amigurumi Pattern

This plush backpack frog pattern is the perfect blend of functionality and whimsy, designed to delight children while serving a practical purpose. The pattern uses luxuriously soft velvet yarn that creates a cuddly texture kids will love to touch and carry. With detailed photo instructions spanning 55 images across 8 pages, you'll have visual guidance every step of the way. The finished backpack measures a kid-friendly size that's perfect for preschoolers and young children to carry their favorite small items on adventures.

Plush Backpack Frog Amigurumi Pattern crochet pattern - detailed view of completed project

This versatile design works beautifully as a thoughtful handmade gift or a special project for your own little one. The cheerful frog character adds personality while the sturdy construction ensures this backpack will withstand active play and daily use.

Why You'll Love This Plush Backpack Frog Amigurumi Pattern

I absolutely love this pattern because it combines two of my favorite things: creating adorable amigurumi characters and making functional items that get regular use! There's something incredibly satisfying about crocheting a project that won't just sit on a shelf but will actually become part of a child's daily adventures. The velvet yarn works up quickly and feels amazing in your hands, making the crocheting process itself a joy. I'm particularly fond of how the frog's bulging eyes and sweet little legs give it so much character without being overly complicated to construct. Best of all, watching a child's face light up when they receive this handmade treasure makes every stitch worthwhile!

Plush Backpack Frog Amigurumi Pattern step 1 - construction progress Plush Backpack Frog Amigurumi Pattern step 2 - assembly progress Plush Backpack Frog Amigurumi Pattern step 3 - details and accessories Plush Backpack Frog Amigurumi Pattern step 4 - final assembly and finishing

Switch Things Up

I love experimenting with this backpack pattern to create unique variations! For a completely different look, try swapping the frog theme for other animalsβ€”a bunny with long floppy ears or a teddy bear with round ears would be absolutely precious. You could also play with color combinations; imagine a pink and purple unicorn version with a sparkly horn, or a bright orange and black tiger with felt stripes.

Another fun modification I enjoy is adding extra pockets to the exterior. Simply crochet small rectangular pieces and sew them onto the sides or front of the backpack for additional storage. You could even add a zippered pocket if you're feeling adventurous! For older children, consider making the backpack larger by using a thicker yarn weight or adding extra increase rounds.

I've also experimented with different closure systemsβ€”instead of the button and cord, you could add a magnetic snap, velcro strips, or even a simple drawstring closure. The straps can be made adjustable by adding slider buckles, which you can find at craft stores. For a more personalized touch, embroider the child's name on the tummy section or add their initials using surface crochet.

Don't be afraid to mix up the yarn textures either! Combining velvet yarn with regular acrylic for certain details creates interesting visual and tactile contrasts. You could use sparkly yarn for special occasion versions or add ribbon trim around the flap edges for extra flair.

Common Mistakes & How to Fix Them

βœ— Not using stitch markers when working in continuous rounds can cause you to lose your place and create uneven shaping in the backpack body βœ— Stuffing the frog head and eyes too firmly will distort their shape and make it difficult to sew them securely onto the backpack flap βœ— Skipping the back loops only technique in round seven will eliminate the decorative ridge detail and affect the backpack's structured appearance βœ— Failing to measure and evenly space the straps before sewing them on can result in an unbalanced backpack that sits awkwardly when worn βœ— Not leaving long enough yarn tails when finishing pieces makes assembly frustrating and can result in weak connections that come apart with use

Plush Backpack Frog Amigurumi Pattern

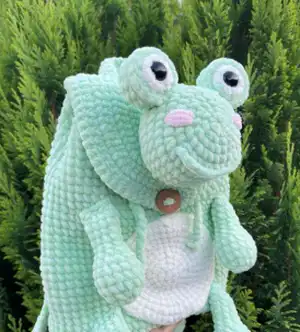
Create an adorable and functional plush backpack frog that any child will treasure! This charming project combines practicality with cuteness, featuring a spacious backpack design complete with adjustable straps, a secure flap closure, and an endearing frog character decoration. Working with soft velvet yarn, you'll craft a durable 21cm wide and 24cm high backpack that's perfect for carrying small treasures, toys, or snacks. The detailed pattern guides you through creating the main backpack body, comfortable straps, and all the delightful frog features including bulging eyes, a sweet tummy, and four adorable legs that bring this amphibian friend to life.

Intermediate 6-7 Hours

Materials Needed for Plush Backpack Frog Amigurumi Pattern

β€” Main Fabric

  • 01
    Super Bulky/Super Chunky/14ply velvet yarn HIMALAYA DOLPHIN BABY in green color (2 skeins)
  • 02
    Super Bulky/Super Chunky/14ply velvet yarn HIMALAYA DOLPHIN BABY in cream color (1/5 skein)
  • 03
    Small amount of pink yarn for embroidering cheeks

β€” Tools Required

  • 01
    Crochet hook size 3.75mm by Clover
  • 02
    Sewing needle
  • 03
    Safety eyes 14mm
  • 04
    Wooden button 2mm
  • 05
    Stuffing toy material
  • 06
    Stitch markers or contrasting thread
  • 07
    Scissors
  • 08
    Pink chenille thread for cheek embroidery

Progress Tracker

0% Complete

β€” FLAP :

Info :

Crochet with green yarn. Work in rows.

Round 1 :

ch2, crochet 5 sc into the 2nd ch from the hook. Do not pull the ring. Turn. (5)

Round 2 :

t-ch, 1 sc, inc * 4, turn (9)

Round 3 :

t-ch, (sc, inc) * 4, 1 sc, turn (13)

Round 4 :

t-ch, (2 sc, inc) * 4, 1 sc, turn (17)

Round 5 :

t-ch, (3 sc, inc) * 4, 1 sc, turn (21)

Round 6 :

t-ch, (4 sc, inc) * 4, 1 sc, turn (25)

Round 7 :

t-ch, (5 sc, inc) * 4, 1 sc, turn (29)

Round 8 :

t-ch, (7 sc, inc) * 3, 5 sc, turn (32)

Round 9 :

t-ch, (8 sc, inc) * 3, 5 sc (35)

Round 10 :

t-ch, (9 sc, inc) * 3, 5 sc (38)

Info :

Do not turn. Work along the top of the flap.

Round 11 :

t-ch, 21 sc, turn (21)

Round 12-18 :

t-ch, 21 sc, turn (6 rows)

Round 19 :

t-ch, 21 sc (21). Do not turn.

Info :

Then work in rounds.

Round 20 :

t-ch, 26 sc, 3 ch, skip 3 stitches, 25 sc, turn (54)

Round 21 :

t-ch, 53 reverse sc (53), sl st

β€” BACKPACK :

Info :

Crochet with green yarn. Ch20. Start on the second chain from the hook:

Round 1 :

18 sc, 3 sc in the last chain, on the other side of the chain: 17 sc, inc, inc into t-ch (42)

Info :

Place a marker.

Round 2 :

inc, 15 sc, (inc, 1 sc) * 2, inc, 17 sc, (inc, 1 sc) * 2 (48)

Round 3 :

inc, 1 sc, inc, 15 sc, (inc, 1 sc) * 4, inc, 15 sc, (inc, 1 sc) * 3 (58)

Round 4 :

inc, 1 sc, inc, 16 sc, (inc, 3 sc) * 3, inc, 18 sc, (inc, 3 sc) * 2 (66)

Round 5 :

inc, 3 sc, inc, 18 sc, (inc, 4 sc) * 3, inc, 17 sc (inc, 4 sc) * 2 (74)

Round 6 :

74 sc (74)

Round 7 :

BLO 74 sc (74)

Round 8-16 :

74 sc (9 rounds)

Round 17 :

32 sc, dec, 35 sc, dec, 3 sc (72)

Round 18-36 :

72 sc (19 rounds)

Info :

Join the flap in the next round

Round 37 :

1 sc, 23 sc with the flap, 48 sc (72), sl st.

β€” STRAPS (two pieces) :

Info :

Crochet with green yarn. Work in rows.

Round 1 :

ch71, start from the second chain on the hook: 70 sc, turn (70)

Round 2-4 :

t-ch, 70 sc (3 rows)

Infos :

You can make the straps longer or shorter. Make more or less chains. My straps are 50 cm long. Cut the yarn. Leave the end for sewing pieces. Sew the straps at the bottom of the backpack between rounds 7 and 11, at the top of the backpack between rounds 32 and 36. Distance between straps 12 sc.

β€” HANDLE :

Info :

Crochet with green yarn. Work in rows.

Round 1 :

ch21, start from the second chain on the hook: 20 sc, turn (20)

Round 2-3 :

t-ch, 20 sc (20 rows)

Infos :

Cut the yarn. Leave the end for sewing pieces. Sew on the handle.

β€” CORD :

Info :

Crochet with green yarn.

Instructions :

Ch150. Step back at the top of the backpack 2 rounds and stretch the cord between the stitches, after folding the backpack, as shown in the photo. Make knots at the ends.

Info :

Sew a button between rounds 23 and 27.

β€” FROG HEAD :

Info :

Crochet with green yarn.

Round 1 :

ch2, crochet 6 sc into the 2nd ch from the hook (6)

Round 2 :

inc * 6 (12)

Round 3 :

(1 sc, inc) * 6 (18)

Round 4 :

1 sc, inc, (2 sc, inc) * 5, 1 sc (24)

Round 5 :

(3 sc, inc) * 6 (30)

Round 6 :

2sc, inc, (4 sc, inc) * 5, 2 sc (36)

Round 7-10 :

36 sc (4 rounds)

Round 8 :

2 sc, dec, (4 sc, dec) * 5, 2 sc (30)

Round 9 :

(3 sc, dec) * 6 (24)

Infos :

Stuff the head. Leave the end for sewing pieces.

β€” EYES (two pieces) :

Info :

Crochet with cream yarn.

Round 1 :

6 sc in MR (6)

Round 2 :

inc *6 (12)

Info :

Change color to green. Cut the cream yarn.

Round 3 :

(3 sc, inc) * 3 (15)

Info :

Insert the safety eye into the middle of the amigurumi ring.

Round 4 :

BLO 15 sc (15)

Round 5 :

15 sc (15)

Round 6 :

(3 sc, dec) * 3 (12)

Info :

Stuff the eye.

Round 7 :

dec * 6 (6)

Infos :

Cut the yarn. Tighten the hole, weave in the yarn ends. Attach the green yarn to the front loops of round 4 and work 15 sl st. Cut the yarn. Leave the yarn tail for sewing.

β€” TUMMY :

Info :

Crochet with cream yarn.

Round 1 :

6 sc in MR (6)

Round 2 :

inc *6 (12)

Round 3 :

(sc, inc) * 6 (18)

Round 4 :

1 sc, inc, (2 sc, inc) * 5, 1 sc (24)

Round 5 :

(3 sc, inc) * 6 (30)

Round 6 :

2 sc, inc, (4 sc, inc) * 5, 2 sc, sl st (36)

Round 7 :

(5 sc, inc) * 6 (42)

Round 8 :

3 sc, inc, (6 sc, inc) * 5, 3 sc (48)

Round 9 :

(7 sc, inc) * 6 (54), sl st.

Infos :

Cut the yarn. Leave the yarn tail for sewing.

β€” FORELEGS (make 2) :

Info :

Crochet with green yarn.

Round 1 :

ch2, crochet 6 sc into the 2nd ch from the hook (6)

Round 2 :

inc * 6 (12)

Round 3 :

(3 sc, inc) * 3 (15)

Round 4-5 :

15 sc (2 rounds)

Round 6 :

(3 sc, dec) * 3 (12)

Round 7 :

(2 sc, dec) * 3 (9)

Info :

Stuff the lower foreleg.

Round 8-12 :

9 sc (5 rounds)

Infos :

Fold it in half and crochet 4 sc through both sides. Cut the yarn. Leave the yarn tail to sew pieces.

β€” HIND LEGS (make 2) :

Info :

Crochet with green yarn.

Round 1 :

ch2, crochet 6 sc into the 2nd ch from the hook (6)

Round 2 :

inc * 6 (12)

Round 3 :

(2 sc, inc) * 4 (16)

Round 4-5 :

16 sc (2 rounds)

Round 6 :

(2 sc, dec) * 4 (12)

Round 7 :

(2 sc, dec) * 3 (9)

Info :

Stuff the lower leg.

Round 8-13 :

9 sc (6 rounds)

Infos :

Fold it in half and crochet 4 sc through both sides. Cut the yarn. Leave the yarn tail to sew pieces.

Assembly Instructions

  • Sew the eyes between rounds 6 and 10 of the head at a distance of 5 sc between them.
  • Create the mouth by attaching green yarn to the stitch between rounds 6 and 7, working 11 sc between the rounds, then slip stitch and weave in ends.
  • Using pink chenille thread, embroider the cheeks between rounds 3 and 7 of the head.
  • Sew the completed frog head securely to the flap of the backpack.
  • Position and sew the cream-colored tummy piece to the front of the backpack body.
  • Attach the forelegs between rounds 25 and 28 of the backpack.
  • Sew the hind legs between rounds 8 and 12 of the backpack, ensuring they're evenly spaced and symmetrical.

Important Notes

  • πŸ’‘If your plush velvet yarn tends to shed or crumble, use cotton thread in a matching color for sewing pieces together for a cleaner finish
  • πŸ’‘Always use stitch markers or contrasting thread at the beginning of rounds when working in continuous spirals to maintain accurate stitch counts
  • πŸ’‘The straps can be customized to any length by adding or removing chains in the foundation row to fit different ages or preferences
  • πŸ’‘Stuff all pieces firmly but not overly tight to maintain proper shaping and allow the backpack to remain flexible and functional
  • πŸ’‘Before sewing straps permanently, try the backpack on the intended user or test with measurements to ensure comfortable strap length and placement
  • πŸ’‘When inserting safety eyes, make sure they're securely fastened as this backpack is intended for children and safety is paramount

This enchanting Plush Backpack Frog pattern brings together creativity and functionality in the most delightful way! Designed with intermediate crocheters in mind, this project offers the perfect challenge while remaining achievable and enjoyable. The combination of soft velvet yarn and charming frog details creates a backpack that children will adore carrying everywhere. With 55 detailed photos guiding you through every step, you'll feel confident tackling each element from the spacious main compartment to the adorable bulging frog eyes. Gift this to a special little one or make it for your own child and watch their face light up with joy! 🧢 Happy crocheting! 🐸✨

You ask,

we answer.

FAQs

Can I use a different type of yarn instead of velvet yarn?

Yes, you can substitute with other super bulky weight yarns, but keep in mind that velvet yarn gives this backpack its signature soft, plush texture that children love. If using regular acrylic or cotton yarn, the finished backpack will have a different feel and the size may vary slightly, so adjust your hook size accordingly and work a gauge swatch first.

Is this backpack sturdy enough for daily use by children?

Absolutely! When made with the recommended super bulky velvet yarn and proper tension, this backpack is quite durable for carrying lightweight items like small toys, snacks, or a change of clothes. However, it's best suited for preschool and early elementary-aged children and lighter loads rather than heavy books or large items.

How do I adjust the strap length for different ages?

The pattern calls for a foundation chain of 71, which creates 50cm long straps. To make them shorter for smaller children, simply reduce the number of chains (try starting with 51 chains for younger toddlers). For longer straps for older children, add more chains to the foundation row. Always work a sample first to test the length before completing both straps.

Do I need to add a lining to the backpack?

A lining is not required as the dense stitches of super bulky yarn create a fairly sturdy fabric on their own. However, adding a fabric lining can increase durability and make the backpack easier to clean. If you choose to add one, simply measure the interior, cut fabric pieces with seam allowance, sew them together, and hand-stitch the lining inside the finished backpack.

Can I make this backpack larger for older children?

Yes! To scale up the pattern, use a larger hook size and thicker yarn, or add additional increase rounds to each section before working the straight rounds. Keep in mind that significantly enlarging the design may require more substantial straps and potentially a stiffener or lining to maintain structure with the added weight.