🧢 Beautiful ✨ Detailed πŸ’ Adorable

Rattle Bunny Amigurumi Pattern

Rattle Bunny Amigurumi Pattern
4.4β˜… Rating
3-4 Hours Time Needed
3.2K Made This
βœ‚οΈ

Intermediate Level

Ideal for those with basic knitting experience, featuring slightly more advanced stitches and techniques to expand your skills.

⏱️

Bite-Sized Project

Complete in under 2 hoursβ€”quick, fun, and perfect for a little creative escape.

🎁

Tiny Treasure

Small, sweet, and gift-worthy creations that fit perfectly in the palm of your hand with detailed charm.

About This Rattle Bunny Amigurumi Pattern

This delightful rattle bunny pattern transforms simple crochet techniques into a functional baby toy that parents will love. The combination of soft cotton yarn and a natural wooden ring creates a sensory experience perfect for teething babies. With its sweet embroidered face and long floppy ears, this bunny becomes an instant favorite. The pattern includes two different methods for working around the wooden ring, so you can choose the technique that works best for your skill level.

Rattle Bunny Amigurumi Pattern crochet pattern - detailed view of completed project

The finished rattle measures approximately 5-6 inches tall depending on yarn choice and tension. The wooden ring provides a safe, natural teething surface while the soft bunny head offers comfort and companionship for baby's developing senses.

Why You'll Love This Rattle Bunny Amigurumi Pattern

I absolutely love this pattern because it creates something both beautiful and practical. There's something incredibly rewarding about making a toy that will become a baby's first friend and companion. I appreciate how the pattern offers flexibility with two different ring-working methods, making it accessible even if you're trying this technique for the first time. The embroidered face gives each bunny its own unique personality, and watching that sweet expression come to life is pure magic. Plus, knowing that this handmade treasure will be cherished through countless nap times and play sessions makes every stitch worthwhile.

Rattle Bunny Amigurumi Pattern step 1 - construction progress Rattle Bunny Amigurumi Pattern step 2 - assembly progress Rattle Bunny Amigurumi Pattern step 3 - details and accessories Rattle Bunny Amigurumi Pattern step 4 - final assembly and finishing

Switch Things Up

I love experimenting with different color combinations for this rattle bunny pattern. Instead of the natural beige shown in the original, try soft pastels like baby pink, mint green, or lavender for a nursery-perfect look. You could even create a whole rainbow collection of bunnies in different colors.

For a more modern aesthetic, consider using gray or navy blue with a contrasting bright bow. Gender-neutral options like cream, tan, or soft yellow work beautifully for gift-giving when you don't know baby's nursery colors yet.

I've also experimented with adding texture by using different stitches for the earsβ€”try a simple ribbed pattern or even a lacy stitch to make them extra special. Some makers add a small bell inside instead of a traditional rattle for a gentler sound.

You can personalize each bunny by varying the ear lengthβ€”make them extra long and floppy or shorter and more upright. The embroidered face offers endless possibilities too; try different eye placements or add little eyelashes for a sweeter expression.

Consider using variegated or self-striping yarn for a unique ombre effect on the head and ears. This adds visual interest without requiring color changes.

For gifting, I love making matching sets with different sized wooden ringsβ€”a larger one for older babies and a smaller one for tiny newborn hands. Package them together in a sweet gift basket with a handwritten care card.

Common Mistakes & How to Fix Them

βœ— Working too loosely around the wooden ring causing the fabric to slide and shift around instead of staying secure and tight βœ— Forgetting to place the rattle insert inside the head before completing the decreases which makes it impossible to add later βœ— Positioning the ears too high or too low on the head resulting in an unbalanced appearance instead of the classic bunny look βœ— Not stuffing the head firmly enough before attaching to the ring which creates a floppy appearance and poor structural integrity βœ— Embroidering the eyes and nose after assembling instead of before stuffing making it difficult to secure stitches properly and neatly

Rattle Bunny Amigurumi Pattern

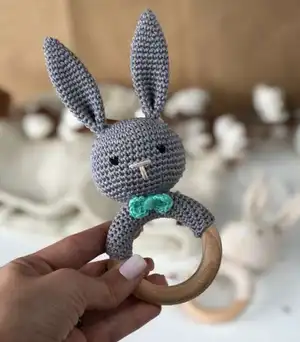
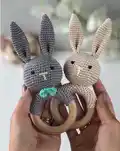
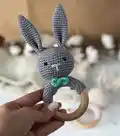
Create an adorable handmade rattle bunny perfect for baby's first toy. This charming crochet pattern combines a soft amigurumi bunny head with a natural wooden ring teether, making it both cuddly and functional. The pattern features sweet embroidered details, long floppy ears, and an optional decorative bow. With detailed photo instructions and two methods for working around the ring, you'll craft a treasured keepsake that's safe, gentle, and full of handmade love for little ones.

Intermediate 3-4 Hours

Materials Needed for Rattle Bunny Amigurumi Pattern

β€” Main Fabric

  • 01
    Vita Cotton Lily 100% cotton yarn, 1.75 oz/50g, approximately 137 yards/125 meters
  • 02
    Suggested substitute: Scheepjes Catona or Alpina Anabel, approximately 87 yards/80 meters

β€” Tools Required

  • 01
    Crochet hook 2mm
  • 02
    Crochet hook 2.5mm
  • 03
    Wooden ring 2-3 inches (60-70mm) in diameter, beech wood recommended
  • 04
    Rattle insert approximately 1 inch (24-30mm) in diameter
  • 05
    Polyester stuffing
  • 06
    Scissors
  • 07
    Black embroidery floss or yarn for facial features
  • 08
    Tapestry needle
  • 09
    Stitch markers or contrasting yarn

Progress Tracker

0% Complete

β€” Working around the ring. Option 1 :

Instructions :

Work around the ring in a continuous spiral. The total number of sts depends on the size of your wooden ring and yarn. For my size ch10 using hook 2.5mm, then work around the ring using hook 2mm. Join chain with sl st around the ring. Then sc in every st around. The first rnd is the most difficult. Then start to work in a continuous spiral, sc in each st. If it's still uncomfortable to work, try to use smaller size hook. Pay attention to your tension, crochet around the ring tightly. If the fabric is moving loosely, rip it out and start over again with one st less. Cont to work until half or a less than half of the ring is covered. End with sl st. The beginning and the end of work should be inside of the ring. Weave in ends. Pull the end through the last rnd to tighten the fabric around the ring, and then pull it through the fabric inside the ring.

β€” Working around the ring. Option 2 :

Instructions :

If option 1 is too complicated for you, you can crochet a rectangle, working sc. For my ring size, ch20 and work for 9 rows. When the rectangle is finished, fold it over the ring and sew it, the fabric should be tight around the ring. The seam should be inside the ring. Weave in ends using tapestry needle.

β€” Head :

Rnd 1 :

6sc in magic ring = 6 sts

Rnd 2 :

(inc) * 6 times= 12 sts

Rnd 3 :

(inc, sc in next st) * 6 times = 18 sts

Rnd 4 :

(inc, sc in next 2 sts) * 6 times = 24 sts

Rnd 5 :

(inc, sc in next 3 sts) * 6 times = 30 sts

Rnd 6 :

(inc, sc in next 4 sts) * 6 times = 36 sts

Rnd 7 :

(inc, sc in next 5 sts) * 6 times = 42 sts

Rnd 8 :

(inc, sc in next 6 sts) * 6 times = 48 sts

Rnds 9-15 :

48sc (work even for 7 rnds)

Rnd 16 :

(dec, sc in next 6 sts) * 6 times = 42 sts

Rnd 17 :

(dec, sc in next 5 sts) * 6 times = 36 sts

Rnd 18 :

(dec, sc in next 4 sts) * 6 times = 30 sts

Rnd 19 :

(dec, sc in next 3 sts) * 6 times = 24 sts

Info :

Embroider eyes and nose, stuff the head in half and put the rattle inside. Embroider the eyes at level of row 3 or 4 after the last inc with 7 sts between the eyes. Embroider the nose one row below the eyes.

Rnd 20 :

(dec, sc in next 2 sts) * 6 times = 18 sts

Info :

Stuff the head tightly, for your convenience you can use tweezers.

Rnd 21 :

(dec, sc in next st) * 6 times = 12 sts

Rnd 22 :

(dec) * 6 times = 6 sts

Info :

Bind off rem 6 sts using a needle. Leave a long tail to sewing around a ring (approx 18-20in/45-50cm). The head is done.

β€” Ears (Make 2) :

Rnd 1 :

4 sc into magic ring = 4 sts

Rnd 2 :

(inc, sc in next st) * 2 times= 6 sts

Rnd 3 :

(inc, sc in next 2 sts) * 2 times= 8 sts

Rnd 4 :

(inc, sc in next 3 sts) * 2 times = 10 sts

Rnd 5 :

(inc, sc in next 4 sts) * 2 times = 12 sts

Rnd 6 :

(inc, sc in next 5 sts) * 2 times = 14 sts

Rnd 7 :

(inc, sc in next 6 sts) * 2 times = 16 sts

Rnds 8-20 :

sc in next 16 sts (work even for 13 rnds)

Info :

Sl st in next st, finish off leaving a long tail for sewing to the head. Fold the ear in half as it's shown on the pic and sew it.

β€” Bow :

Instructions :

In magic ring ch4, tr4, ch4, sl st into magic ring, ch4, tr4, ch4, sl st. Finish off leaving a long tail for sewing. Fasten off, tighten the magic ring and wrap it using a tail.

Assembly Instructions

  • Sew the ears to the head at level of row 4 from the top of the head, sewing around twice for security.
  • Place the head directly in the middle of the wooden ring and press it slightly to position correctly.
  • Sew the head to the ring using the long tail left from binding off, stitching around twice for durability and security.
  • Pay careful attention that the head remains centered on the ring; if it shifts, remove and reposition before continuing.
  • Sew the decorative bow to the neck area where the head meets the ring for a sweet finishing touch.

Important Notes

  • πŸ’‘Work all pieces in continuous spiral without joining rounds, using stitch markers to track the beginning of each round
  • πŸ’‘Use hook 2.5mm for the bunny head and smaller 2mm hook when working around the wooden ring for easier handling
  • πŸ’‘Embroider facial features before stuffing the head completely to ensure neat and secure stitching from the inside
  • πŸ’‘Insert the rattle before completing the final decrease rounds as it cannot be added after the opening is closed
  • πŸ’‘Crochet tightly around the wooden ring to prevent the fabric from sliding; if it moves loosely, restart with fewer stitches
  • πŸ’‘Stuff the head firmly but not overly tight to maintain proper shape and ensure the rattle can move freely inside
  • πŸ’‘Leave a long tail of 18-20 inches when finishing the head to allow for secure attachment to the wooden ring

This sweet rattle bunny pattern creates the perfect first toy for baby's tiny hands to explore and love. The natural wooden ring provides gentle teething relief while the soft crocheted bunny head offers cuddles and comfort. With clear photo instructions and two different techniques for working around the ring, you'll find success no matter your experience level. The embroidered face gives each bunny its own unique personality, making this a truly special handmade gift. 🧢 Happy crocheting! 🐰✨

You ask,

we answer.

FAQs

What size will the finished rattle bunny be?

The finished rattle bunny measures approximately 5-6 inches tall depending on your yarn choice, hook size, and personal tension. The wooden ring adds about 2-3 inches in diameter.

Can I use different yarn weights for this pattern?

Yes, you can substitute yarn as long as you match the original gauge of 26 sc x 25 rows = 4 inches. Adjust your hook size accordingly and ensure your fabric is tight enough to keep stuffing from showing through.

Is this rattle safe for babies?

When made with baby-safe materials like 100% cotton yarn, natural wooden rings, and securely attached parts, this rattle is appropriate for babies. Ensure all embroidered features are securely stitched and regularly check for any loose parts.

Which method should I use for working around the ring?

Option 1 (working directly around the ring in spiral) creates a seamless look but requires more skill. Option 2 (crocheting a rectangle and sewing it around the ring) is easier for beginners. Both methods work beautifully.

How do I keep the fabric from sliding around the wooden ring?

Crochet very tightly around the ring and use a smaller hook size (2mm). If the fabric moves loosely, unravel and restart with one fewer stitch in your foundation chain to ensure a snug fit.

Can I make this without the bow accessory?

Absolutely! The bow is optional and decorative. The rattle bunny looks adorable with or without it. You could also substitute a different embellishment like a small flower or leave it plain.