🧢 Beautiful ✨ Detailed πŸ’ Adorable

Sharkito the Polite Shark Amigurumi Pattern

Sharkito the Polite Shark Amigurumi Pattern
4.5β˜… Rating
2-3 Hours Time Needed
2.0K Made This
βœ‚οΈ

Beginner Friendly Level

Perfect for those just starting their sewing journey, with clear instructions and simple techniques

⏱️

Bite-Sized Project

Complete in under 2 hoursβ€”quick, fun, and perfect for a little creative escape.

🧸

Cute Companion

An adorable friend to cherish, handcrafted with love to bring comfort and joy for years to come.

About This Sharkito the Polite Shark Amigurumi Pattern

Sharkito the Polite Shark Amigurumi Pattern crochet pattern - detailed view of completed project

Available in two sizes depending on your yarn choice, this versatile pattern works beautifully with fine mercerized cotton thread for a miniature version or medium weight acrylic yarn for a larger cuddly companion. The color-switching technique creates seamless transitions between grey and white sections for professional-looking results.

Why You'll Love This Sharkito the Polite Shark Amigurumi Pattern

I absolutely adore this pattern because Sharkito has so much personality packed into such a small package! I love how the simple color switch between grey and white creates that iconic shark belly without any complicated techniques. The adorable embroidered smile and the option to give him a tiny cup of tea for greeting guests never fails to make me smile. I'm always impressed by how quick this project works upβ€”you can finish a cute companion in just a couple of hours, making it perfect for last-minute gifts or whenever you need a creative pick-me-up. What I appreciate most is how beginner-friendly the pattern is while still producing something genuinely charming that looks impressive. The tiny details like the gills and the split tail design add so much character, and watching this friendly shark come to life stitch by stitch brings me so much joy every single time.

Sharkito the Polite Shark Amigurumi Pattern step 1 - construction progress Sharkito the Polite Shark Amigurumi Pattern step 2 - assembly progress Sharkito the Polite Shark Amigurumi Pattern step 3 - details and accessories Sharkito the Polite Shark Amigurumi Pattern step 4 - final assembly and finishing

Switch Things Up

I love experimenting with Sharkito by playing with different color combinations beyond the traditional grey and white. Try making a bright blue shark with a white belly for a more vibrant ocean vibe, or go completely whimsical with pastel pink and white for an adorable kawaii version. I've even created rainbow sharks by changing colors every few rounds on the body, which creates a magical effect that kids absolutely adore.

The tea cup accessory opens up so many creative possibilities too! Instead of green tea, I sometimes make hot chocolate by using brown yarn, or create a pink strawberry milk version that's incredibly cute. You could even make tiny coffee cups or juice boxes for seasonal variations. During holidays, I've made Sharkito holding pumpkin spice lattes in orange or peppermint hot chocolate with red and white striped cups.

For different occasions, I customize the facial expressions by adjusting the embroidered mouth. A wider smile creates an excited Sharkito, while a small curved line makes a shy, gentle version. Adding rosy cheeks with pink embroidery floss or fabric paint gives extra personality. I've also experimented with creating baby sharks by using even finer thread and smaller hooks, making an entire shark family in graduating sizes that look adorable displayed together on a shelf or as mobile decorations for a nursery.

Common Mistakes & How to Fix Them

βœ— Forgetting to use a smaller hook than recommended for your yarn results in visible gaps that show stuffing through the fabric βœ— Not inserting safety eyes at the correct position between rounds six and seven causes the face proportions to look unbalanced and off-center βœ— Switching colors too loosely creates visible gaps and messy transitions between the grey body and white belly sections throughout the pattern βœ— Skipping the step to pin parts before sewing leads to crooked fins and misaligned tail placement that's difficult to correct afterward βœ— Overstuffing the body makes the color transitions pull and distort while understuffing creates a floppy shark that won't stand properly

Sharkito the Polite Shark Amigurumi Pattern

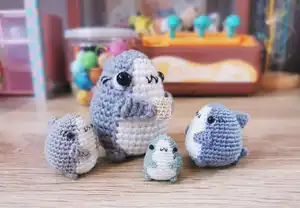
Meet Sharkito, the most polite shark you'll ever crochet! This adorable amigurumi pattern creates a charming little shark complete with a sweet smile and optional cup of green tea for greeting guests. Work this pattern in continuous rounds to craft either a tiny Mini Sharkito at 3.5cm tall or a larger Sharkito Mama at 7cm tall. The color-coded design features a distinctive white belly that contrasts beautifully with grey body sections, while cute fins, feet, and an expressive face bring this friendly ocean dweller to life. Perfect for shark lovers and anyone who appreciates whimsical handmade creatures with personality and manners!

Beginner Friendly 2-3 Hours

Materials Needed for Sharkito the Polite Shark Amigurumi Pattern

β€” Main Fabric

  • 01
    Monaco Mercerized Cotton Thread for Mini Sharkito version
  • 02
    4-ply Medium Worsted Weight Acrylic Yarn for Sharkito Mama version
  • 03
    Grey yarn or thread for body, fins, feet, dorsal fin, and tail
  • 04
    White yarn or thread for belly section
  • 05
    Green yarn or thread for optional tea accessory
  • 06
    Ecru or tan yarn or thread for optional tea cup

β€” Tools Required

  • 01
    1.10mm crochet hook for Mini Sharkito version
  • 02
    2.25mm crochet hook for Sharkito Mama version
  • 03
    Safety eyes 3mm for Mini Sharkito
  • 04
    Safety eyes 8mm for Sharkito Mama
  • 05
    Stitch markers
  • 06
    Tapestry or sewing needle
  • 07
    Embroidery or sewing thread in black
  • 08
    White felt for eye details (optional)
  • 09
    Toy stuffing or polyfill
  • 10
    Scissors
  • 11
    Glue
  • 12
    Pins for assembly

Progress Tracker

0% Complete

β€” Head/Body :

Note :

The highlighted parts represent where you switch to white

Round 1 :

6sc in MR (6)

Round 2 :

inc x6 (12)

Round 3 :

(inc, 2sc) x2, inc, 2sc, inc, 2sc (16)

Round 4 :

(inc, 3sc) x2, sc, sc in same st, 3sc, sc in same st, 4sc (20)

Round 5 :

3sc, inc, 4sc, inc, 2sc, 2sc, inc, 2sc, sc, inc, 2sc (24)

Info :

Insert the eyes between rounds 6 & 7 around 2 stitches from the white belly

Round 6 :

sc, (inc, 5sc) x2, sc, sc in same st, 4sc, sc in same st, 6sc (28)

Round 7 :

16sc, 5sc, 7sc (28)

Round 8 :

2sc, (inc, 6sc) x2, inc, 4sc, inc, 6sc (32)

Round 9 :

2sc, (inc, 7sc) x2, sc, sc in same st, 5sc, sc in same st, 8sc (36)

Round 10 :

21sc, 6sc, 9sc (36)

Round 11 :

inc, 12sc, inc, 7sc, 9sc, 6sc (38)

Round 12 :

8sc, inc, 9sc, inc, 4sc, 5sc, inc, 4sc, inc, 4sc (42)

Round 13 :

25sc, 7sc, 10sc (42)

Round 14 :

inc, 19sc, inc, 4sc, 7sc, 10sc (44)

Round 15 :

27sc, 7sc, 10sc (44)

Round 16 :

dec, 19sc, dec, 4sc, 10sc, 7sc (42)

Round 17 :

(dec, 5sc) x3, dec, 2sc, dec, 5sc, 3sc, dec, 5sc (36)

Round 18 :

(dec, 4sc) x6 (30)

Round 19 :

(dec, 3sc) x6 (24)

Round 20 :

(dec, 2sc) x6 (18)

Info :

Stuff amigurumi well

Round 21 :

(dec, sc) x6 (12)

Round 22 :

(dec) x6 (6)

Info :

Finish off and sew close. Cut off white yarn

β€” Fins :

Info :

Make 2 in grey. Leave long tail before you start your chain

Instructions :

Ch 7, sk 2nd ch from hook, hdc, dc, dc, tc, tc

Info :

Cut thread leave long tail for sewing

β€” Feet :

Info :

Make 2 in grey

Round 1 :

8sc in MR (8)

Info :

Cut thread leave long tail for sewing

β€” Dorsal Fin :

Info :

Make in grey

Round 1 :

4sc in MR (4)

Round 2 :

(inc, sc) x2 (6)

Round 3 :

(inc, 2sc) x2 (8)

Round 4 :

(inc, 3sc) x2 (10)

Round 5 :

(inc, 4sc) x2 (12)

Info :

Cut thread leave long tail for sewing. The belly may look rough around the edges but don't worry because they will be covered by the fins

β€” Tail :

Info :

Make in grey

1st Piece Round 1 :

ch2, 4sc in 2nd ch from hook (4)

1st Piece Round 2 :

(inc, sc) x2 (6)

Info :

Cut thread and fasten off, then start on the 2nd piece

2nd Piece Round 1 :

ch2, 4sc in 2nd ch from hook (4)

Info :

You will now have 2 pieces of the tail. Join the 2nd piece that's on the hook to the 1st piece we made by crocheting the next round with the combined pieces

Joined Round :

(inc, 2sc) x2 to the 1st piece, (inc, sc) x2 to the 2nd piece (14)

Info :

Cut thread and leave long tail for sewing. Do not stuff tail. Watch video demo for joining the tail

β€” Bonus Cup of Green Tea :

Info :

Sharkito Mama always holds a cup of green tea in case she needs to greet guests. You can add this accessory using crochet thread and 1.10mm hook or smaller yarn than what you used to make Sharkito Mama. Start in ecru or tan yarn

Round 1 :

6sc in MR (6)

Round 2 :

inc x6 (12)

Round 3 :

BLO sc around (12)

Rounds 4-6 :

sc around for 3 rounds (12)

Info :

Stuff cup with polyfill

Round 5 :

s2green BLO sc around (12)

Round 6 :

dec x6 (6)

Info :

Cut green yarn and sew hole shut, insert needle through the center of the tea and exit through the center MR on the other side. Pull down yarn tail hard. With the yarn used for the cup, cut long tail to sew on to the belly later

Assembly Instructions

  • Pin all parts before sewing to ensure you're happy with the placement and alignment of each component.
  • Sew the fins slightly slanted facing the belly, laying flat on Rounds 9-11. If adding the tea cup accessory, sew the cup to the belly first, then attach the fins to the cup to let Sharkito hold it.
  • Pin the dorsal fin at the back of the shark's body between rounds 5 and 9, then sew it in place straight and centered.
  • Attach the tail at the back of the base of the body where it starts to curve, with the larger tail fin positioned above the lower tail fin.
  • Sew the feet on the junction of the shark's belly where the grey and white yarns switch on Round 17.
  • Embroider a curved smile mouth on the white belly part on Round 6, positioned in line with the eyes with 2 white stitches on either side.
  • With black embroidery thread, create the gills beside the eyes on round 7 by making 2 slanting lines on each side. Optionally embroider white eye details with white yarn or felt.

Important Notes

  • πŸ’‘Use a slightly smaller crochet hook than the suggested size for your yarn and crochet tightly so color switches look more seamless
  • πŸ’‘This pattern is worked in continuous rounds, so use stitch markers to keep track of the beginning of each round
  • πŸ’‘Insert safety eyes between rounds 6 and 7, approximately 2 stitches away from the white belly section for proper facial proportions
  • πŸ’‘The belly edges may look rough around the white-to-grey transition, but the fins will cover these areas once attached
  • πŸ’‘Do not stuff the tail piece as it needs to remain flat for proper shape and movement
  • πŸ’‘Pin all parts in place before final sewing to check positioning and ensure you're satisfied with the overall look
  • πŸ’‘The pattern can be made in two sizes: Mini Sharkito at 3.5cm using fine thread, or Sharkito Mama at 7cm using acrylic yarn

Sharkito the Polite Shark was designed to show that even ocean predators can have impeccable manners! This charming pattern combines beginner-friendly techniques with color-coded instructions to create an endearing character that's perfect for shark enthusiasts of all ages. The optional green tea cup accessory adds a delightful touch of whimsy and personality that makes Sharkito truly special. Whether you make the tiny mini version or the larger mama shark, this quick project brings smiles and proves that friendly sharks are the best kind of companions. 🦈 Happy crocheting and stay polite! πŸ’™βœ¨

You ask,

we answer.

FAQs

What's the difference between Mini Sharkito and Sharkito Mama?

The main difference is the materials and resulting size. Mini Sharkito uses Monaco Mercerized Cotton Thread with a 1.10mm hook and 3mm safety eyes, resulting in a tiny 3.5cm tall shark. Sharkito Mama uses 4-ply medium worsted weight acrylic yarn with a 2.25mm hook and 8mm safety eyes, creating a larger 7cm tall version. Both follow the same pattern instructions, just scaled to different yarn weights.

How do I make the color switches between grey and white look seamless?

The pattern recommends using a slightly smaller crochet hook than suggested for your yarn weight and crocheting tightly. This helps minimize gaps at color transitions. When switching colors, carry the unused color inside your work and crochet over it for a few stitches. The key is maintaining consistent tight tension throughout, especially during color changes. The pattern notes that any rough edges around the belly will be covered by the fins, so small imperfections won't be visible in the finished piece.

Is the green tea cup accessory difficult to make?

Not at all! The tea cup is actually quite simple and uses the same basic stitches as the main shark body. You work in rounds starting with a magic ring, then switch to green yarn for the tea portion. The clever technique of pulling the yarn tail through the center creates the illusion of tea filling the cup. Use thread and a 1.10mm hook for Mini Sharkito or yarn smaller than what you used for Sharkito Mama to keep the accessory properly scaled.

How do I join the two pieces of the tail together?

The pattern includes a helpful video demonstration for this step. You'll crochet two separate tail fin pieces, then join them by crocheting them together in one combined round. Keep the second piece on your hook after completing it, then work stitches that connect both pieces following the pattern instructions. This creates the distinctive split shark tail. Remember not to stuff the tail so it remains flat and moves naturally.

Can I make Sharkito in different colors besides grey and white?

Absolutely! While the classic grey and white combination creates that iconic shark look, you can customize Sharkito with any color combination you like. Consider making a blue shark, pink shark for a whimsical twist, or even rainbow colors for a fantasy version. Just maintain the contrast between the body and belly colors so the distinctive belly section remains visible. The pattern structure works beautifully with any color palette you choose.