🧢 Beautiful ✨ Detailed πŸ’ Adorable

Snow Globe Crochet Pattern

Snow Globe Crochet Pattern
4.3β˜… Rating
5-7 Hours Time Needed
3.2K Made This
βœ‚οΈ

Intermediate Level

Ideal for those with basic knitting experience, featuring slightly more advanced stitches and techniques to expand your skills.

⏱️

Weekend Treat

Takes 5-7 hours, making it an enjoyable project to finish over a couple of days.

πŸŽ„

Holiday Cheer

Festive fun for the season, bringing handmade magic to celebrations and creating new family traditions.

About This Snow Globe Crochet Pattern

Snow Globe Crochet Pattern crochet pattern - detailed view of completed project

The finished snow globe stands approximately 5 inches tall and makes a perfect addition to your holiday decor or a thoughtful gift for loved ones. The sturdy construction includes a cardboard base and weighted stuffing material to ensure your snow globe sits beautifully on any surface.

Why You'll Love This Snow Globe Crochet Pattern

I absolutely love this pattern because it combines practical crochet skills with creative freedom. The tapestry crochet technique might seem challenging at first, but once you get the hang of carrying colors, you'll find it incredibly rewarding to watch the snowy scene emerge row by row. What I find most delightful is the embellishment stage where you get to choose your own winter buttons and arrange them however you like. Each snow globe becomes a personal expression of your style and creativity. The finished piece is sturdy enough to display year after year, becoming a cherished part of your holiday traditions. Plus, the satisfaction of creating something so charming and detailed makes every stitch worthwhile.

Snow Globe Crochet Pattern step 1 - construction progress Snow Globe Crochet Pattern step 2 - assembly progress Snow Globe Crochet Pattern step 3 - details and accessories Snow Globe Crochet Pattern step 4 - final assembly and finishing

Switch Things Up

I love experimenting with this snow globe pattern because there are so many ways to make it uniquely yours. While the original uses a classic light blue and white color scheme, I've tried creating versions in different color combinations like pink and silver for a more whimsical look, or traditional red and green for a Christmas theme. You could even make a purple and white version for a magical twilight effect.

The button embellishments offer endless creative possibilities too. I've used miniature reindeer, gingerbread men, and candy cane buttons for a full holiday scene, or kept it simple with just snowflakes for an elegant winter aesthetic. Some crafters even add tiny LED tea lights inside before closing up the base for a gentle glow.

For a completely different approach, try using sparkly or metallic yarn to give your snow globe a glamorous shimmer. I've also experimented with adding small jingle bells to the weighted stuffing for a gentle sound when the globe is moved. Another fun variation is creating themed versions like a Halloween snow globe with orange and black colors and spooky buttons, or a spring version with pastels and flower buttons.

Common Mistakes & How to Fix Them

βœ— Not using stitch markers consistently can lead to losing your place in the continuous rounds, especially during color changes in tapestry crochet. βœ— Stuffing the globe too loosely results in a floppy shape instead of a nice spherical form, so make sure to stuff firmly for the best appearance. βœ— Forgetting to carry the unused color properly in tapestry crochet creates messy color transitions and visible yarn strands on the inside of your work. βœ— Skipping the cardboard insert in the bottom makes the snow globe unstable and causes it to tip over easily instead of sitting flat.

Snow Globe Crochet Pattern

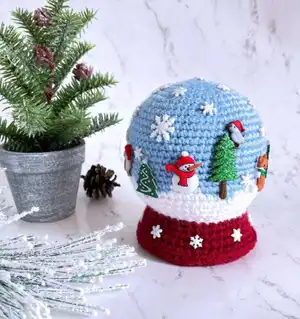
Create your own enchanting winter wonderland with this charming crochet snow globe pattern. Standing at about 5 inches tall, this festive decoration combines tapestry crochet techniques with adorable winter-themed embellishments to capture the magic of the season. Perfect for holiday decor or as a heartfelt handmade gift, this project lets you design your own miniature winter scene with customizable buttons and decorations. The pattern uses simple materials and includes detailed instructions to guide you through creating both the globe and its sturdy base, resulting in a delightful keepsake that brings cozy winter vibes to any space.

Intermediate 5-7 Hours

Materials Needed for Snow Globe Crochet Pattern

β€” Main Fabric

  • 01
    Red Heart Super Saver medium weight #4 yarn in light blue (Color A)
  • 02
    Red Heart Super Saver medium weight #4 yarn in white (Color B)
  • 03
    Red Heart Super Saver medium weight #4 yarn in burgundy (Color C)

β€” Tools Required

  • 01
    Crochet hook E/4 (3.5 mm)
  • 02
    Stitch marker
  • 03
    Large sewing needle
  • 04
    Poly-fil stuffing
  • 05
    Piece of cardboard
  • 06
    Scissors
  • 07
    Hot glue gun
  • 08
    Weighted stuffing material (Poly Pellets weighted stuffing beads)
  • 09
    Winter-themed buttons of your choice (flat back preferred)
  • 10
    Craft cutter (to remove button shanks if needed)
  • 11
    Compass (optional, for cutting cardboard circle)

Progress Tracker

0% Complete

β€” Snow Globe :

Round 1 :

With Color A, make magic ring; Ch 1, 6 SC in magic ring (6)

Round 2 :

2 SC in each St around (12)

Round 3 :

[2 SC in first St, SC in next St] 6 times (18)

Round 4 :

SC in first St, [2 SC in next St, SC in each of next 2 Sts] 5 times, 2 SC in next St, SC in next St (24)

Round 5 :

[2 SC in first St, SC in each of next 3 Sts] 6 times (30)

Round 6 :

SC in first St and in next St, [2 SC in next St, SC in each of next 4 Sts] 5 times, 2 SC in next St, SC in each of next 2 Sts (36)

Round 7 :

[2 SC in first St, SC in each of next 5 Sts] 6 times (42)

Round 8 :

SC in first St and in each of next 2 Sts, [2 SC in next St, SC in each of next 6 Sts] 5 times, 2 SC in next St, SC in each of next 3 Sts (48)

Round 9 :

[2 SC in first St, SC in each of next 7 Sts] 6 times (54)

Round 10 :

SC in first St and in each of next 3 Sts, [2 SC in next St, SC in each of next 8 Sts] 5 times, 2 SC in next St, SC in each of next 4 Sts (60)

Round 11-19 :

SC in each St around (60)

Round 20 :

A:(SC - 4), B:(SC - 4), A:(SC - 9), B:(SC - 4), A:(SC - 7), B:(SC - 5), A:(SC - 7), B:(SC - 4), A:(SC - 7), B:(SC - 6), A:(SC - 3) (60)

Round 21 :

A:(SC - 3), B:(SC - 20), A:(SC - 3), B:(SC - 9), A:(SC - 3), B:(SC - 9), A:(SC - 2), B:(SC - 11). Fasten off Color A (60)

Info :

Continue with Color B

Round 22 :

[SC in each of next 8 Sts, INV DEC] 6 times (54)

Round 23 :

SC in each of next 3 Sts, INV DEC, [SC in each of next 7 Sts, INV DEC] 5 times, SC in each of next 4 Sts (48)

Round 24 :

[SC in each of next 6 Sts, INV DEC] 6 times (42)

Round 25 :

SC in each of next 2 Sts, INV DEC, [SC in each of next 5 Sts, INV DEC] 5 times, SC in each of next 3 Sts (36)

Round 26 :

Sl St in each St around. Fasten off Color B (36)

β€” Base :

Info :

Continue working on base. Join Color C to BL of first St of previous round

Round 1 :

Ch 1, BLO: SC in same St and in each of next 7 Sts, 2 SC in next St, [SC in each of next 8 Sts, 2 SC in next] 3 times (40)

Round 2 :

SC in each St around (40)

Round 3 :

[SC in each of next 9 Sts, 2 SC in next St] 4 times (44)

Round 4 :

SC in each St around (44)

Round 5 :

[SC in each of next 10 Sts, 2 SC in next St] 4 times (48)

Round 6 :

SC in next St, Sl St in each of next 2 Sts. Fasten off

β€” Bottom :

Round 1 :

With Color C, make magic ring; Ch 1, 6 SC in magic ring (6)

Round 2 :

2 SC in each St around (12)

Round 3 :

[2 SC in first St, SC in next St] 6 times (18)

Round 4 :

SC in first, [2 SC in next St, SC in each of next 2 Sts] 5 times, 2 SC in next St, SC in next St (24)

Round 5 :

[2 SC in first St, SC in each of next 3 Sts] 6 times (30)

Round 6 :

SC in first St and in next St, [2 SC in next St, SC in each of next 4 Sts] 5 times, 2 SC in next St, SC in each of next 2 Sts (36)

Round 7 :

[2 SC in first St, SC in each of next 5 Sts] 6 times (42)

Round 8 :

SC in first St and in each of next 2 Sts, [2 SC in next St, SC in each of next 6 Sts] 5 times, 2 SC in next St, SC in each of next 3 Sts (48). Leave long tail for sewing bottom to the base

Assembly Instructions

  • Stuff your snow globe and the base, leaving some space at the bottom. Make sure the globe has a nice spherical shape by stuffing it firmly but not too tightly.
  • Cut out a circular piece of cardboard that is slightly smaller than the diameter of the bottom piece using scissors or a compass for precision.
  • Using a sewing needle and the saved long tail from the bottom piece, start sewing the bottom to the base, remembering to insert the cardboard circle inside.
  • Sew about three-quarters of the diameter, then add more stuffing as necessary to ensure the globe maintains its shape.
  • Add weighted stuffing material (Poly Pellets) to the base for stability before finishing the sewing.
  • Complete sewing the bottom to the base, securing all stitches firmly.
  • If your winter-themed buttons have shanks, use a craft cutter to carefully remove them so the buttons will sit flat against the globe surface.
  • Using a hot glue gun, attach the winter-themed buttons to the snow globe in any pattern you like, creating your own unique winter scene.

Important Notes

  • πŸ’‘Use stitch markers to mark the first stitch of each round, especially important since this pattern is worked in continuous rounds
  • πŸ’‘The pattern uses tapestry crochet technique, so remember to carry the unused color by laying it on top of the previous row and working over it
  • πŸ’‘When changing colors, work the final stitch with the first color but don't complete it, leaving 2 loops on hook, then draw through with new color
  • πŸ’‘Make sure to stuff the snow globe well to achieve a nice spherical shape before beginning assembly
  • πŸ’‘The cardboard insert is essential for stability, so don't skip this step when assembling the bottom
  • πŸ’‘Use flat back buttons for easier application, or be prepared to remove shanks from shank-style buttons with a craft cutter
  • πŸ’‘Hot glue works best for attaching buttons, but be careful to apply it precisely to avoid messy glue marks on your finished piece

This charming snow globe pattern brings the magic of winter right into your home with a handcrafted touch that store-bought decorations simply can't match. The combination of tapestry crochet color work and personalized button embellishments makes each globe a one-of-a-kind treasure. Whether you're creating festive decor for your own space or crafting heartfelt gifts for friends and family, this project captures the cozy spirit of the season in every stitch. The sturdy construction ensures your snow globe will become a beloved part of your holiday traditions for years to come. Happy crocheting and enjoy creating your own winter wonderland! πŸ§Άβ„οΈβœ¨

You ask,

we answer.

FAQs

What is tapestry crochet and is it difficult to learn?

Tapestry crochet is a technique where you work over the unused color yarn, carrying it along inside your stitches. While it requires practice, it's not overly difficult once you understand the basic principle of laying the unused yarn on top of the previous row and crocheting over it. This pattern is perfect for practicing this skill.

Can I use different yarn weights for this pattern?

While the pattern is designed for medium weight #4 yarn, you can experiment with different weights, but keep in mind that your finished snow globe will be a different size. If using a different weight, adjust your hook size accordingly and expect the final dimensions to vary from the stated 5 inches.

Where can I find winter-themed buttons for embellishment?

Winter-themed buttons can be found at most craft stores, online retailers like Etsy or Amazon, or fabric stores. Look for snowflakes, trees, snowmen, or other seasonal designs. Flat-back buttons work best, but shank buttons can be used if you remove the shanks with a craft cutter.

Why do I need weighted stuffing material?

The weighted stuffing material (like Poly Pellets) helps your snow globe sit stable and upright without tipping over. It adds heft to the base, making the finished piece more durable and display-worthy. Regular poly-fil alone won't provide enough stability.

Can I make the snow globe larger or smaller?

Yes, you can adjust the size by adding or removing increase rounds in the globe section. Just remember to adjust the base and bottom pieces proportionally, and you may need more or fewer buttons for embellishment depending on your final size.