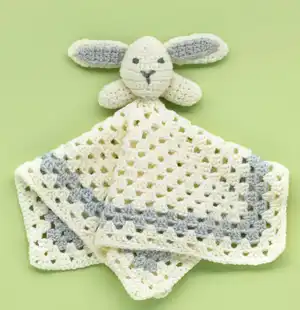
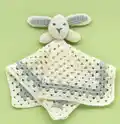
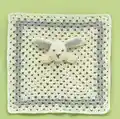
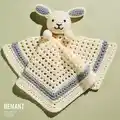
Create this adorable Snuggle Bunny lovey blanket, perfect for comforting little ones with its soft texture and sweet bunny companion. This charming pattern combines a beautifully crocheted square blanket with an attached bunny head, floppy ears, and little arms that babies will love to cuddle. The gentle color combination of cream and grey creates a timeless, gender-neutral design that makes a thoughtful handmade gift for baby showers or newborns.
Progress Tracker
0% Complete
— Main Section :
Info :
Make 4 ch using 4mm hook and Color A, join with ss to form a ring
Round 1 (rs) :
3 ch (counts as first st), 2 tr (dc) into ring, (2 ch, 3 tr (dc) into ring) 3 times, 1 ch, 1 dc (sc) into top of 3 ch at beg of round
Round 2 :
3 ch (counts as first st), 2 tr (dc) into ch sp partly formed by dc (sc) at end of previous round, *1 ch, miss 3 tr (dc), (3 tr (dc), 2 ch and 3 tr (dc)) into next ch sp, rep from * twice more, 1 ch, 3 tr (dc) into same ch sp as used at beg of round, 1 ch, 1 dc (sc) into top of 3 ch at beg of round
Round 3 :
3 ch (counts as first st), 2 tr (dc) into ch sp partly formed by dc (sc) at end of previous round, *1 ch, miss 3 tr (dc), 3 tr (dc) into next ch sp, 1 ch, miss 3 tr (dc)**, (3 tr (dc), 2 ch and 3 tr (dc)) into next ch sp, rep from * to end, ending last rep at **, 3 tr (dc) into same ch sp as used at beg of round, 1 ch, 1 dc (sc) into top of 3 ch at beg of round
Round 4 :
3 ch (counts as first st), 2 tr (dc) into ch sp partly formed by dc (sc) at end of previous round, *(1 ch, miss 3 tr (dc), 3 tr (dc) into next ch sp) twice, 1 ch, miss 3 tr (dc)**, (3 tr (dc), 2 ch and 3 tr (dc)) into next ch sp, rep from * to end, ending last rep at **, 3 tr (dc) into same ch sp as used at beg of round, 1 ch, 1 dc (sc) into top of 3 ch at beg of round
Round 5 :
3 ch (counts as first st), 2 tr (dc) into ch sp partly formed by dc (sc) at end of previous round, *(1 ch, miss 3 tr (dc), 3 tr (dc) into next ch sp) 3 times, 1 ch, miss 3 tr (dc)**, (3 tr (dc), 2 ch and 3 tr (dc)) into next ch sp, rep from * to end, ending last rep at **, 3 tr (dc) into same ch sp as used at beg of round, 1 ch, 1 dc (sc) into top of 3 ch at beg of round
Round 6 :
3 ch (counts as first st), 2 tr (dc) into ch sp partly formed by dc (sc) at end of previous round, *(1 ch, miss 3 tr (dc), 3 tr (dc) into next ch sp) 4 times, 1 ch, miss 3 tr (dc)**, (3 tr (dc), 2 ch and 3 tr (dc)) into next ch sp, rep from * to end, ending last rep at **, 3 tr (dc) into same ch sp as used at beg of round, 1 ch, 1 dc (sc) into top of 3 ch at beg of round
Round 7 :
3 ch (counts as first st), 2 tr (dc) into ch sp partly formed by dc (sc) at end of previous round, *(1 ch, miss 3 tr (dc), 3 tr (dc) into next ch sp) 5 times, 1 ch, miss 3 tr (dc)**, (3 tr (dc), 2 ch and 3 tr (dc)) into next ch sp, rep from * to end, ending last rep at **, 3 tr (dc) into same ch sp as used at beg of round, 1 ch, 1 dc (sc) into top of 3 ch at beg of round
Round 8 :
3 ch (counts as first st), 2 tr (dc) into ch sp partly formed by dc (sc) at end of previous round, *(1 ch, miss 3 tr (dc), 3 tr (dc) into next ch sp) 6 times, 1 ch, miss 3 tr (dc)**, (3 tr (dc), 2 ch and 3 tr (dc)) into next ch sp, rep from * to end, ending last rep at **, 3 tr (dc) into same ch sp as used at beg of round, 1 ch, 1 dc (sc) into top of 3 ch at beg of round
Round 9 :
3 ch (counts as first st), 2 tr (dc) into ch sp partly formed by dc (sc) at end of previous round, *(1 ch, miss 3 tr (dc), 3 tr (dc) into next ch sp) 7 times, 1 ch, miss 3 tr (dc)**, (3 tr (dc), 2 ch and 3 tr (dc)) into next ch sp, rep from * to end, ending last rep at **, 3 tr (dc) into same ch sp as used at beg of round, 1 ch, 1 dc (sc) into top of 3 ch at beg of round
Round 10 :
3 ch (counts as first st), 2 tr (dc) into ch sp partly formed by dc (sc) at end of previous round, *(1 ch, miss 3 tr (dc), 3 tr (dc) into next ch sp) 8 times, 1 ch, miss 3 tr (dc)**, (3 tr (dc), 2 ch and 3 tr (dc)) into next ch sp, rep from * to end, ending last rep at **, 3 tr (dc) into same ch sp as used at beg of round, 1 ch, 1 dc (sc) into top of 3 ch at beg of round
Round 11 :
3 ch (counts as first st), 2 tr (dc) into ch sp partly formed by dc (sc) at end of previous round, *(1 ch, miss 3 tr (dc), 3 tr (dc) into next ch sp) 9 times, 1 ch, miss 3 tr (dc)**, (3 tr (dc), 2 ch and 3 tr (dc)) into next ch sp, rep from * to end, ending last rep at **, 3 tr (dc) into same ch sp as used at beg of round, 1 ch, 1 dc (sc) into top of 3 ch at beg of round
Info :
Break off A and join in B
Round 12 :
3 ch (counts as first st), 2 tr (dc) into ch sp partly formed by dc (sc) at end of previous round, *(1 ch, miss 3 tr (dc), 3 tr (dc) into next ch sp) 10 times, 1 ch, miss 3 tr (dc)**, (3 tr (dc), 2 ch and 3 tr (dc)) into next ch sp, rep from * to end, ending last rep at **, 3 tr (dc) into same ch sp as used at beg of round, 1 ch, 1 dc (sc) into top of 3 ch at beg of round
Round 13 :
3 ch (counts as first st), 2 tr (dc) into ch sp partly formed by dc (sc) at end of previous round, *(1 ch, miss 3 tr (dc), 3 tr (dc) into next ch sp) 11 times, 1 ch, miss 3 tr (dc)**, (3 tr (dc), 2 ch and 3 tr (dc)) into next ch sp, rep from * to end, ending last rep at **, 3 tr (dc) into same ch sp as used at beg of round, 1 ch, 1 dc (sc) into top of 3 ch at beg of round
Info :
Break off B and join in A
Round 14 :
3 ch (counts as first st), 2 tr (dc) into ch sp partly formed by dc (sc) at end of previous round, *(1 ch, miss 3 tr (dc), 3 tr (dc) into next ch sp) 12 times, 1 ch, miss 3 tr (dc)**, (3 tr (dc), 2 ch and 3 tr (dc)) into next ch sp, rep from * to end, ending last rep at **, 3 tr (dc) into same ch sp as used at beg of round, 1 ch, 1 dc (sc) into top of 3 ch at beg of round
Round 15 :
3 ch (counts as first st), 2 tr (dc) into ch sp partly formed by dc (sc) at end of previous round, *(1 ch, miss 3 tr (dc), 3 tr (dc) into next ch sp) 13 times, 1 ch, miss 3 tr (dc)**, (3 tr (dc), 2 ch and 3 tr (dc)) into next ch sp, rep from * to end, ending last rep at **, 3 tr (dc) into same ch sp as used at beg of round, 2 ch, ss to top of 3 ch at beg of round
Round 16 :
1 ch (does NOT count as st), 1 dc (sc) into st at base of 1 ch, 1 dc (sc) into each of next 2 tr, *(1 dc (sc) into next ch sp, 1 dc (sc) into each of next 3 tr) 14 times, 3 dc (sc) into next ch sp**, 1 dc (sc) into each of next 3 tr, rep from * to end, ending last rep at **, ss to first dc (sc)
— Head :
Info :
Make 2 ch using 3mm hook and Color A
Round 1 (rs) :
6 dc (sc) into 2nd ch from hook, ss to first dc (sc), turn (6 sts)
Round 2 :
1 ch (does NOT count as st), 2 dc (sc) into st at base of 1 ch, 2 dc (sc) into each of next 5 dc (sc), ss to first dc (sc), turn (12 sts)
Round 3 :
1 ch (does NOT count as st), (1 dc (sc) into next dc (sc), 2 dc (sc) into next dc (sc)) 3 times, (2 dc (sc) into next dc (sc), 1 dc (sc) into next dc (sc)) 3 times, ss to first dc (sc), turn (18 sts)
Round 4 :
1 ch (does NOT count as st), 1 dc (sc) into each of first 8 sts, 2 dc (sc) into each of next 2 sts, 1 dc (sc) into each of last 8 sts, ss to first dc (sc), turn (20 sts)
Round 5 :
1 ch (does NOT count as st), (1 dc (sc) into each of next 2 dc (sc), 2 dc (sc) into next dc (sc)) twice, 1 dc (sc) into each of next 3 dc (sc), 2 dc (sc) into each of next 2 dc (sc), 1 dc (sc) into each of next 3 dc (sc), (2 dc (sc) into next dc (sc), 1 dc (sc) into each of next 2 dc (sc)) twice, ss to first dc (sc), turn (26 sts)
Round 6 :
1 ch (does NOT count as st), 1 dc (sc) into each st to end, ss to first dc (sc), turn
Round 7 :
1 ch (does NOT count as st), (1 dc (sc) into each of next 3 dc (sc), 2 dc (sc) into next dc (sc)) twice, 1 dc (sc) into each of next 4 dc (sc), 2 dc (sc) into each of next 2 dc (sc), 1 dc (sc) into each of next 4 dc (sc), (2 dc (sc) into next dc (sc), 1 dc (sc) into each of next 3 dc (sc)) twice, ss to first dc (sc), turn (32 sts)
Round 9 :
1 ch (does NOT count as st), 1 dc (sc) into each of first 15 dc (sc), 2 dc (sc) into each of next 2 dc (sc), 1 dc (sc) into each of last 15 dc (sc), ss to first dc (sc), turn (34 sts)
Round 11 :
1 ch (does NOT count as st), (1 dc (sc) into each of next 3 dc (sc), dc2tog (sc2tog) over next 2 dc (sc)) twice, 1 dc (sc) into each of next 14 dc (sc), (dc2tog (sc2tog) over next 2 dc (sc), 1 dc (sc) into each of next 3 dc (sc)) twice, ss to first dc (sc), turn (30 sts)
Round 13 :
1 ch (does NOT count as st), (1 dc (sc) into each of next 2 dc (sc), dc2tog (sc2tog) over next 2 dc (sc)) twice, 1 dc (sc) into each of next 5 dc (sc), (dc2tog (sc2tog) over next 2 dc (sc)) twice, 1 dc (sc) into each of next 5 dc (sc), (dc2tog (sc2tog) over next 2 dc (sc), 1 dc (sc) into each of next 2 dc (sc)) twice, ss to first dc (sc), turn (24 sts)
Round 14 :
1 ch (does NOT count as st), 1 dc (sc) into each of first 10 sts, (dc2tog (sc2tog) over next 2 sts) twice, 1 dc (sc) into each of last 10 sts, ss to first dc (sc), turn (22 sts)
Round 15 :
1 ch (does NOT count as st), (1 dc (sc) into next st, dc2tog (sc2tog) over next 2 sts) 3 times, (dc2tog (sc2tog) over next 2 sts) twice, (dc2tog (sc2tog) over next 2 sts, 1 dc (sc) into next st) 3 times, ss to first dc (sc), turn (14 sts)
Round 16 :
1 ch (does NOT count as st), (dc2tog (sc2tog) over next 2 sts) 7 times, ss to first st (7 sts)
Info :
Fasten off, leaving a fairly long end
— Ears (Make 2) :
Info :
Make 2 ch using 3mm hook and Color A
Round 1 (rs) :
4 dc (sc) into 2nd ch from hook, ss to first dc (sc), turn (4 sts)
Round 2 :
1 ch (does NOT count as st), 2 dc (sc) into st at base of 1 ch, 2 dc (sc) into each of next 3 dc (sc), ss to first dc (sc), turn (8 sts)
Round 3 :
1 ch (does NOT count as st), 1 dc (sc) into st at base of 1 ch, 1 dc (sc) into each dc (sc) to end, ss to first dc (sc), turn
Round 4 :
1 ch (does NOT count as st), 2 dc (sc) into st at base of 1 ch, 1 dc (sc) into each of next 2 dc, 2 dc (sc) into each of next 2 dc (sc), 1 dc (sc) into each of next 2 dc (sc), 2 dc (sc) into last dc (sc), ss to first dc (sc), turn (12 sts)
Rounds 5 to 14 :
As round 3
Round 15 :
1 ch (does NOT count as st), dc2tog (sc2tog) over first 2 sts, 1 dc (sc) into each of next 2 dc (sc), (dc2tog (sc2tog) over next 2 dc (sc)) twice, 1 dc (sc) into each of next 2 dc (sc), dc2tog (sc2tog) over last 2 dc (sc), ss to first st, turn (8 sts)
Info :
Fasten off, leaving a fairly long end
— Ear Patches (Make 2) :
Info :
Make 2 ch using 3mm hook and Color B
Row 1 (rs) :
3 dc (sc) into 2nd ch from hook, turn (3 sts)
Row 2 :
1 ch (does NOT count as st), 1 dc (sc) into each dc (sc) to end, turn
Row 10 :
1 ch (does NOT count as st), dc3tog (sc3tog) over all 3 sts, turn (1 st)
Row 11 :
1 ch (does NOT count as st), 1 dc (sc) into top of dc3tog (sc3tog)
Info :
Fasten off, leaving a fairly long end
— Arms (Make 2) :
Info :
Make 2 ch using 3mm hook and Color A
Round 1 (rs) :
6 dc (sc) into 2nd ch from hook, ss to first dc (sc), turn (6 sts)
Round 2 :
1 ch (does NOT count as st), 2 dc (sc) into st at base of 1 ch, 2 dc (sc) into each of next 5 dc (sc), ss to first dc (sc), turn (12 sts)
Round 3 :
1 ch (does NOT count as st), 1 dc (sc) into st at base of 1 ch, 1 dc (sc) into each of next 11 sts, ss to first dc (sc), turn
Info :
Rep last round 6 times more
Info :
Fasten off, leaving a fairly long end
This sweet Snuggle Bunny lovey pattern creates a timeless comfort object that babies will treasure through their early years. The combination of a soft, open-work blanket with an adorable bunny companion makes this pattern perfect for gift-giving or creating a special heirloom for your own little one. With simple construction techniques and clear instructions, you'll create a beautiful piece that's both practical and precious. 🧶 Happy crocheting! 🐰✨