🧶 Beautiful ✨ Detailed 💝 Adorable

Squirtle Amigurumi Pattern

Squirtle Amigurumi Pattern
4.6★ Rating
3-4 Hours Time Needed
1.6K Made This
✂️

Beginner Friendly Level

Perfect for those just starting their sewing journey, with clear instructions and simple techniques

⏱️

Weekend Treat

Takes 5-7 hours, making it an enjoyable project to finish over a couple of days.

🧸

Cute Companion

An adorable friend to cherish, handcrafted with love to bring comfort and joy for years to come.

About This Squirtle Amigurumi Pattern

Squirtle Amigurumi Pattern crochet pattern - detailed view of completed project

Working in continuous rounds with worsted weight yarn and safety eyes, this pattern creates a sturdy yet soft companion perfect for display or play. The techniques used are fundamental amigurumi skills that will serve you well in countless future projects.

Why You'll Love This Squirtle Amigurumi Pattern

I absolutely adore this Squirtle pattern because it combines nostalgia with the joy of creating something tangible from childhood memories. There's something incredibly satisfying about watching those simple blue rounds transform into a recognizable Pokémon character right in your hands. I love how approachable this pattern is for beginners while still resulting in a polished, professional-looking finished product that makes people say 'wow, you made that?' The separate shell construction is particularly clever, adding wonderful dimension and authenticity to the design. Plus, once you've mastered this little water turtle, you'll have the confidence and skills to tackle an entire Pokédex of crochet characters. It's the perfect starter project that doesn't feel like practice—it feels like magic!

Squirtle Amigurumi Pattern step 1 - construction progress Squirtle Amigurumi Pattern step 2 - assembly progress Squirtle Amigurumi Pattern step 3 - details and accessories Squirtle Amigurumi Pattern step 4 - final assembly and finishing

Switch Things Up

I love experimenting with this Squirtle pattern by creating different expressions and poses to give each one unique personality! Try positioning the safety eyes slightly closer or further apart to change his facial expression from cheerful to surprised. You could also embroider a little smile or open mouth using black yarn for added character detail.

For a shiny Squirtle variant, swap the blue yarn for a gorgeous teal or turquoise shade and watch your creation transform into the rare alternative coloring that Pokémon collectors dream about. Some crafters even add a subtle gradient effect by switching between two shades of blue throughout the body for extra visual interest.

Consider embellishing your Squirtle with additional details like spots on the shell using embroidery, or create texture on the shell sections using surface crochet techniques. I've seen beautiful versions where makers added small ridges to the shell using slip stitches for a more realistic turtle shell appearance. You could even make a whole evolution family by adapting the pattern for Wartortle (add ear-like flaps and a fluffier tail) or Blastoise (increase the body size and add cannon details to the shell). The possibilities for customization are endless, making each Squirtle truly one-of-a-kind!

Common Mistakes & How to Fix Them

✗ Placing safety eyes too close together or at wrong height creates an unbalanced facial expression that looks off ✗ Not stuffing the head firmly enough before closing causes the finished head to become misshapen and floppy over time ✗ Forgetting to switch yarn colors at correct row transitions results in improper color blocking and loses Squirtle's signature appearance ✗ Skipping stitch counts during increase and decrease rounds leads to uneven shaping and lopsided body parts that won't assemble properly

Squirtle Amigurumi Pattern

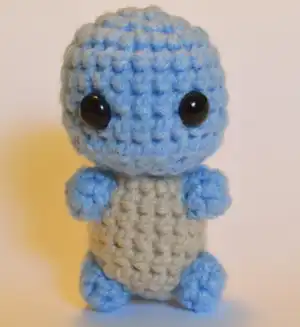
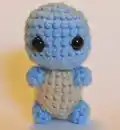
Bring the beloved water-type Pokémon to life with this adorable Squirtle crochet pattern! Perfect for Pokémon fans and amigurumi enthusiasts alike, this charming little turtle features his signature blue body, beige belly, distinctive brown shell with white rim, and curly tail. Whether you're creating a gift for a Pokémon trainer in your life or adding to your own collection of handmade characters, this Squirtle will capture hearts with his sweet expression and huggable size. The pattern breaks down each component step-by-step, making it easy to create your very own pocket monster companion!

Beginner Friendly 3-4 Hours

Materials Needed for Squirtle Amigurumi Pattern

— Main Fabric

  • 01
    Worsted weight yarn in blue for head, body, arms, legs, and tail
  • 02
    Worsted weight yarn in beige for belly section
  • 03
    Worsted weight yarn in light brown for shell base
  • 04
    Worsted weight yarn in white for shell rim detail

— Tools Required

  • 01
    3.5mm crochet hook
  • 02
    Scissors
  • 03
    Tapestry needle for sewing and weaving ends
  • 04
    1 pair of 10mm safety eyes
  • 05
    Polyfil or soft stuffing material
  • 06
    Stitch markers (optional but helpful for tracking rounds)

Progress Tracker

0% Complete

— Head :

Info:

Using the blue yarn

Row 1:

CH 2, SC 8 in first stitch (8 stitches). Alternatively, SC 8 into a magic circle

Row 2:

INC x 8 (16 stitches)

Row 3:

*SC, INC* x 8 (24 stitches)

Row 4-6:

SC x 24 (24 stitches)

Row 7:

*SC x 7*, INC, *SC x 8*, INC, *SC x 7* (26 stitches)

Info:

Place eyes 5 stitches apart, and 6 stitches down from the top of the head, between the two increases

Row 8:

SC x 26 (26 stitches)

Row 9:

*SC x 2*, *DEC x 11*, *SC x 2* (15 stitches)

Info:

Stuff the head as much as possible

Row 10:

SC, *DEC x 6*, *SC x 2* (9 stitches)

Info:

Finish stuffing the head

— Body :

Info:

Cut the blue yarn, leaving a tail, but don't fasten off, and switch to the beige yarn. Stuff any extra yarn into the head

Row 1:

INC x 9 (18 stitches)

Row 2-6:

SC x 18 (18 stitches)

Row 7:

DEC to close, FO

Info:

Stuff the body before you complete the DEC
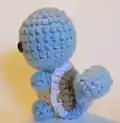
— Shell :

Info:

With light brown

Row 1:

CH 2, SC 7 in first stitch (7 stitches). Alternatively, SC 7 into a magic circle

Row 2:

INC x 7 (14 stitches)

Row 3:

*SC x 3, INC x 4* x 2 (22 stitches)

Info:

Switch to white

Row 4:

SC x 22 (22 stitches)

Info:

FO with SlSt. Sew shell onto body
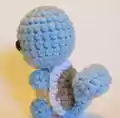
— Arms :

Info:

Make 2 pieces using blue yarn

Row 1:

CH 2, SC 6 into first stitch (6 stitches). Alternatively, make a magic circle and SC 6 into it

Row 2:

SC x 6 (6 stitches)

Info:

FO with SlSt. Sew on arms using the tapestry needle

— Legs :

Info:

Make 2 pieces using blue yarn

Row 1:

CH 2, SC 7 into first stitch (7 stitches). Alternatively, make a magic circle and SC 7 into it

Row 2:

SC x 7 (7 stitches)

Info:

FO with SlSt. Sew on legs using the tapestry needle

— Tail :

Info:

Using blue yarn

Row 1:

CH 2, SC 10 in first stitch (10 stitches). Alternatively, SC 10 into a magic circle

Row 2:

*SC x 2*, INC, *SC x 4*, INC, *SC x 2* (12 stitches)

Row 3-7:

SC x 12 (12 stitches)

Row 8:

*SC x 2*, DEC, *SC x 4*, DEC, *SC x 2* (10 stitches)

Row 9:

SC x 10 (10 stitches)

Row 10:

*SC x 4*, DEC, *SC x 4* (9 stitches)

Row 11:

SC x 9, FO with a SlSt

Info:

Using the same shade of blue yarn, fold over the top (row 1) and sew to fasten, creating the curl. Sew the tail to the base of the shell

Final Step:

Weave in any remaining loose ends, and trim off

Assembly Instructions

  • Position and attach safety eyes between rows 13-14, spacing them 5 stitches apart centered on the head
  • Sew the completed shell onto the back of the beige body section, centering it for balanced appearance
  • Attach both arms to the sides of the body at shoulder height where blue meets beige yarn
  • Sew legs to the bottom of the body, positioning them evenly spaced for stable sitting posture
  • Create the signature tail curl by folding row 1 over and sewing it closed, then attach to base of shell
  • Weave in all loose yarn ends throughout the piece and trim excess for clean professional finish

Important Notes

  • 💡Maintain consistent tension throughout to ensure all body parts are proportional and match in size
  • 💡Count your stitches carefully at the end of each round to avoid shaping errors that compound over rows
  • 💡Stuff the head very firmly before closing to maintain proper round shape and prevent sagging
  • 💡When switching yarn colors, leave tails long enough to weave in securely or use for sewing assembly
  • 💡Position safety eyes before stuffing and closing the head as they cannot be repositioned later
  • 💡Use the pattern photos as reference for proper placement of arms, legs, and tail for authentic Squirtle appearance
  • 💡The magic circle method creates a tighter, more polished center than the chain 2 method if you're comfortable with it

This adorable Squirtle amigurumi pattern brings the iconic Pokémon starter to life in cuddly crochet form! Created with beginner-friendly techniques and clear step-by-step instructions, this pattern results in a charming water-type companion that any Pokémon fan will treasure. The separate construction of the shell, limbs, and tail gives your Squirtle wonderful dimension and personality. Perfect for gifts, collection displays, or introducing someone special to the world of amigurumi! Gotta crochet 'em all! 🐢💙✨

You ask,

we answer.

FAQs

Can I make Squirtle in different sizes?

Absolutely! You can size up by using a larger hook and bulkier yarn, or size down with a smaller hook and finer yarn. Just make sure to adjust your safety eye size accordingly - use larger eyes for bigger Squirtles and smaller eyes for miniature versions.

What if I don't have safety eyes?

You can embroider eyes using black yarn or felt circles instead. This also makes the finished amigurumi safer for young children. Simply mark the eye positions with pins before sewing or embroidering them in place.

Do I need to stuff the arms, legs, and tail?

These small appendages typically don't require stuffing since they're quite small and will hold their shape when sewn to the body. However, you can add very light stuffing to the tail if you want it to be more dimensional and structured.

How do I create the curled effect on the tail?

After completing all rows of the tail, fold the wider end (row 1) over toward the narrower end and sew it in place using matching blue yarn. This creates the signature spiral shape of Squirtle's tail before you attach it to the shell base.

Can I use this pattern to make other Pokémon?

Yes! This basic body structure can be adapted for other turtle-like Pokémon or modified with different colors and features. Once you understand the construction method, you can let your creativity run wild with variations and customizations.