🧢 Beautiful ✨ Detailed πŸ’ Adorable

Toadstool Keychain Amigurumi Pattern

Toadstool Keychain Amigurumi Pattern
4.2β˜… Rating
1-1.5 Hours Time Needed
4.0K Made This
βœ‚οΈ

Beginner Friendly Level

Perfect for those just starting their sewing journey, with clear instructions and simple techniques

⏱️

Bite-Sized Project

Complete in under 2 hoursβ€”quick, fun, and perfect for a little creative escape.

🎁

Tiny Treasure

Small, sweet, and gift-worthy creations that fit perfectly in the palm of your hand with detailed charm.

About This Toadstool Keychain Amigurumi Pattern

This adorable toadstool keychain pattern brings whimsical woodland charm to your everyday accessories. Worked in continuous rounds with simple increases and decreases, it creates a perfectly shaped mushroom with a spotted cap and sturdy white stem. The compact size makes it ideal for keychains, bag charms, or decorative zipper pulls that add personality to any item.

Toadstool Keychain Amigurumi Pattern crochet pattern - detailed view of completed project

Using basic stitches and minimal materials, this quick project is perfect for beginners looking to practice shaping techniques while creating something truly delightful. The pattern includes detailed instructions for both the mushroom cap and stem with professional finishing touches.

Why You'll Love This Toadstool Keychain Amigurumi Pattern

I absolutely love this pattern because it's one of those instant-gratification projects that brings so much joy for such little effort. There's something magical about watching a tiny toadstool take shape in your hands, and the satisfaction of adding those cute white spots to the cap never gets old. I find myself making these in different color combinations whenever I have a spare hour, and they make the most thoughtful little gifts that people genuinely treasure. The portability of this project means you can easily tuck it in your bag and work on it anywhere, making it perfect for those moments when you need a creative escape.

Toadstool Keychain Amigurumi Pattern step 1 - construction progress Toadstool Keychain Amigurumi Pattern step 2 - assembly progress Toadstool Keychain Amigurumi Pattern step 3 - details and accessories Toadstool Keychain Amigurumi Pattern step 4 - final assembly and finishing

Switch Things Up

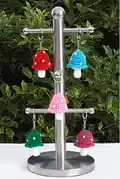
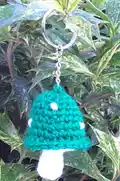
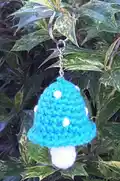
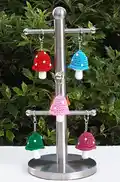
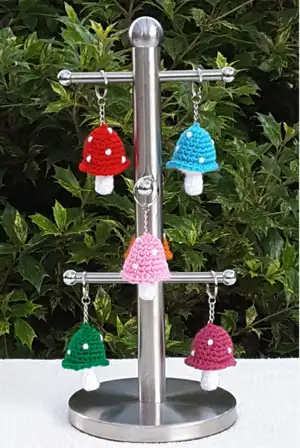
I love experimenting with different color combinations for this toadstool keychain to create unique variations. Instead of the classic red cap with white spots, try making a purple mushroom with pink spots for a fairy-tale vibe, or go bold with a bright turquoise cap and yellow spots for something more modern and playful.

You can also adjust the size by using different yarn weights - try fingering weight yarn with a 2mm hook for an even tinier charm, or chunky yarn with a 5mm hook for a larger bag decoration. Each size brings its own appeal and the pattern scales beautifully.

For added personality, consider embroidering tiny details on the cap or adding a small felt face to the stem. Some crafters love attaching small bells inside the cap for a jingling charm, while others add a loop at the bottom to create ornaments instead of keychains.

If you're making these as gifts, create a whole rainbow collection in different colors and package them together in a small box. They also look adorable attached to gift packages as reusable decorative elements that recipients will treasure long after unwrapping.

Common Mistakes & How to Fix Them

βœ— Overstuffing the cap and stem which causes the stitches to stretch and stuffing to show through the fabric βœ— Forgetting to use stitch markers in continuous rounds leading to misaligned rows and uneven shaping throughout the piece βœ— Not working the base and cap assembly row tight enough causing gaps between the two pieces when joined together βœ— Pulling too tightly when weaving the finishing thread through the cap which distorts the mushroom shape and creates puckering βœ— Skipping the back loop only rows which are essential for creating the distinct ridge between stem and cap βœ— Sewing spots too large or unevenly spaced making the toadstool look messy instead of charming and whimsical

Toadstool Keychain Amigurumi Pattern

Create your own adorable toadstool keychain with this charming crochet pattern. This delightful mini mushroom features a colorful spotted cap and white stem, perfect for adding a whimsical touch to your keys or bag. Quick to work up and ideal for using up yarn scraps, this tiny treasure makes wonderful handmade gifts for friends and family who appreciate cute accessories.

Beginner Friendly 1-1.5 Hours

Materials Needed for Toadstool Keychain Amigurumi Pattern

β€” Main Fabric

  • 01
    Hayfield Bonus White yarn - 2g
  • 02
    Hayfield Bonus Main color yarn - 3g (any color of your choice for the mushroom cap)

β€” Tools Required

  • 01
    3mm crochet hook
  • 02
    Wool needle for sewing
  • 03
    Keychain attachment
  • 04
    Hi-Loft Quality toy stuffing
  • 05
    Stitch markers
  • 06
    Scissors

Progress Tracker

0% Complete

β€” Base :

Info :

Using White

Row 1 :

ch2, hdc 8sts into 2nd st from hook (alternatively hdc 8sts into magic ring) (8) sl st to join

Row 2 :

BLO Row: sc to end (8)

Row 3 :

sc (8)

Row 4 :

(sc into next 2sts, dec) x2 (6)

Row 5 :

sc (6)

Row 6 :

FLO Row: inc x6 (12)

Row 7 :

inc x12 (24)

Info :

F/O leaving a short end. Stuff the stalk section and put to one side.

β€” Cap :

Info :

Using Main

Row 1 :

ch 2, sc 6sts into 2nd st from hook (alternatively sc 6sts into magic ring) (6)

Row 2 :

inc x6 (12)

Row 3 :

(sc into next 3sts, inc) x3 (15)

Row 4 :

sc (15)

Row 5 :

(sc into next 4sts, inc) x3 (18)

Row 6 :

sc (18)

Row 7 :

(sc into next 5sts, inc) x3 (21)

Row 8 :

(sc into next 6sts, inc) x3 (24)

Row 9 :

pick up base and place behind the cap wrong sides together, sl st to join, ch1, working through both layers hdc the 2 pieces together until 5sts remain, stuff the cap just enough to hold it's shape, hdc to end (24) sl st to join

Info :

F/O leaving a 20cm end.

β€” Finishing :

Step 1 :

Weave end through the coloured section of cap, coming out in the starting circle of cap

Step 2 :

Secure end with a couple of small sts being careful not to pull the toadstool out of shape

Step 3 :

Using small back sts attach the keychain securely

Step 4 :

Using white and groups of 3 small back sts, 1 row deep, sew spots to toadstool cap at random

Step 5 :

Weave ends through cap and cut flush

Assembly Instructions

  • Join the base and cap together in Row 9 by placing them wrong sides together and working through both layers with half double crochet stitches
  • Leave 5 stitches unworked before stuffing to allow proper filling of the cap without overstuffing
  • Weave the finishing yarn tail through the colored section of the cap to secure and reinforce the structure
  • Attach the keychain hardware securely using small back stitches to ensure it won't pull loose with regular use
  • Add white spots randomly across the mushroom cap using groups of 3 small back stitches worked 1 row deep for dimensional texture

Important Notes

  • πŸ’‘Work in continuous rounds and use a stitch marker to track the last stitch of each row for accurate counting
  • πŸ’‘Do not overstuff the pieces as you want the stitches to remain tight without showing stuffing through the fabric
  • πŸ’‘Each part should be filled just enough that it can be easily squeezed when pinched firmly for the best final shape
  • πŸ’‘The BLO and FLO rows create important ridges that define the mushroom stem and cap transition so work them carefully
  • πŸ’‘When joining the base and cap in Row 9, align them carefully with wrong sides together before slip stitching
  • πŸ’‘Be gentle when weaving the finishing thread to avoid pulling the toadstool out of shape or creating puckering

This charming toadstool keychain pattern is perfect for bringing a touch of woodland magic to your everyday accessories. With its cheerful spotted cap and simple construction, it's an ideal project for practicing your amigurumi shaping skills while creating something truly delightful. Whether you make it in classic red with white spots or experiment with your own color combinations, this tiny treasure will add personality wherever it goes. Happy crocheting and enjoy creating your own magical mushroom garden of keychains!

You ask,

we answer.

FAQs

Can I use different yarn weights for this pattern?

While the pattern is written for DK weight yarn with a 3mm hook, you can experiment with different weights. Just remember that using thicker yarn and a larger hook will create a bigger keychain, while thinner yarn will make a smaller one. Adjust your hook size accordingly to maintain tight stitches that won't show stuffing.

How do I prevent the stuffing from showing through my stitches?

The key is maintaining consistent tension throughout your work and not overstuffing the pieces. Each section should be filled just enough to hold its shape but still feel squeezable when pinched. Working with a slightly smaller hook than recommended for your yarn weight also helps create tighter stitches.

What does BLO and FLO mean and why are they important?

BLO means back loops only and FLO means front loops only. These techniques create ridges in your work by only crocheting into one loop of the stitch instead of both. In this pattern, they're essential for creating the distinct ridge between the mushroom stem and cap that gives the toadstool its realistic shape.

Can I make this without a magic ring?

Absolutely! The pattern provides an alternative starting method using chain 2 and working into the second chain from the hook. Both methods work equally well, so use whichever technique you're most comfortable with.

How can I make the spots look neat and professional?

Use groups of 3 small back stitches worked about 1 row deep into the cap surface. Space them randomly but evenly across the cap for the most natural look. Take your time with placement before sewing, and you can even use pins to mark where you want spots before stitching them in place.