🧢 Beautiful ✨ Detailed πŸ’ Adorable

The Little Sheep Amigurumi Pattern

The Little Sheep Amigurumi Pattern
4.6β˜… Rating
2-3 Hours Time Needed
3.6K Made This
βœ‚οΈ

Beginner Friendly Level

Perfect for those just starting their sewing journey, with clear instructions and simple techniques

⏱️

Bite-Sized Project

Complete in under 2 hoursβ€”quick, fun, and perfect for a little creative escape.

🧸

Cute Companion

An adorable friend to cherish, handcrafted with love to bring comfort and joy for years to come.

About This The Little Sheep Amigurumi Pattern

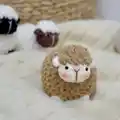
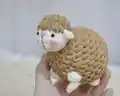
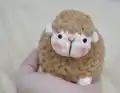
This charming little sheep pattern combines simple crochet techniques with delightful textural details to create an utterly irresistible amigurumi. The pattern features bobble stitches that give the body its signature fluffy appearance, while the uniquely constructed head with decorative ear loops adds extra character. Using chunky weight yarn makes this project work up quickly, and the small finished size of approximately 7cm makes it perfect as a keychain, desk companion, or sweet handmade gift.

The Little Sheep Amigurumi Pattern crochet pattern - detailed view of completed project

With clear round-by-round instructions and helpful video tutorials included, even beginners can successfully create this adorable woolly friend. The pattern includes special techniques for color changes and bobble stitches that create the sheep's distinctive fluffy texture.

Why You'll Love This The Little Sheep Amigurumi Pattern

I absolutely love how this little sheep pattern works up so quickly yet delivers maximum cuteness! The combination of chunky yarn and bobble stitches creates that perfect fluffy texture that makes you want to squeeze it. I'm particularly fond of the creative head construction with those sweet little ear loops that give each sheep so much personality. The embroidered face with rosy cheeks adds such a tender touch, and at just 7cm tall, it's the ideal size to tuck into a pocket or display on a shelf. What I appreciate most is how forgiving this pattern is for beginners while still offering interesting techniques that keep experienced crocheters engaged.

The Little Sheep Amigurumi Pattern step 1 - construction progress The Little Sheep Amigurumi Pattern step 2 - assembly progress The Little Sheep Amigurumi Pattern step 3 - details and accessories The Little Sheep Amigurumi Pattern step 4 - final assembly and finishing

Switch Things Up

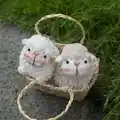
I love experimenting with different yarn textures and colors to make each sheep unique and special. Try using a fluffy eyelash yarn for the body to create an even woollier effect, or mix multiple shades of cream and brown for a more realistic variegated fleece look. You could also add a tiny bow around the neck using ribbon or crocheted chain stitches for extra charm.

For a fun twist, consider making a whole flock in rainbow colors - imagine pastel pink, mint green, or lavender sheep lined up together! You can also adjust the ear loops by making them longer or adding small bobbles at the tips for a different style. Some crafters even add a small bell inside (securely enclosed) so the sheep makes a gentle sound when moved.

If you want to turn your sheep into a keychain, simply add a small jump ring and keychain clasp to the top of the head before closing. For nursery decor, create several sheep in different sizes by using various yarn weights, then string them together as a mobile or garland. The possibilities are truly endless with this versatile little pattern!

Common Mistakes & How to Fix Them

βœ— Not using invisible decreases can create unsightly holes in the finished piece, so make sure to master this technique for a professional-looking result βœ— Skipping the stitch marker can cause you to lose track of rounds, especially during color changes, leading to misshapen pieces that don't match the pattern βœ— Stuffing too loosely will result in a floppy sheep that doesn't hold its shape, while overstuffing can stretch the stitches and show the fiberfill through gaps βœ— Forgetting to insert safety eyes at the correct position before finishing the head makes it nearly impossible to add them later without distorting the face

The Little Sheep Amigurumi Pattern

Create your very own adorable little sheep with this charming amigurumi pattern that's perfect for beginners and experienced crocheters alike. This delightful pocket-sized companion features a fluffy textured body, sweet embroidered face, and rosy cheeks that bring instant joy to any space. Standing at approximately 7cm tall, this quick project uses chunky yarn and simple techniques including bobble stitches for that signature woolly texture. Whether you're crafting a gift or adding to your handmade collection, this little sheep will steal hearts with its irresistible cuteness and timeless charm.

Beginner Friendly 2-3 Hours

Materials Needed for The Little Sheep Amigurumi Pattern

β€” Main Fabric

  • 01
    Chunky yarn size 4-5mm in white or cream color for body
  • 02
    Chunky yarn size 4-5mm in cream or tan color for head
  • 03
    Brown embroidery thread for nose details
  • 04
    Recommended brands: Himalaya Velvet or Himalaya Dolphin Baby yarn

β€” Tools Required

  • 01
    4mm crochet hook
  • 02
    4.5mm toy safety eyes
  • 03
    Needle for sewing and embroidery
  • 04
    Toy stuffing (fiberfill)
  • 05
    Stitch marker
  • 06
    Scissors
  • 07
    Powder blush for cheeks (optional)

Progress Tracker

0% Complete

β€” Body :

Info :

Start in white yarn (Note: Use cream yarn in pink word, white yarn in black word)

Rnd 1 :

8sc in MR [8]

Rnd 2 :

8inc [16]

Rnd 3 :

(sc, inc) x 8 [24]

Rnd 4 :

(3sc, inc) x 6 [30]

Rnd 5 :

11sc, bo4, 4sc, bo4, 13 sc [30]

Rnd 6-9 (4 rounds) :

30sc [30]

Rnd 10 :

11sc, bo4, 4sc, bo4, 13 sc [30]

Rnd 11 :

(3sc, dec) x 6 [24]

Rnd 12 :

(sc, dec) x 8 [16]

Info :

Stuff the body firmly with fiberfill

Rnd 13 :

8dec [8]

Info :

Fasten off, leaving the yarn tail. Using the yarn needle, weave the yarn tail through the front loop of each remaining stitch and pull it tight to close

β€” Head :

Info :

Start in cream yarn. Ch 4. Stitches are worked in both sides of the foundation chain

Rnd 1 :

Skip the first ch on the hook, inc in next ch, sc in next ch, 4sc in next ch. Continue on the other side of the foundation chain, sc in next ch, inc in next ch [10]

Rnd 2 :

2inc, sc, 4inc, sc, 2inc [18]

Rnd 3 :

18sc [18]

Rnd 4 :

(ch 4, skip 3 ch from the hook, slst in next ch), sc in next st of the base, dec, (sc, dec) x 2, (ch 4, skip 3 ch from the hook, slst in next ch), sc in next st of the base, dec, (sc, dec) x 2 [12]

Info :

Change to white yarn

Rnd 5 :

(sc, bo2) x 6 [12]

Info :

Stuff the head firmly with fiberfill

Rnd 6 :

6dc-dec [6]

Info :

Fasten off, leaving the yarn tail. Using the yarn needle, weave the yarn tail through the front loop of each remaining stitch and pull it tight to close

β€” Assembly & Details :

Infos :

Insert the 4.5mm safety eyes between rounds 3 and 4, 4 stitches apart. Embroider the nose with brown threads. Use powder blush for the cheeks. Sew the head to the body

Assembly Instructions

  • Insert 4.5mm safety eyes between rounds 3 and 4 of the head, positioning them 4 stitches apart for proper spacing
  • Embroider the nose using brown thread in the center of the face below the eyes for a sweet expression
  • Apply powder blush gently to the cheek areas for a rosy, adorable finish
  • Sew the completed head securely to the top of the body, ensuring it's centered and firmly attached
  • Weave in all remaining yarn ends neatly on the inside of the pieces for a clean professional finish

Important Notes

  • πŸ’‘Use invisible decrease stitches throughout for a cleaner, more professional appearance without visible holes
  • πŸ’‘Keep your stitches close together to prevent stuffing from showing through gaps in your work
  • πŸ’‘Master the bobble stitch technique before starting as it's essential for creating the fluffy sheep texture
  • πŸ’‘Watch the included video tutorials if you need help with special techniques like the head construction
  • πŸ’‘Stuff firmly but not too tightly to maintain the proper shape while avoiding stretched stitches
  • πŸ’‘Use stitch markers consistently to track your rounds, especially during color changes between cream and white yarn

This delightful Little Sheep pattern was created to bring warmth and joy through its irresistibly fluffy texture and sweet expression. The combination of simple techniques with charming bobble stitch details makes it accessible for beginners while remaining enjoyable for experienced crocheters. At just 7cm tall, this pocket-sized companion is perfect for gifting, displaying, or carrying with you wherever you go. The pattern's clever use of chunky yarn means you'll have your adorable woolly friend finished in just a couple of hours. πŸ‘ Happy crocheting! 🧢✨

You ask,

we answer.

FAQs

What yarn weight works best for this pattern?

This pattern is designed for chunky yarn size 4-5mm such as Himalaya Velvet or Himalaya Dolphin Baby. Using the recommended yarn weight ensures your finished sheep will be approximately 7cm tall with the proper fluffy texture.

Can I use different colors for my sheep?

Absolutely! While the pattern uses white/cream for a classic sheep look, you can create your sheep in any color combination you like. Try gray, brown, or even pastel colors for unique variations.

How do I achieve the fluffy texture on the body?

The fluffy texture comes from the bobble stitches (bo4) worked in rounds 5 and 10. Make sure to work 4 double crochets into the same stitch and close them together properly for the best textured effect.

What if I've never done bobble stitches before?

Don't worry! Bobble stitches are easier than they look. The pattern includes the abbreviation explanation, and there are many online video tutorials available. Practice on a small swatch first if you're nervous.

Can I make the sheep larger or smaller?

Yes! To make a larger sheep, use a thicker yarn with a larger hook, or to make a smaller one, use thinner yarn with a smaller hook. Just remember this will affect the finished size and you may need to adjust safety eye size accordingly.

Do I need to use safety eyes or can I embroider them?

While the pattern calls for 4.5mm safety eyes, you can absolutely embroider the eyes instead using black yarn or thread. This is especially recommended if making the sheep for young children under 3 years old.