๐Ÿงถ Beautiful โœจ Detailed ๐Ÿ’ Adorable

Toastie Bread Bag Crochet Pattern

Toastie Bread Bag Crochet Pattern
4.1โ˜… Rating
4-5 Hours Time Needed
2.6K Made This
โœ‚๏ธ

Intermediate Level

Ideal for those with basic knitting experience, featuring slightly more advanced stitches and techniques to expand your skills.

โฑ๏ธ

Weekend Treat

Takes 5-7 hours, making it an enjoyable project to finish over a couple of days.

๐ŸŽ

Tiny Treasure

Small, sweet, and gift-worthy creations that fit perfectly in the palm of your hand with detailed charm.

About This Toastie Bread Bag Crochet Pattern

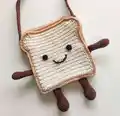
This Toastie Bread Bag pattern brings together creativity and functionality in one adorable package. You'll craft two bread slice pieces that join together to form a functional bag, complete with a cute face and poseable limbs. The pattern includes detailed instructions for creating the dimensional bread crust effect using back loop only stitches, giving your bread slice that authentic toasted appearance.

Toastie Bread Bag Crochet Pattern crochet pattern - detailed view of completed project

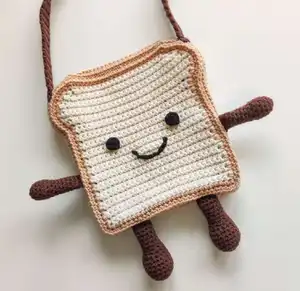
The finished bag features a sling strap for easy carrying, making it perfect for storing small treasures, craft supplies, or simply as a kawaii companion. The dimensional construction techniques you'll learn can be applied to many future projects.

Why You'll Love This Toastie Bread Bag Crochet Pattern

I absolutely love this pattern because it transforms something as simple as a slice of bread into an adorable functional accessory! The creative use of back loop only stitches to create the dimensional crust is such a clever technique that adds realistic texture. I'm especially fond of how the pattern includes personality through the cute facial features and poseable limbs - it's not just a bag, it's a friend! The step-by-step diagrams make it easy to understand the shaping, and the final result is so uniquely charming that everyone who sees it wants one.

Toastie Bread Bag Crochet Pattern step 1 - construction progress Toastie Bread Bag Crochet Pattern step 2 - assembly progress Toastie Bread Bag Crochet Pattern step 3 - details and accessories Toastie Bread Bag Crochet Pattern step 4 - final assembly and finishing

Switch Things Up

I love experimenting with this pattern to create different bread personalities! Try using darker brown yarn for a heavily toasted version, or add white yarn details to create a partial butter spread effect. You could even make multiple slices in different colors - whole wheat brown, white bread cream, or even fun colors like purple for ube bread or green for matcha.

For the facial features, I sometimes switch up the expression - try embroidering sleepy eyes for a lazy morning toast vibe, or add little blush circles with pink yarn for extra cuteness. You can also play with the limb positions during assembly to give your bread different poses.

The bag functionality opens up so many creative possibilities too. I've made versions with internal pockets by crocheting a divider before joining the slices. Some makers add a button closure at the top, while others create a zipper opening along one edge for easier access.

Consider making a whole bread family - smaller versions for keychains, larger ones for actual grocery bags, or even a giant floor cushion version! The dimensional crust technique works beautifully at any scale.

Common Mistakes & How to Fix Them

โœ— Miscounting stitches along the curved portion can throw off the entire bread slice shape - use stitch markers frequently โœ— Skipping the back loop only technique in Row 3 will result in a flat slice without the dimensional crust effect โœ— Placing increases in the wrong corner stitches during corner turns will create uneven edges and distort the bread shape โœ— Forgetting to skip one stitch in Step 6 causes misalignment between front and back slices when joining them together

Toastie Bread Bag Crochet Pattern

Create your own adorable bread bag companion with this delightful crochet pattern! This charming Toastie design features a cute bread slice character complete with eyes, mouth, arms, legs, and a handy sling strap. Perfect for storing small items or simply displaying as a whimsical decoration, this pattern combines practical functionality with kawaii cuteness. The dimensional bread crust technique creates realistic texture that makes your creation truly stand out.

Intermediate 4-5 Hours

Materials Needed for Toastie Bread Bag Crochet Pattern

โ€” Main Fabric

  • 01
    Yarn in cream/beige color for bread base
  • 02
    Yarn in light brown/tan color for crust
  • 03
    Small amounts of black yarn for facial features
  • 04
    Small amounts of pink or red yarn for mouth

โ€” Tools Required

  • 01
    Crochet hook (size 3.5mm or 4mm recommended)
  • 02
    Yarn needle for sewing
  • 03
    Scissors
  • 04
    Stitch markers
  • 05
    Stuffing or fiberfill
  • 06
    Safety eyes (6mm or 8mm)
  • 07
    Pins for assembly

Progress Tracker

0% Complete

โ€” Front and back slice

โ€” Bread crust

Info :

Continue to sc around the entire slice, forming the bread crust. Follow the diagrams below to know how many sc to place in each st.

Step 1 :

Starting from the standing sc, continue to sc in every st along the top row until you have 1 st left. Place 2 sc in the last st of the row.

Step 2 :

Place 2 sc in every hole you see along the curved portion. You should make a total of 9 inc, including the one done in the previous step.

Step 3 :

Sc next 2 st together (dec).

Step 4 :

Place 1 sc in every hole along the vertical portion of the slice till you reach the bottom left-hand corner. You should have made 22 sc. Place 3 sc in the hole at the bottom left-hand corner. This will form the corner turn.

Step 5 :

Place 1 sc in every st along the bottom of the slice till you reach the bottom right-hand corner. You should have made 23 sc. Place 3 sc in the last st at the bottom right-hand corner. This will form the corner turn.

Step 6 :

Sk 1 st. This is to ensure that there are the same number of sc on each side of the bread. Sc along the vertical portion of the slice till you reach the curved portion. You should have made 22 sc.

Step 7 :

Sc next 2 st together (dec).

Step 8 :

Place 2 sc in every hole you see along the curved portion until you reach the first standing sc. Place 1 sc in the same st you made the standing sc in. You should end up with a total of 9 inc, including the one done with the standing sc. Sl st into the first st. Ch 1.

Row 2 :

Sc in the st that you did the sl st in and continue to sc in every st until the bottom left hand corner of the slice. Place 2 sc in the 2nd st of the corner turn. Sc in every st until the bottom right-hand corner of the slice. Place 2 sc in the 2nd st of the corner turn. Sc in every st until the first st. Sl st in the first st. Ch 1.

Row 3 :

Scblo in every st. To ensure that the st made are more secure, instead of just going through the back loop, go through the bumps at the back when doing scblo. It may be hard to go through the back bumps but you may use your finger to help push your hook through. Your work should start to bend. Continue doing scblo in every st until the first st. Sl st into the first st. Ch 1.

Info :

The first sc in every round goes into the same st you did the sl st in.

Row 4 :

Sc in every st. Sl st into the first st. Ch 1.

Row 5 :

Sc in every st. Sl st into the first st. Fasten off and cut yarn.

Info :

You may repeat row 4 to make the bag as thick as you want. Repeat rows 1-5 to make the bread crust for the back slice but do not fasten off for the second slice. Ch 1.

โ€” Joining both slices

โ€” Eyes (make 2)

Info :

To secure both eyes, tie a knot at the back using the two ends to fix the placement, then proceed to sew them on tightly onto the main body.

โ€” Mouth

โ€” Arms (make 2)

โ€” Legs (make 2)

โ€” Assembling the arms and legs

โ€” Sling strap

Assembly Instructions

  • Complete both front and back bread slices following rows 1-5, keeping the yarn attached on the second slice for joining
  • Place both slices together with wrong sides facing and single crochet around the edges to join them, leaving an opening for stuffing
  • Stuff the bag lightly if desired for a plumper appearance, then continue crocheting to close the opening completely
  • Attach safety eyes to the front slice and secure them from the inside with the backing pieces
  • Sew or embroider the mouth onto the face using black or pink yarn in your preferred smile design
  • Attach the arms to both sides of the bag body and sew the legs to the bottom portion
  • Create and attach the sling strap to the top corners of the bag for carrying

Important Notes

  • ๐Ÿ’กUse stitch markers to keep track of where each round begins, especially during the curved portions
  • ๐Ÿ’กThe back loop only technique in Row 3 is essential for creating the dimensional crust effect
  • ๐Ÿ’กCount your stitches carefully in each section to ensure both slices match perfectly when joining
  • ๐Ÿ’กPin the facial features and limbs in place before sewing to ensure proper positioning and symmetry
  • ๐Ÿ’กYou can customize the bag thickness by repeating Row 4 as many times as desired
  • ๐Ÿ’กMake sure to skip the stitch in Step 6 to maintain equal stitch counts on both sides

This delightful Toastie Bread Bag pattern combines whimsy with functionality to create a truly unique accessory! The clever use of dimensional crochet techniques brings your bread slice to life, while the practical bag design makes it perfect for everyday use. Whether you're making it as a gift or keeping it for yourself, this kawaii companion is sure to bring smiles wherever it goes. The detailed instructions and step-by-step guidance make it achievable for intermediate crocheters ready to expand their skills. ๐Ÿžโœจ Happy crocheting! ๐Ÿงถ

You ask,

we answer.

FAQs

What yarn weight works best for this bread bag pattern?

Medium weight yarn (worsted weight/size 4) works perfectly for this pattern, giving you a nice sturdy bag with good stitch definition for the dimensional crust effect.

How can I make my bread crust look more dimensional?

The key is working through the back bumps during the back loop only row (Row 3). This creates a ridge that makes the crust pop out from the main body of the bread slice.

Can I make this bag larger or smaller?

Yes! Use a larger hook and thicker yarn for a bigger bag, or a smaller hook with thinner yarn for a mini version. Just maintain the same stitch pattern and proportions.

What size should I make the sling strap?

The strap length depends on your preference - measure how long you want it to hang and chain accordingly. A typical crossbody length is around 40-50 inches.

Do I need to stuff the bread bag?

Light stuffing is optional and depends on whether you want a flatter functional bag or a plumper decorative piece. For maximum storage space, skip the stuffing.