🧢 Beautiful ✨ Detailed πŸ’ Adorable

Twinkletoes Tiny Gecko Amigurumi Pattern

Twinkletoes Tiny Gecko Amigurumi Pattern
4.3β˜… Rating
2-3 Hours Time Needed
1.7K Made This
βœ‚οΈ

Beginner Friendly Level

Perfect for those just starting their sewing journey, with clear instructions and simple techniques

⏱️

Bite-Sized Project

Complete in under 2 hoursβ€”quick, fun, and perfect for a little creative escape.

🐾

Pocket Pal

A mini friend to carry anywhere, providing comfort and companionship in a perfectly portable size.

About This Twinkletoes Tiny Gecko Amigurumi Pattern

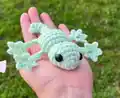
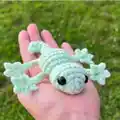
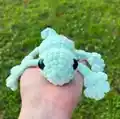
Twinkletoes is a delightfully unique gecko pattern that showcases the beauty of no-sew construction techniques. This all-in-one design starts at the head and flows seamlessly through the body to create an adorable tail with a gentle curve. The distinctive feature of this pattern is the special leg stitch that creates five tiny toes on each foot, giving your gecko that signature 'twinkletoes' charm that makes it truly special.

Twinkletoes Tiny Gecko Amigurumi Pattern crochet pattern - detailed view of completed project

The pattern offers flexibility with two size options - create a tiny palm-sized gecko with medium weight yarn or opt for a slightly chunkier version using Premier Parfait Chunky yarn. Both versions work up quickly and result in an irresistibly cute companion.

Why You'll Love This Twinkletoes Tiny Gecko Amigurumi Pattern

I absolutely love this pattern because it eliminates the tedious sewing process that often intimidates beginners - everything is worked in one continuous piece! The special leg stitch might seem complex at first, but once you get the rhythm, it becomes incredibly satisfying to create those tiny gecko toes. I appreciate how the designer included detailed photo tutorials for the leg construction, making even the trickiest parts accessible. The curved tail detail at the end adds such a realistic touch that brings Twinkletoes to life. Plus, working with safety eyes and simple increases and decreases means you can focus on enjoying the process rather than worrying about complicated techniques.

Twinkletoes Tiny Gecko Amigurumi Pattern step 1 - construction progress Twinkletoes Tiny Gecko Amigurumi Pattern step 2 - assembly progress Twinkletoes Tiny Gecko Amigurumi Pattern step 3 - details and accessories Twinkletoes Tiny Gecko Amigurumi Pattern step 4 - final assembly and finishing

Switch Things Up

I love experimenting with color combinations for Twinkletoes! While the original uses a lovely mint green, I've created versions in vibrant orange for a crested gecko look, soft pink for a sweet twist, and even tried a gradient yarn that gives the gecko a magical color-shifting effect from head to tail.

For a more realistic approach, I recommend researching actual gecko species and matching their color patterns - leopard geckos with their spotted design or day geckos with their brilliant green and red markings would be stunning interpretations. You could also add small embroidered details like spots or stripes using a contrasting yarn color.

I've found that varying the stuffing density creates different personalities - firmly stuffed Twinkletoes stands proud and perky, while lighter stuffing gives a more relaxed, floppy friend. Some makers even add small bells inside the body (if not for small children) to create a gentle sound when moved.

The leg positioning offers creative freedom too - angle them differently during assembly to create climbing, resting, or even swimming poses. I once positioned all four legs forward to make it look like my gecko was reaching for a hug!

Common Mistakes & How to Fix Them

βœ— Forgetting to place stitch markers between rounds can cause you to lose track of where each round begins, especially during the leg construction - always use markers consistently throughout βœ— Not stuffing the head firmly enough before continuing to the body will result in a floppy gecko that won't hold its shape properly over time βœ— Crocheting into the chain stitches from the legs when working subsequent rounds will distort the leg shape - always skip the leg chains and only work into body stitches βœ— Overstuffing the tail makes it stiff and prevents the natural curve at the tip - stuff lightly and stop when it becomes too narrow βœ— Placing safety eyes too far apart or misaligned with the center marker creates an unbalanced facial expression - use the round 6 marker as your guide for symmetrical placement

Twinkletoes Tiny Gecko Amigurumi Pattern

Create your own adorable Twinkletoes, the tiniest gecko companion that fits perfectly in the palm of your hand! This charming pattern features an innovative no-sew design that's worked all in one piece from head to tail, complete with delightful little toes that give this gecko its personality. Whether you choose the petite version with medium weight yarn or go chunky for a slightly larger friend, Twinkletoes will quickly become a treasured handmade keepsake. Perfect for nature lovers and anyone who adores unique amigurumi characters with whimsical details.

Beginner Friendly 2-3 Hours

Materials Needed for Twinkletoes Tiny Gecko Amigurumi Pattern

β€” Main Fabric

  • 01
    Medium weight yarn in your choice of color (for tiny version)
  • 02
    Premier Parfait Chunky yarn (for chunky version)

β€” Tools Required

  • 01
    4.0mm crochet hook (for tiny version)
  • 02
    5.0mm crochet hook (for chunky version)
  • 03
    10mm safety eyes (for tiny version)
  • 04
    14mm safety eyes (for chunky version)
  • 05
    Fiber fill stuffing
  • 06
    Yarn needle
  • 07
    Stitch markers
  • 08
    Scissors

Progress Tracker

0% Complete

β€” Special Stitch: Leg

Step 1 :

Ch 10, sl st in 2nd ch from hook and the third ch. That third ch will be your "base chain"

Step 2 :

Ch 2, sl st in 2nd ch from hook, sl st in base stitch - Repeat this step 3 more times for a total of 5 toes

Step 3 :

Sl st in the 7 stitches back down the chain, then continue on with the round

β€” Body :

Round 1 :

Make 4 sc in a mc (4)

Round 2 :

Inc x 4 (8)

Round 3 :

*inc, 3 sc* x 2 (10)

Round 4 :

Inc x 5, 5 sc (15)

Round 5 :

3 sc in the next st, 8 sc, 3 sc in the next st, 5 sc (19)

Round 6 :

Sc in each st (19)

Info :

Place a SM between the 6th & 7th sc of this row. This is a guide for the center/top of the body

Round 7 :

Sc in in each st (19)

Infos :

Insert safety eyes between r3 & r4, with 4 or 5 st visible in between them. Use the SM from r6 as a visual guide to place each eye equal distance away from the SM

Round 8 :

Dec x 6, 7 sc (13)

Info :

Stuff head

Round 9 :

Dec x 4, 5 sc (9)

Round 10 :

3 sc in the next st, inc x 3, 3 sc in the next st, 4 sc (16)

Round 11 :

Leg, sc, inc, *2 sc, inc* x 2, sc, inc, leg, 6 sc (20)

Round 12-14 :

Sc in each st (20)

Info :

Make sure to move the limbs outward and be careful not to sc in the chain stitch from the leg

Round 15 :

Leg, sc, *dec, sc* x 4, sc, leg, 6 sc (16)

Round 16 :

*2 sc, dec* x 3, 4 sc (13)

Info :

Stuff body

Round 17 :

*sc, dec* x 4, sc (9)

Info :

You will now be making the tail - Stuff the tail lightly as you go, until it gets too narrow to stuff

Round 18 :

Sc in each st (9)

Round 19 :

*dec, sc* x 2, 3 sc (7)

Round 20 :

Sc in each st (7)

Round 21 :

Dec, 5 sc (6)

Round 22 :

Sc in each st (6)

Round 23 :

Dec, 4 sc (5)

Round 24 :

Sc in each st (5)

Round 25 :

Dec, 3 sc (4)

Round 26 :

Sc in each st (4)

Info :

Fasten off and leave a long tail

Assembly Instructions

  • Sew the hole at the end of the tail closed, keeping the yarn on your needle for the next step.
  • Slightly curve the tip of the gecko tail to the side so that the tip aligns beside rounds 23-24.
  • Insert your needle between the rounds to bring the tip of the tail to the body, creating the natural curve.
  • Weave the yarn tail through the stitches several more times to secure the curl firmly in place.
  • Important: Don't weave the yarn tail to the opposite side as this will create an unwanted indent in the tail.
  • Ensure all legs are positioned outward and properly shaped before declaring your gecko complete.
  • Weave in any remaining yarn ends securely and trim excess yarn close to the work.

Important Notes

  • πŸ’‘This pattern is worked in continuous rounds unless otherwise specified - use stitch markers at the beginning of each round
  • πŸ’‘The stitch count at the end of each round does not include the limbs, only the body stitches
  • πŸ’‘Pattern is made all in one piece starting at the head and finishing at the tail with no sewing required
  • πŸ’‘When working the legs, be very careful not to crochet into the chain stitches from previous legs
  • πŸ’‘Use the stitch marker placed in round 6 as a visual guide for symmetrical eye placement
  • πŸ’‘Stuff the head and body firmly but stuff the tail only lightly until it becomes too narrow

This enchanting Twinkletoes pattern brings the magic of nature into your hands with a no-sew design that's both clever and beginner-friendly. The special leg stitch creates those signature tiny toes that give this little gecko such incredible personality and charm. Whether you display your Twinkletoes climbing on a plant, gift it to a reptile lover, or keep it as your crafting companion, this quick project delivers maximum cuteness in minimal time. 🦎 Happy crocheting! 🧢✨

You ask,

we answer.

FAQs

Can I make Twinkletoes with different yarn weights?

The pattern provides two size options - medium weight yarn with a 4.0mm hook for a tiny version, or Premier Parfait Chunky with a 5.0mm hook for a larger version. You can experiment with other yarn weights, but remember to adjust your hook size and safety eye size accordingly for best results.

How do I prevent the legs from being too loose or floppy?

Make sure to maintain consistent tension throughout the leg construction, especially when slip stitching back down the chain. The legs are meant to be delicate, but if they seem too loose, try going down a hook size just for the leg portions.

What if I've never worked a magic circle before?

The magic circle (mc) is used to start the body. If you're uncomfortable with this technique, you can substitute by chaining 2 and working your stitches into the first chain, then pulling the starting tail tight to close the hole.

When should I insert the safety eyes?

Insert the safety eyes between rounds 3 and 4, with 4 or 5 stitches visible between them. Use the stitch marker from round 6 as your guide to ensure they're placed symmetrically. Always insert safety eyes before stuffing the head.

Can I add wire to the legs to make them poseable?

While the original pattern doesn't include wire, you could carefully thread thin floral wire through the legs after completion if you want them poseable. However, this would make the gecko unsuitable for young children due to safety concerns.

How do I achieve the perfect tail curve?

After fastening off at round 26, gently curve the tail tip to align with rounds 23-24 on the side of the body. Use your yarn needle to secure this curve by weaving through the stitches a few times, but avoid pulling the yarn to the opposite side which creates an indent.