๐Ÿงถ Beautiful โœจ Detailed ๐Ÿ’ Adorable

Wine Tote Bag Pattern

Wine Tote Bag Pattern
4.3โ˜… Rating
3-4 Hours Time Needed
1.5K Made This
โœ‚๏ธ

Intermediate Level

Ideal for those with basic knitting experience, featuring slightly more advanced stitches and techniques to expand your skills.

โฑ๏ธ

Weekend Treat

Takes 5-7 hours, making it an enjoyable project to finish over a couple of days.

๐ŸŽ

Tiny Treasure

Small, sweet, and gift-worthy creations that fit perfectly in the palm of your hand with detailed charm.

About This Wine Tote Bag Pattern

Wine Tote Bag Pattern crochet pattern - detailed view of completed project

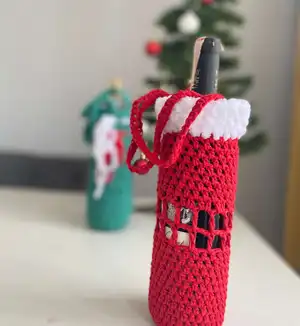
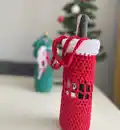
The pattern uses macrame yarn for durability and structure, finished with soft velvet yarn for a luxurious touch. Optional decorative elements allow you to add your personal creative flair.

Why You'll Love This Wine Tote Bag Pattern

I absolutely love this wine tote pattern because it transforms a simple gift into something truly special and memorable. There's something magical about presenting a bottle of wine in a handmade carrier that shows genuine thoughtfulness and care. I appreciate how the pattern works up relatively quickly but looks impressively detailed with those beautiful perforated rows. The versatility is fantastic too - you can keep it simple and elegant or embellish it with decorative touches to match any occasion. Plus, knowing that this tote will be reused again and again makes it an eco-friendly alternative to disposable gift bags, which feels wonderful.

Wine Tote Bag Pattern step 1 - construction progress Wine Tote Bag Pattern step 2 - assembly progress Wine Tote Bag Pattern step 3 - details and accessories Wine Tote Bag Pattern step 4 - final assembly and finishing

Switch Things Up

I love experimenting with different yarn weights and colors to give this wine tote a completely unique personality for every occasion. Try using chunky cotton yarn in rich jewel tones for an elegant evening look, or switch to bright summer colors with lightweight yarn for casual gatherings. You could even create holiday versions using festive reds and greens with metallic thread woven through the perforated sections for extra sparkle.

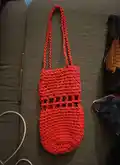
For a rustic farmhouse aesthetic, I sometimes use natural jute or hemp cord which gives the tote wonderful texture and earthy appeal. If you're making these as wedding favors, consider soft pastels or classic white with delicate ribbon threaded through the openwork rows. The handles offer another opportunity for creativity - make them extra long for shoulder carrying, or keep them short for a handheld clutch style.

Don't be afraid to play with the perforated row placement either. You could create multiple bands of openwork separated by solid sections, or even experiment with different lacework patterns if you're feeling adventurous. Adding embellishments like crocheted flowers, wooden beads, or embroidered monograms transforms each tote into a truly personalized gift. The beauty of this pattern is its versatility - it's your canvas to create something that perfectly matches your style and the occasion!

Common Mistakes & How to Fix Them
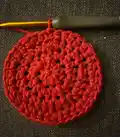
โœ— Skipping the edge-line technique in Round 4-5 can prevent proper curling and bottle shape formation โœ— Making the stitches too tight during the perforated rows will cause the fabric to pucker and lose its decorative effect โœ— Not counting stitches carefully during increase rounds leads to uneven shaping and a lopsided tote structure
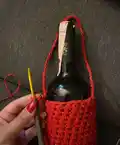
 โœ— Forgetting to secure handles tightly at connection points results in weak straps that may pull loose with bottle weight

Wine Tote Bag Pattern

Create your own elegant wine tote bag with this delightful crochet pattern! Perfect for gifting or carrying your favorite bottle in style, this charming tote features a beautiful structured design that holds a wine bottle securely. The pattern includes decorative perforated rows and comfortable handles, making it both functional and fashionable. Whether you're bringing wine to a dinner party or creating handmade gifts, this tote adds a personal touch that shows you care.

Intermediate 3-4 Hours

Materials Needed for Wine Tote Bag Pattern

โ€” Main Fabric

  • 01
    100g macrame yarn for main body structure
  • 02
    20g white velvet yarn for finishing touches and decorative elements

โ€” Tools Required

  • 01
    4.5mm crochet hook
  • 02
    Scissors
  • 03
    Yarn needle for weaving ends
  • 04
    Stitch markers (optional but helpful for tracking rounds)

Progress Tracker

0% Complete

โ€” Round 1:

Row 1:

Make 6 ch, and connect to the first ch to form a ring. Make 10 hdc into the ring. Close the row by sinking into the top of the first hdc. (10 hdc)

โ€” Round 2:

Row 2:

With 2 ch go to the top row. Make 2 hdc into each stitch. At the end of the row you will have a total of 20 hdc. Connect to the top of the first hdc. (20 hdc)

โ€” Round 3:

Row 3:

Make 3 ch to go up. Make 1 more hdc into the same ch. 1 hdc on the next ch, 2 hdc on the next ch, continue alternating. Connect to the top of the first hdc. (30 hdc)

โ€” Round 4:

Row 4:

Move on with 2 ch. Work as follows: 1 hdc, 1 hdc, 2 hdc in next ch (increase pattern: 2 single, 1 double). Connect to the first hdc and close. (40 hdc)

Info:

In rows 4 and 5, it will start to curl inwards and take the bottle form

โ€” Round 5:

Row 5:

Make 2 ch. Make 1 hdc on each ch, working only on the edge line for complete curl. Connect to the first hdc and close the row.

โ€” Round 6:

Rows 6-15:

In all the next 10 rows, close each row with 1 ch to go to top row. Make 1 hdc on each ch.

โ€” Round 7 (Perforated Row 1):

Row 16:

Go to the top row with 4 ch. Skip 1 ch and make 1 dc on the 2nd ch. Make 1 ch, skip 1 ch, make 1 dc on next ch. Complete the whole row. Connect to the 3rd of the first 4 ch groups and close.

Row 17:

Go up with 4 ch. Make 1 dc on top of the dc in the next row. Make 2 ch, make 1 dc on top of the next dc to form squares. Connect to the 3rd of the first group of 4 ch and close.

โ€” Round 8 (Return to Straight Rows):

Row 18:

Work on the 2 ch spaces from bottom row. Make 2 hdc in every 2 ch space. Do not knit tightly, knit freely. Connect to the first ch.

Rows 19-26:

Go to top row with 1 ch. In these 8 rows, make 1 hdc on each ch.

โ€” Handles:

First Handle:

Make 40 ch (adjust length as desired). Skip 8 ch and connect on the 9th ch tightly. Complete the belt by making 1 hdc on each ch. Connect to the beginning and cut the rope. Knot tightly.

Second Handle:

Count 4 ch from the end of the first handle and tie into ch 5. Make 40 ch. Skip 8 ch and tie tightly to the 9th ch. Go back and make 1 hdc in all ch. Tie at the beginning and cut the rope. Knot tightly.

โ€” Velvet Finish:

Final Rows:

Switch to velvet thread. Continue for a total of 2 rows by making 1 hdc on each ch. This keeps the straps inside for a beautiful finish.

Info:

Since velvet rope is fluffy, it may be difficult to see the chains. Try to feel with your hand.

โ€” Optional Decoration:

Finishing Touches:

Decorate perforated areas with velvet threads if desired. Add a cute note on note paper and tie it, or keep it simple.

Assembly Instructions

  • Weave in all yarn ends securely using a yarn needle to ensure clean finish
  • Check that both handles are securely attached and evenly spaced on opposite sides of tote
  • If adding decorative velvet accents to perforated rows, weave them through carefully maintaining even tension
  • Gently shape the tote by hand to ensure the bottom sits flat and sides curve naturally around bottle shape
  • Test fit with a wine bottle to ensure proper sizing and adjust if needed before gifting

Important Notes

  • ๐Ÿ’กWork the edge-line technique carefully in rows 4-5 to achieve proper bottle shape and inward curl
  • ๐Ÿ’กKeep tension loose during the perforated row transition to prevent puckering and maintain drape
  • ๐Ÿ’กCount stitches carefully during increase rounds to ensure even shaping throughout the tote
  • ๐Ÿ’กSecure handles very tightly at connection points as they will bear the weight of wine bottle
  • ๐Ÿ’กWhen switching to velvet yarn, feel the stitches with your fingers since fluff makes chains hard to see
  • ๐Ÿ’กHandles can be adjusted to any length by changing the initial chain count before connecting back
  • ๐Ÿ’กConsider blocking the finished tote gently with steam to even out stitches and perfect the shape

This elegant wine tote pattern was created to turn every bottle into a thoughtful gift worth treasuring! Combining structured macrame construction with luxurious velvet finishing touches, this versatile carrier works beautifully for dinner parties, hostess gifts, or holiday celebrations. The decorative perforated rows add visual interest while keeping the design functional and reusable. Your recipients will love receiving wine in such a beautiful handmade tote! ๐Ÿทโœจ

You ask,

we answer.

FAQs

Can I adjust the size to fit different bottle shapes?

Yes! You can modify the initial ring size and adjust the number of increase rounds to accommodate wider bottles. For taller bottles, simply add more straight rows after the shaping rounds before starting the perforated section.

What if I don't have velvet yarn for the finish?

You can absolutely continue with the same macrame yarn throughout or substitute any bulky or medium weight yarn in a contrasting color. The velvet simply adds a luxurious touch but isn't essential to the structure.

How do I prevent the handles from stretching over time?

Make sure to work the handle stitches tightly and secure the connection points with extra reinforcement stitches. You can also work a strand of thin wire or fishing line through the handles for extra stability if needed.

Can I make this pattern without the perforated rows?

Definitely! Simply continue with straight rows of half double crochet instead of switching to the chain and double crochet pattern. This creates a more solid, traditional tote bag style that's equally beautiful.

Is this pattern suitable for beginners?

This pattern is best suited for intermediate crocheters who are comfortable with basic stitches and can follow multiple row instructions. Beginners with some practice can attempt it but should take extra time counting stitches carefully.