Navy Beige Crochet Hobo Bag Pattern
Beginner Friendly
Perfect for those just starting their crochet journey, with clear instructions and simple techniques
Single-Day Project
A satisfying project you can complete in a single afternoon or evening.
Handmade Gift
A beautiful keepsake — free forever. Read online or print at home.
About This Navy Beige Crochet Hobo Bag Pattern
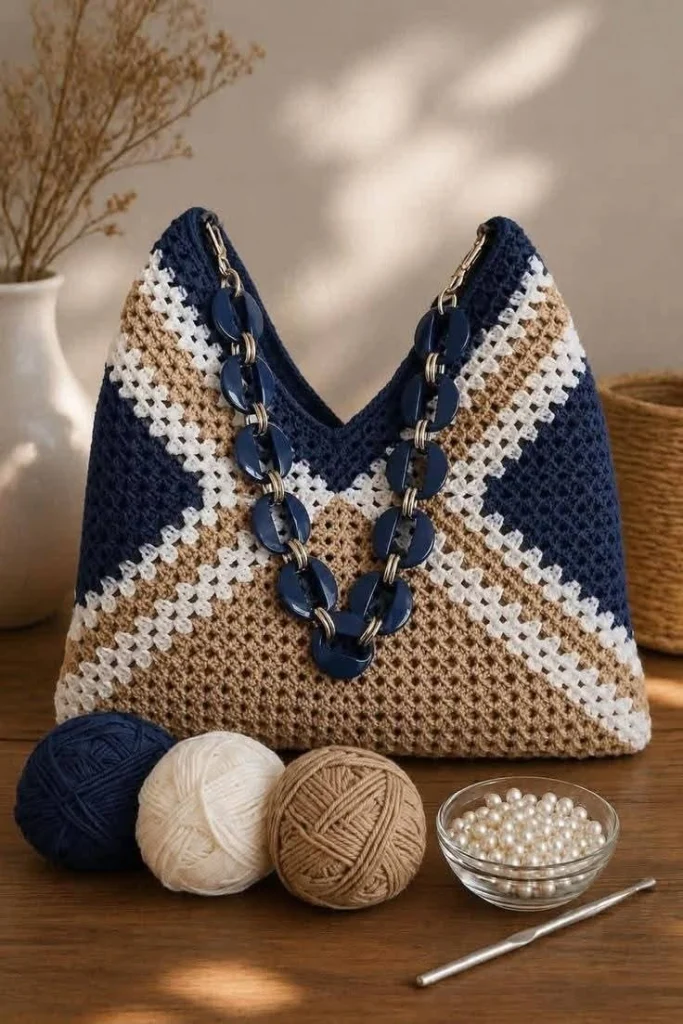
This crochet hobo bag pattern creates an elegant everyday shoulder bag with a striking geometric color-block design. Deep navy forms the upper corners, warm beige anchors the lower body, and crisp cream stripes create the dramatic diagonal V pattern across the front and back.
The bag has a softly structured triangular silhouette with a dipped center opening and a decorative chain-style handle. It looks polished enough to pair with everyday outfits while still keeping the beautiful texture of handmade crochet.
Materials
- DK or light worsted cotton yarn – navy 180-220 g
- DK or light worsted cotton yarn – warm beige 180-220 g
- DK or light worsted cotton yarn – cream 100-130 g
- 3.5-4 mm crochet hook 1
- Large decorative chain or acrylic-link bag handle 1
- Metal connector rings 2-4
- Yarn needle 1
- Stitch markers 4
- Scissors 1 pair
- Cotton lining fabric – optional approximately 50 × 80 cm
- Magnetic snap – optional 1
Abbreviations
chchainsl stslip stitchscsingle crochethdchalf double crochetdcdouble crochetststitchstsstitchesincincreasedecdecreasereprepeatFOfasten offFinished Size
- Width: approximately 36-40 cm
- Height at sides: approximately 34-37 cm
- Height at center opening: approximately 25-28 cm
- Base depth: approximately 9-11 cm
- Handle drop: approximately 25-30 cm
The finished size can be adjusted by changing the number of foundation stitches and repeating additional rows before beginning the upper shaping.
Color Placement
The distinctive look of this bag comes from three carefully placed colors:
- Navy: upper corners and portions of the diagonal design
- Cream: narrow contrasting diagonal stripes
- Warm beige: lower center and base
The front and back should mirror one another so the diagonal stripes meet cleanly at the center.
Gauge
Approximately 18 sc × 20 rows = 10 cm using a 3.5-4 mm hook.
Exact gauge is not essential for this project, but a dense fabric is important. If your stitches feel loose or you can easily see through the fabric, move down one hook size.
Bag Base
Begin with beige yarn.
- Ch 43.
- Sc in the 2nd ch from the hook.
- Sc across until the final ch.
- Work 4 sc into the final ch.
- Continue along the opposite side of the foundation chain.
- Work 3 sc into the first foundation ch.
- Place a marker at the beginning of the round.
- Continue in continuous rounds.
- Increase evenly around both curved ends for approximately 5-6 rounds.
- Stop increasing when the base measures approximately 9-11 cm deep.
Lower Beige Section
- Work one round of sc through the back loops only.
- Continue in regular sc without increasing.
- Work approximately 6-8 rounds in beige.
- Keep your tension consistent around the entire bag.
This creates the solid lower portion visible beneath the diagonal color work.
Creating the Diagonal Color Pattern
The front and back are divided into visual sections. Use stitch markers to identify the center front, center back and both side points.
The color changes gradually move outward to create the large V-shaped pattern.
Color Sequence
- Begin the diagonal section with beige dominating the center.
- Introduce cream approximately 10-12 stitches from each side.
- Introduce navy outside the cream sections.
- On every second round, move each color transition approximately 1-2 stitches toward the center.
- Carry unused yarn neatly along the wrong side or cut and rejoin yarn where necessary.
- Keep the cream stripe approximately 3-4 stitches wide throughout.
Front Color Layout
Think of the front as a large inverted geometric V:
- The beige section rises toward the center.
- A narrow cream band follows both beige edges.
- Navy fills the upper outer sections.
- A second cream accent can be introduced above the beige section for the layered stripe effect.
Repeat the same arrangement on the back of the bag.
Building the Main Body
- Continue working sc rounds while maintaining the diagonal color placement.
- Work until the body measures approximately 24-26 cm from the base.
- At this stage, stop increasing completely.
- Check that the front and back color patterns remain centered.
Shaping the Hobo Opening
The center of the bag dips downward while both sides extend upward to create the distinctive shoulder-bag silhouette.
- Mark the exact center front and center back.
- Stop working in continuous rounds.
- Begin working the front section in rows.
- Decrease 1 stitch at both ends of every second row.
- Continue until the center section forms a shallow V.
- Repeat the same shaping on the back.
- Leave the side sections taller than the center opening.
Upper Navy Corners
Finish both upper sides in navy to create the strong dark framing seen in the design.
- Attach navy yarn at one upper side.
- Work sc rows upward.
- Decrease slightly toward the top if necessary.
- Continue until the side reaches approximately 34-37 cm from the base.
- Repeat on the opposite side.
- Repeat the same process for the back.
Finishing the Opening
- Join navy yarn anywhere along the upper opening.
- Work sc evenly around the entire opening.
- Work a second round of sc.
- At the highest point on each side, work additional stitches if necessary to keep the edge flat.
- Finish with one round of reverse sc for a firm polished edge.
Handle Attachment Tabs
Create reinforced tabs at the two highest points of the bag.
- Mark approximately 5-6 stitches around each upper side point.
- Join navy yarn.
- Work 5-6 sc.
- Turn and repeat for approximately 5 rows.
- Fold the tab around a metal connector ring.
- Sew the tab securely back onto itself.
- Repeat on the opposite side.
Statement Chain Handle
The large navy chain-style handle gives this bag its distinctive modern finish.
- Choose a large acrylic or resin-link handbag chain in navy.
- Attach a metal connector ring to each end.
- Connect one end to each reinforced crochet tab.
- Check that all metal clasps close completely.
- Allow the chain to fall naturally into a soft U shape.
A tortoiseshell, cream, wooden or gold chain can also be used for a different look.
Optional Crochet Handle
If you prefer an entirely handmade bag, replace the chain with a crochet strap.
- Ch until the strap measures approximately 55-65 cm.
- Sc across.
- Continue for 5-7 rows.
- FO.
- Fold the strap lengthwise.
- Slip stitch the long edges together.
- Sew securely to both upper attachment points.
Optional Fabric Lining
- Lay the finished bag flat on folded lining fabric.
- Trace around the bag body.
- Add approximately 1.5 cm seam allowance.
- Cut two matching pieces.
- Sew the side and bottom seams.
- Turn the upper edge inward.
- Insert the lining into the crochet bag.
- Hand stitch it approximately 1 cm below the crochet opening.
Optional Interior Pocket
- Cut a rectangle of lining fabric approximately 18 × 14 cm.
- Fold all raw edges inward.
- Topstitch the upper edge.
- Sew the remaining three edges onto the lining before installing it.
Optional Magnetic Closure
- Mark the center front and back of the lining.
- Attach one magnetic snap piece to each side.
- Reinforce behind each snap with interfacing or scrap fabric.
- Test the alignment before sewing the lining permanently into the bag.
Finishing
- Weave in every yarn end securely.
- Inspect all color-change areas.
- Lightly block the bag if necessary.
- Shape the base and side corners by hand.
- Attach the handle only after the bag is completely dry.
- Add the lining and closure if desired.
Color Ideas
- Classic: navy + cream + camel
- Autumn: chocolate brown + cream + rust
- Minimal: black + ivory + taupe
- Spring: sage + cream + dusty pink
- Coastal: denim blue + white + sand
- Elegant: burgundy + ivory + mocha
- Soft neutral: oatmeal + cream + warm beige
Ways to Customize the Bag
- Add pearl beads along the cream stripe.
- Replace the navy chain with a wooden handle.
- Add a removable crochet flower charm.
- Use gold hardware for a dressier finish.
- Add an interior zipper pocket.
- Make the bag smaller for an evening handbag.
- Lengthen the handle for shoulder carrying.
- Add bag feet to the base.
- Use four colors instead of three.
Frequently Asked Questions
The stitches themselves are simple, but maintaining the symmetrical diagonal color changes and shaping the upper V requires careful counting. The pattern is best suited to an intermediate crocheter.
A firm cotton or cotton-blend DK yarn works especially well because it gives the bag structure and keeps the color-block lines crisp.
Yes. A wide crochet strap, leather handle or wooden handle can be substituted. Make sure the attachment points are reinforced regardless of the handle style.
Mark the center front and back before beginning the color work. Move both color-change points by the same number of stitches on every shaping round and count frequently.
You can carry yarn across short sections, but for larger color areas it is usually cleaner to use separate yarn balls or cut and rejoin the colors. This also prevents unnecessary bulk inside the bag.
A lining is optional, but it is recommended for regular use. It helps the bag retain its shape and prevents small items from stretching through the crochet fabric.
Yes. Replace the short statement handle with a longer reinforced strap and attach it securely to the two upper side points.
The finished Navy Beige Crochet Hobo Bag Pattern