Crochet Christmas Poinsettia Door Hanging with Bells and Ornaments – Free Pattern
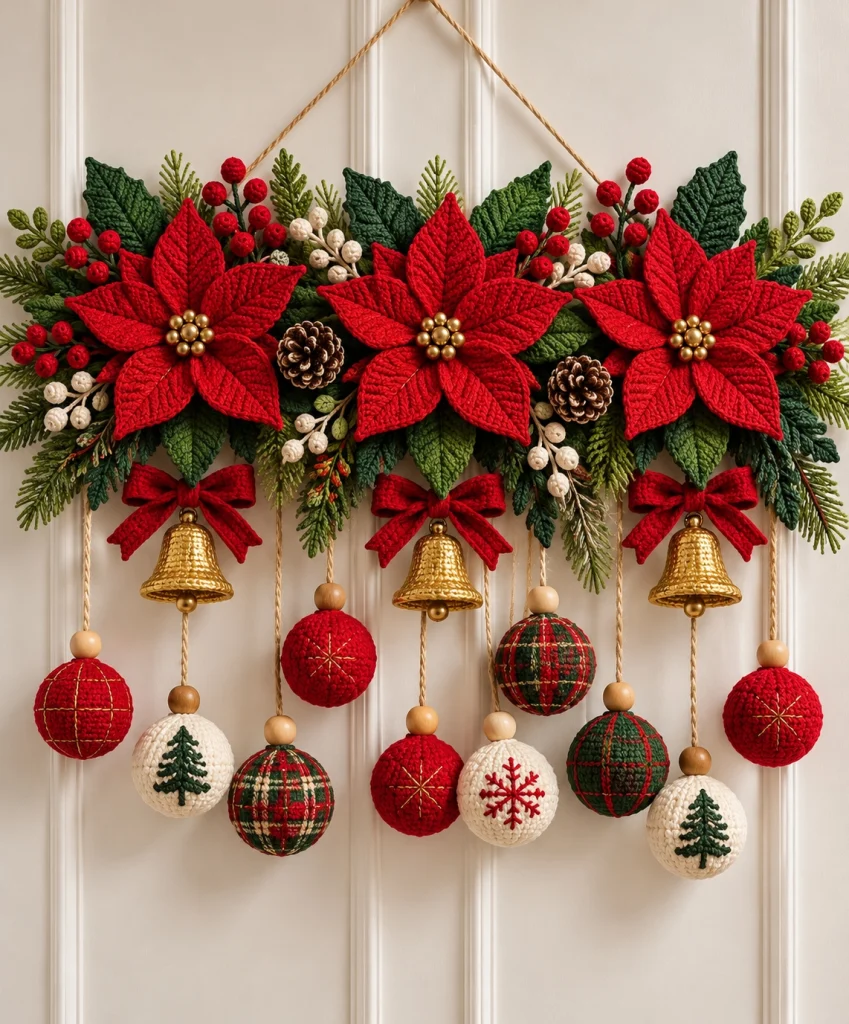
Bring the magic of Christmas into your home with this beautiful crochet Christmas poinsettia door hanging! Featuring three vibrant red poinsettia flowers, lush green foliage, festive berries, golden bells, and colorful hanging ornaments, this handmade Christmas decoration creates a stunning holiday display.
Unlike a traditional circular Christmas wreath, this elegant horizontal door hanging combines a floral garland with cascading ornaments for a unique and festive look. The rich red, forest green, cream, and gold color palette gives it a timeless Christmas charm that looks beautiful on doors, walls, and above fireplaces.
In this free crochet tutorial, you’ll learn how to create the poinsettia flowers, crochet decorative leaves and berries, make Christmas baubles, and assemble everything into a gorgeous holiday door hanging.
Pattern Note: This is an original crochet pattern inspired by the pictured decoration. The design recreates its main visual features, but the exact construction of the photographed piece cannot be determined from the image alone.
Pattern Information
- Skill Level: Intermediate to Advanced
- Finished Width: Approximately 55–65 cm (22–26 inches)
- Finished Height: Approximately 65–75 cm (26–30 inches), including hanging ornaments
- Yarn Weight: DK or light worsted-weight cotton yarn
- Hook Sizes: 3 mm and 3.5 mm
- Terminology: US crochet terms
- Construction: Individual crocheted flowers, foliage, berries, and ornaments assembled onto a horizontal support
- Estimated Time: 18–25 hours
- Recommended Use: Indoor Christmas decoration
Materials Needed
- 150–200 g bright Christmas red cotton yarn
- 100–150 g dark forest green cotton yarn
- 50–80 g olive-green cotton yarn
- 50 g cream or ivory cotton yarn
- Small amount of burgundy yarn
- Small amount of gold or metallic embroidery thread
- 3 mm crochet hook
- 3.5 mm crochet hook
- Polyester fiberfill stuffing
- Yarn needle
- Stitch markers
- Scissors
- Measuring tape
- Decorative wooden beads
- Gold-colored craft bells
- Gold-colored decorative beads for flower centers
- Strong cotton cord for hanging
- Wooden dowel or lightweight rigid support, approximately 50–55 cm long
- Floral wire or pipe cleaners for shaping leaves
- Optional small pinecones
- Optional artificial evergreen sprigs
Important: If using floral wire, keep the ends covered and securely enclosed. Use lightweight, securely attached decorations so the finished hanging remains safe and stable.
Crochet Abbreviations
- ch: Chain
- sc: Single crochet
- hdc: Half double crochet
- dc: Double crochet
- tr: Treble crochet
- sl st: Slip stitch
- st: Stitch
- sp: Space
- inc: Increase (2 sc in the same stitch)
- dec: Invisible decrease
- BLO: Back loop only
- FO: Fasten off
- MR: Magic ring
Part 1: Crochet the Large Red Poinsettia Flowers
The three poinsettia flowers are the main focal points of this Christmas decoration.
Each flower consists of a small central base, two layers of pointed red petals, and decorative golden beads.
Make three large poinsettias.
Step 1: Crochet the Flower Center
Using dark red yarn and a 3 mm hook:
Round 1: Make a magic ring and work 6 sc into the ring.
Round 2: Work 2 sc in each stitch around. (12 stitches)
Round 3: Work 1 sc in the first stitch, inc in the next stitch. Repeat around. (18 stitches)
Join with a sl st.
FO, leaving a long tail for assembly.
Step 2: Crochet the Large Pointed Petals
Using bright red yarn and a 3.5 mm hook:
Ch 16.
Row 1: Sc in the second chain from the hook, hdc in the next stitch, dc in the next 4 stitches, tr in the next 4 stitches, dc in the next 3 stitches, and hdc in the next 2 stitches.
Work 3 sc into the final chain.
Continue along the opposite side of the foundation chain, mirroring the stitch sequence.
Join with a sl st.
Row 2: Work sc around the petal, placing increases near the widest section to create a full pointed shape.
At the tip, work ch 2 and sl st into the same stitch.
FO, leaving a long tail for sewing.
Make 6 large petals for each flower.
Step 3: Crochet the Smaller Inner Petals
Using the same red yarn:
Ch 12.
Sc in the second chain from the hook.
Hdc in the next stitch.
Dc in the next 3 stitches.
Tr in the next 3 stitches.
Dc in the next 2 stitches.
Hdc in the final stitch.
Work 3 sc into the end chain.
Continue along the opposite side, mirroring the stitch sequence.
Finish with a round of sc and a small pointed tip.
Make 6 smaller petals for each flower.
Step 4: Add Raised Petal Veins
Using matching red yarn and a yarn needle, embroider a central vein along each petal.
Add two or three shorter diagonal veins branching toward the edges.
These raised details create the beautiful textured appearance of the poinsettias.
Step 5: Assemble the Flower
Arrange the six large petals evenly around the center.
Sew them securely to the back of the central circle.
Place the six smaller petals above the larger petals, slightly offset.
Sew them into position.
Attach 6–8 gold-colored beads to the center of the flower.
Repeat until you have three complete poinsettias.
Part 2: Crochet the Dark Green Poinsettia Leaves
The large dark green leaves frame the red flowers and create depth.
Using forest-green yarn and a 3.5 mm hook:
Leaf Foundation
Ch 18.
Leaf Row 1
Sc in the second chain from the hook.
Hdc in the next 2 stitches.
Dc in the next 4 stitches.
Tr in the next 5 stitches.
Dc in the next 3 stitches.
Hdc in the next stitch.
Work 3 sc into the final chain.
Continue along the opposite side, mirroring the stitch sequence.
Leaf Edging
Work sc evenly around the leaf.
At the pointed end, work ch 2 and sl st into the same stitch.
FO, leaving a long tail.
Make approximately 12–15 leaves.
For a realistic appearance, create some leaves in dark forest green and others in olive green.
Embroider a central vein along each leaf using slightly lighter green yarn.
Part 3: Crochet the Evergreen Sprigs
The evergreen sprigs add volume and create the traditional Christmas greenery effect.
Using olive-green yarn and a 3 mm hook:
Step 1
Ch 30.
Step 2
Sl st into the second chain from the hook.
Step 3
Ch 6, sl st back into the main chain.
Step 4
Move to the next chain and repeat.
Step 5
Alternate chain branches of 4, 5, and 6 stitches to create natural-looking evergreen foliage.
Step 6
Continue along both sides of the foundation chain.
Step 7
FO, leaving a long tail for attaching.
Make approximately 12–18 evergreen sprigs.
Use different shades of green to create a fuller and more natural arrangement.
Part 4: Crochet the Christmas Berries
Small red and cream berries fill the spaces between the poinsettias and greenery.
Using red or cream yarn and a 3 mm hook:
Round 1
Make a magic ring and work 6 sc into the ring.
Round 2
Work 2 sc in each stitch around. (12 stitches)
Rounds 3–4
Sc in each stitch around.
Round 5
Work 6 decreases evenly around. (6 stitches)
Add a small amount of stuffing.
Close the opening and FO.
Make approximately 18–24 berries in red, burgundy, and cream.
Attach groups of three berries to short crocheted stems.
Arrange them in small clusters throughout the greenery.
Part 5: Crochet the Christmas Baubles
The hanging Christmas ornaments create the cascading effect beneath the floral arrangement.
Make approximately 9–10 ornaments in red, cream, and dark green.
Use a 3 mm hook and cotton yarn.
Round 1
Make a magic ring and work 6 sc into the ring. (6 stitches)
Round 2
Inc in every stitch. (12 stitches)
Round 3
Repeat (1 sc, inc) around. (18 stitches)
Round 4
Repeat (2 sc, inc) around. (24 stitches)
Round 5
Repeat (3 sc, inc) around. (30 stitches)
Rounds 6–10
Sc in each stitch around. (30 stitches)
Round 11
Repeat (3 sc, dec) around. (24 stitches)
Round 12
Repeat (2 sc, dec) around. (18 stitches)
Begin stuffing the ornament firmly but evenly.
Round 13
Repeat (1 sc, dec) around. (12 stitches)
Round 14
Dec around. (6 stitches)
Close the opening and weave in the ends.
Repeat until you have all the ornaments.
Part 6: Decorate the Christmas Baubles
Create different ornament styles to match the festive reference design.
Style 1: Red Baubles with Gold Stars
Using gold embroidery thread, stitch a simple starburst pattern onto the surface of the red ornament.
Add small straight stitches around the center for a sparkling effect.
Style 2: Cream Baubles with Christmas Trees
Using dark green yarn, embroider a small Christmas tree onto the front of the cream ornament.
Begin with a vertical trunk and add progressively wider branches toward the bottom.
Style 3: Cream Baubles with Red Snowflakes
Using red embroidery thread, stitch a six-point snowflake onto the surface of the cream ornament.
Add small branches along each arm.
Style 4: Green and Red Plaid Baubles
Using contrasting red and cream embroidery thread, stitch vertical and horizontal lines around the ornament.
Space the lines evenly to create a classic Christmas plaid appearance.
Style 5: Solid Red Baubles
Leave a few ornaments plain red for balance.
Add a small gold star or metallic thread detail if desired.
Part 7: Make the Hanging Ornament Cords
Using natural beige cotton yarn:
Cut or crochet cords in different lengths, approximately 15–35 cm.
For crocheted cords, make a chain slightly longer than the desired finished length.
Sl st back along the chain to reinforce it.
Attach one end securely to the top of each ornament.
Thread a wooden bead onto the cord above the ornament.
Leave the opposite end long enough for attaching to the main support.
Vary the cord lengths to create an elegant cascading arrangement.
Part 8: Prepare the Golden Bells
The pictured design features three decorative golden bells hanging beneath the poinsettias.
For the closest appearance, use three lightweight gold-colored craft bells.
Cut three lengths of natural cotton cord approximately 15–20 cm long.
Attach each bell to a cord.
Make sure the knots are secure.
Optional: Crochet a small red bow for each bell.
Simple Crochet Bow
Using red yarn:
Ch 18.
Row 1: Hdc in the second chain from the hook and across.
Rows 2–4: Ch 1, turn, hdc across.
FO and weave in the ends.
Fold the rectangle into a bow shape.
Wrap matching yarn tightly around the center.
Secure the yarn at the back.
Attach one bow above each golden bell.
Part 9: Prepare the Horizontal Support
A sturdy horizontal support helps maintain the shape of the finished decoration.
Step 1
Choose a wooden dowel approximately 50–55 cm long.
Step 2
Wrap the dowel with dark green yarn or cover it with crocheted fabric.
Step 3
Cut a strong cotton cord approximately 90–110 cm long.
Step 4
Tie one end securely to the left side of the dowel.
Step 5
Tie the other end securely to the right side.
Step 6
Check that the hanging cord forms a balanced triangle when lifted.
This support will carry the weight of the flowers, foliage, bells, and ornaments.
Part 10: Assemble the Christmas Poinsettia Arrangement
Step 1: Arrange the Greenery
Place the dark green leaves and evergreen sprigs along the horizontal support.
Allow some foliage to extend beyond both ends.
Arrange the greenery in overlapping layers to create a full garland shape.
Step 2: Position the Three Poinsettias
Place one poinsettia in the center.
Position the remaining two flowers to the left and right.
Keep the flowers at approximately the same height.
Make sure the red petals remain visible against the dark green foliage.
Step 3: Attach the Flowers
Use strong matching yarn to sew each flower to the support and surrounding greenery.
Secure the flower centers firmly.
Avoid pulling the stitches too tightly, as this may distort the petals.
Step 4: Add the Berries
Arrange small clusters of red and cream berries between the flowers.
Place additional berry clusters near the outer edges.
Sew them securely into the greenery.
Step 5: Add Decorative Pinecones
Position two or three lightweight pinecones between the poinsettias.
Attach them using strong yarn or covered floral wire.
Keep the pinecones smaller than the flowers so they do not overpower the arrangement.
Part 11: Attach the Bells and Hanging Baubles
Step 1
Attach one golden bell beneath each poinsettia.
Step 2
Position the bells so they hang slightly below the greenery.
Step 3
Arrange the crocheted baubles across the lower section.
Step 4
Alternate red, cream, and green ornaments.
Step 5
Vary the cord lengths to create a cascading display.
Step 6
Distribute the ornaments evenly across the width of the decoration.
Step 7
Attach the cords securely to the horizontal support.
Step 8
Lift the entire decoration and check its balance.
Adjust the ornament positions until the arrangement hangs evenly.
Part 12: Final Finishing
Step 1
Weave in all loose yarn ends.
Step 2
Check every flower, leaf, berry, and ornament attachment.
Step 3
Adjust the poinsettia petals to create a full, symmetrical appearance.
Step 4
Gently shape the green leaves and evergreen sprigs.
Step 5
Make sure the bells and ornaments hang freely without becoming tangled.
Step 6
Test the hanging cord and support before displaying the decoration.
Step 7
Hang your finished Christmas decoration on a sturdy indoor door hook or wall hanger.
Your beautiful crochet Christmas poinsettia door hanging is complete!
Creative Christmas Color Variations
Traditional Christmas
Bright red poinsettias, forest-green leaves, cream berries, and gold bells.
Elegant Winter White
Ivory poinsettias, frosted sage-green leaves, silver bells, and white ornaments.
Rustic Farmhouse
Burgundy poinsettias, olive-green foliage, natural wooden beads, and beige ornaments.
Luxury Christmas
Deep wine-red flowers, emerald-green leaves, champagne-gold accents, and metallic ornaments.
Vintage Holiday
Muted cranberry red, antique cream, dusty green, and warm brass bells.
Scandinavian Christmas
White poinsettias, soft gray-green foliage, natural wood beads, and minimalist red ornaments.
Pink Christmas
Dusty rose poinsettias, ivory foliage, blush ornaments, and champagne-gold bells.
Helpful Crochet Tips
- Use cotton yarn to help the flowers and leaves maintain their shape.
- Keep your stitch tension consistent throughout the project.
- Make all three poinsettias before beginning the final assembly.
- Use a smaller hook for the berries and ornaments.
- Stuff the baubles evenly to maintain their round shape.
- Embroider the ornament details before attaching the hanging cords.
- Use different shades of green for more natural-looking foliage.
- Arrange the flowers and leaves before permanently attaching them.
- Keep the central poinsettia slightly more prominent for visual balance.
- Use lightweight decorative bells to reduce the overall weight.
- Reinforce the hanging cord with strong cotton yarn.
- Secure the gold beads carefully to the flower centers.
- Keep the ornament cords separated to prevent tangling.
- Check the decoration’s balance before hanging it.
- Store the finished piece flat between Christmas seasons.
Frequently Asked Questions
Is this crochet Christmas door hanging suitable for beginners?
This project is best for intermediate to advanced crocheters because it includes shaped petals, decorative leaves, stuffed ornaments, embroidery, and detailed assembly.
Can I make the decoration smaller?
Yes. Use two poinsettias instead of three, reduce the number of hanging ornaments, and choose a shorter horizontal support.
Can I make it larger?
Absolutely. Add more poinsettias, foliage, and ornaments, and use a longer support.
Can I use acrylic yarn?
Yes. Acrylic yarn works well for decorative pieces, although cotton yarn generally provides firmer stitch definition.
Do I need to use real bells?
No. You can replace the metal bells with crocheted bells for a completely yarn-based decoration.
Can I use artificial greenery?
Yes. Combining crocheted flowers with artificial evergreen sprigs can create a fuller appearance and reduce the amount of crochet work required.
How many poinsettias should I make?
Three large poinsettias are recommended for the pictured horizontal arrangement.
Can I use different ornament colors?
Yes. White, gold, silver, burgundy, and emerald green are beautiful alternatives.
Can I hang this decoration outdoors?
It is best suited for indoor use or a fully sheltered porch. Rain, direct sunlight, and moisture can damage the yarn and decorative elements.
Can I sell finished decorations made from this pattern?
Yes. You may sell handmade decorations created using this pattern. Credit to the pattern designer is appreciated.
Care and Storage Instructions
- Dust gently with a soft brush.
- Spot clean using cool water and mild detergent.
- Avoid soaking decorations containing wooden beads or metal bells.
- Do not machine wash the assembled decoration.
- Allow any damp sections to air dry completely.
- Keep away from open flames and excessive heat.
- Do not hang directly above candles or fireplaces.
- Keep small decorative components away from young children and pets.
- Store in a dry, dust-free container.
- Place tissue paper between the flowers to protect their shape.
- Wrap the ornament cords separately to prevent tangling.
- Keep the decoration flat when not in use.
Final Thoughts
This crochet Christmas poinsettia door hanging with bells and ornaments is a beautiful way to celebrate the holiday season with handmade creativity. The vibrant red flowers, rich evergreen foliage, delicate berries, sparkling gold bells, and colorful crocheted baubles come together to create a festive decoration full of warmth and charm.
Whether you display it on your front door, decorate your living room, or make it as a thoughtful handmade Christmas gift, this unique crochet project is sure to become a treasured part of your holiday traditions.
Love this Christmas crochet decoration? Save this free crochet poinsettia door hanging pattern to Pinterest and share it with your crochet friends for more festive handmade inspiration!