Crochet Red Leaf Blanket – Free 3D Autumn Leaf Bedspread Pattern
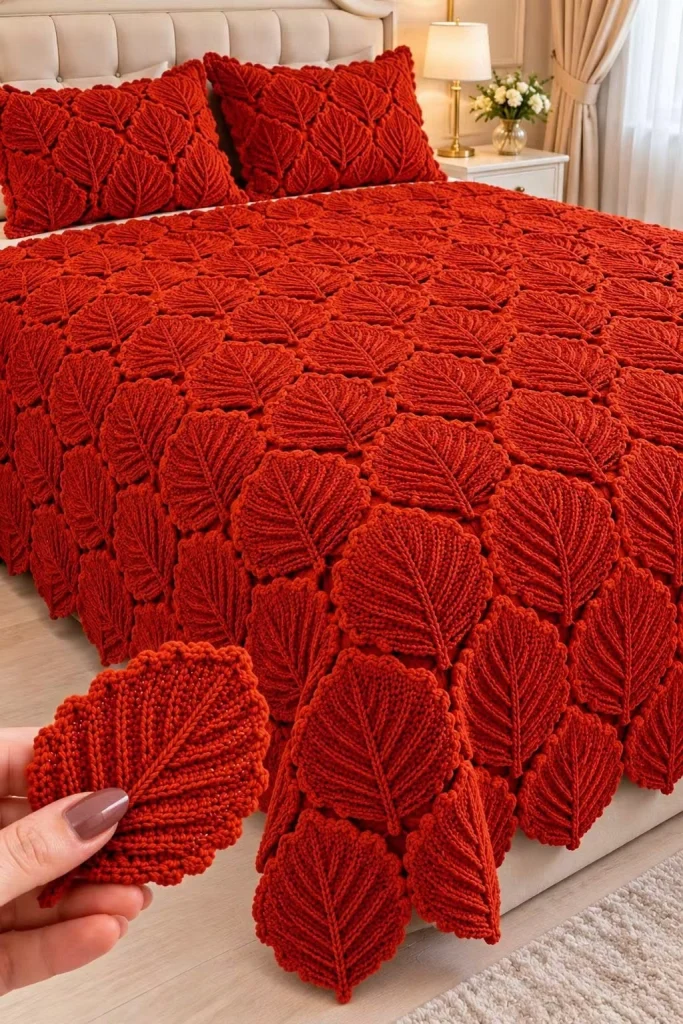
Transform your bedroom with this breathtaking crochet red leaf blanket! Featuring hundreds of beautifully textured leaf motifs in a rich, vibrant red, this luxurious handmade bedspread creates a dramatic and elegant look.
Each leaf features raised stitch ridges, a defined central vein, and softly scalloped edges. The overlapping leaves create a beautiful three-dimensional texture that resembles a blanket covered in autumn foliage.
Paired with matching crochet leaf pillows, this stunning bedspread is perfect for anyone who loves statement crochet projects, romantic bedroom décor, and intricate handmade designs.
In this free crochet tutorial, you’ll learn how to create textured leaf motifs, shape their edges, join them into a large blanket, and make coordinating decorative pillow covers.
Pattern Information
- Skill Level: Advanced
- Finished Blanket Size: Approximately 220 × 240 cm
- Leaf Motif Size: Approximately 14 × 18 cm
- Yarn Weight: Worsted weight (#4)
- Recommended Yarn: Soft acrylic or cotton-acrylic blend
- Crochet Hook: 4 mm and 4.5 mm
- Terminology: US crochet terms
- Construction: Individual textured leaves attached to a crocheted blanket foundation
- Style: Romantic, elegant, autumn-inspired bedroom décor
- Estimated Time: 80–120 hours, depending on size and experience
Design Note: This is an original construction inspired by the reference image. The photographed blanket features densely overlapping red leaves, but its exact stitch pattern and assembly method cannot be determined from the photograph alone. This tutorial uses a practical leaf-appliqué construction to recreate a similar appearance.
Materials Needed
- Approximately 3,500–4,500 g of worsted-weight red yarn for a king-size-style bedspread, depending on gauge and coverage
- Additional red yarn for matching pillow covers
- 4 mm crochet hook for leaves
- 4.5 mm crochet hook for the blanket foundation
- Yarn needle
- Scissors
- Stitch markers
- Measuring tape
- Blocking mats
- Rustproof blocking pins
- Optional matching red fabric for pillow backing
- Optional pillow inserts
Crochet Abbreviations
- ch: Chain
- sc: Single crochet
- hdc: Half double crochet
- dc: Double crochet
- tr: Treble crochet
- sl st: Slip stitch
- inc: Increase
- dec: Decrease
- BLO: Back loop only
- FLO: Front loop only
- FO: Fasten off
- st: Stitch
- rep: Repeat
Part 1: Crochet the Textured Red Leaf Motif
The leaf motif is the heart of this beautiful blanket. Each leaf is worked separately and features a raised central vein with textured side ridges.
Use red yarn and a 4 mm crochet hook.
Step 1: Foundation Chain
Ch 25.
This foundation forms the central spine of the leaf.
Step 2: First Side of the Leaf
Starting in the second chain from the hook, work:
- 1 sl st
- 2 sc
- 3 hdc
- 5 dc
- 5 tr
- 4 dc
- 2 hdc
- 2 sc
Work 3 sc into the last chain to turn around the end.
Step 3: Opposite Side
Working along the opposite side of the foundation chain, mirror the stitch heights:
- 2 sc
- 2 hdc
- 4 dc
- 5 tr
- 5 dc
- 3 hdc
- 2 sc
- 1 sl st
Join with a sl st.
Step 4: Build the Leaf Shape
Ch 1.
Work one round of sc around the entire leaf, placing increases along the widest sections to maintain a flat shape.
At the pointed tip, work 3 sc into the same stitch.
At the base, use slip stitches to keep the shape narrow.
Adjust the increases as necessary to prevent curling.
Step 5: Create the Scalloped Edge
Work around the outer edge using the following decorative repeat:
*Sl st in next st, skip 1 st, 5 hdc in next st, skip 1 st.*
Repeat along both sides of the leaf, adjusting the final repeat to fit.
Use slip stitches near the pointed tip and narrow base to preserve the leaf shape.
FO and weave in the ends.
Part 2: Create the Raised Central Leaf Vein
The raised central vein gives each leaf its distinctive dimensional appearance.
Using matching red yarn:
Step 1
Insert your crochet hook near the base of the leaf.
Step 2
Pull up a loop and work surface slip stitches along the center toward the pointed tip.
Step 3
Keep the surface stitches slightly raised without pulling the leaf too tightly.
Step 4
FO and secure the yarn on the back.
The central vein should form a prominent raised line running the length of the leaf.
Part 3: Add Decorative Side Veins
To recreate the intricate textured appearance of the reference design, add diagonal veins extending from the center toward the leaf edges.
Step 1
Thread a yarn needle with matching red yarn.
Step 2
Starting near the central vein, embroider diagonal lines toward the outer edge.
Step 3
Repeat the diagonal lines along both sides of the leaf.
Step 4
Keep the lines evenly spaced, approximately 1–1.5 cm apart.
Step 5
Use chain stitch or stem stitch embroidery to create raised textured lines.
These decorative veins give the leaf its characteristic layered appearance.
Part 4: Make the Remaining Leaf Motifs
Repeat the leaf pattern until you have enough motifs to cover your blanket.
For a large bedspread, begin with approximately 180–220 leaves and make additional motifs as needed.
The exact number depends on your finished leaf size, blanket dimensions, and how much overlap you prefer.
Recommended Motif Variations
- Large leaves for the main blanket surface
- Medium leaves for filling smaller spaces
- Smaller leaves for the outer edges
- Slightly elongated leaves for decorative corners
To create smaller leaves, reduce the foundation chain length and adjust the stitch-height sequence proportionally.
To create larger leaves, increase the foundation chain length and add additional dc and tr stitches along the widest sections.
Part 5: Crochet the Blanket Foundation
A sturdy crochet foundation helps support the weight of the overlapping leaf motifs.
Use red yarn and a 4.5 mm crochet hook.
Step 1: Foundation Chain
Make a foundation chain approximately 220 cm wide, using your measured stitch gauge to determine the required number of chains.
Step 2: First Row
Starting in the second chain from the hook, work sc across.
Step 3: Remaining Rows
Ch 1, turn.
Work sc across.
Repeat until the foundation measures approximately 240 cm long.
Step 4: Border
Work one round of sc around the entire blanket.
At each corner, work 3 sc into the corner stitch.
Join with a sl st and FO.
Tip: Because the finished blanket will contain many textured appliqués, a lightweight foundation is preferable. You can substitute a simple mesh crochet base to reduce weight and yarn consumption.
Part 6: Arrange the Leaf Motifs
Lay the finished foundation flat on a large, clean surface.
Step 1
Begin arranging the leaves along the bottom edge of the blanket.
Step 2
Place each leaf with its pointed tip facing downward.
Step 3
Overlap neighboring leaves slightly to create a dense layered appearance.
Step 4
Continue arranging leaves in horizontal rows.
Step 5
Offset each new row so the leaves cover the gaps between the previous row.
Step 6
Continue until the blanket surface is covered.
Before sewing, photograph the arrangement so you can reproduce the placement while assembling.
Part 7: Attach the Leaves to the Blanket
Use matching red yarn and a yarn needle.
Step 1
Begin with the bottom row of leaves.
Step 2
Secure each leaf near its upper center and along part of its central vein.
Step 3
Leave the lower portions and outer edges slightly free to preserve the three-dimensional texture.
Step 4
Continue attaching the leaves row by row, working upward.
Step 5
Allow each new row to overlap the attachment points of the previous row.
Step 6
Reinforce the attachment stitches along the sides and corners.
Make sure every leaf is securely attached while retaining a soft, dimensional appearance.
Part 8: Create the Cascading Leaf Border
The dramatic outer border is one of the most beautiful features of this blanket.
Step 1
Arrange additional leaves along the bottom and side edges.
Step 2
Position them so approximately one-third to one-half of each leaf extends beyond the blanket foundation.
Step 3
Attach the upper sections securely to the blanket edge.
Step 4
Overlap the leaves slightly to create a continuous cascading border.
Step 5
Reinforce the attachment points with additional stitches.
This border creates the beautiful layered effect visible along the sides and foot of the bedspread.
Part 9: Crochet Matching Red Leaf Pillows
Complete your bedroom set with coordinating crochet leaf pillow covers.
Pillow Information
- Finished Size: Approximately 45 × 45 cm
- Construction: Crochet front panel with attached leaf motifs
- Backing: Crochet or matching fabric
Step 1: Crochet the Front Panel
Using red yarn and a 4.5 mm hook, create a square single-crochet panel measuring approximately 45 × 45 cm.
Step 2: Make the Leaf Motifs
Crochet approximately 9–12 leaves for each pillow, depending on motif size and desired coverage.
Step 3: Arrange the Leaves
Position the leaves in overlapping rows across the front panel.
Step 4: Attach the Leaves
Sew the leaves securely to the pillow front, keeping their outer edges slightly raised.
Step 5: Create the Back Panel
Crochet a second square panel or cut a matching fabric backing.
Step 6: Join the Panels
Place the front and back panels together with the right sides facing outward.
Join three sides using single crochet or a mattress stitch.
Step 7: Insert the Pillow
Insert a pillow form.
Close the remaining edge with a removable closure or sew it securely.
Repeat for a second matching pillow.
Part 10: Finishing and Blocking
Step 1
Inspect all attachment points and reinforce any loose leaves.
Step 2
Weave in all remaining yarn ends.
Step 3
Gently steam-block individual leaves if necessary, following your yarn manufacturer’s care instructions.
Step 4
Avoid flattening the raised central veins and decorative textures.
Step 5
Spread the blanket across the bed and arrange the leaves so they overlap naturally.
Step 6
Position the matching pillows against the headboard.
Your elegant red crochet leaf bedspread is complete!
Creative Color Variations
Deep Burgundy Elegance
Use burgundy or wine-red yarn for a sophisticated romantic bedroom.
Autumn Terracotta
Choose burnt orange, rust, and cinnamon shades for a warm seasonal look.
Ivory Luxury
Create the entire blanket in ivory or cream for an elegant bridal-style bedspread.
Forest Green
Use deep green yarn to create a dramatic botanical leaf blanket.
Dusty Rose
Choose muted rose or blush pink for a softer feminine design.
Golden Autumn
Combine mustard, copper, terracotta, and brown leaves for a multicolored fall-inspired bedspread.
Helpful Crochet Tips
- Use the same yarn weight throughout the project.
- Make a gauge swatch before beginning.
- Complete one sample leaf before making the full set.
- Measure your sample leaf after blocking.
- Estimate the number of motifs using the actual dimensions.
- Keep the raised veins consistent across all leaves.
- Use stitch markers when arranging the motifs.
- Work in manageable batches of 10–15 leaves.
- Block leaves individually before assembly if needed.
- Attach the leaves from the bottom upward.
- Keep the outer edges slightly loose for dimensional texture.
- Use a lightweight foundation to reduce the finished blanket’s weight.
- Reinforce attachment points along the border.
- Store completed motifs flat until assembly.
- Photograph the arrangement before sewing.
- Keep the blanket away from excessive heat when blocking acrylic yarn.
Frequently Asked Questions
Is this crochet leaf blanket suitable for beginners?
This project is best suited for advanced crocheters because it involves making many individual motifs, adding decorative veins, and assembling a large layered bedspread.
How many crochet leaves do I need?
For a large bedspread, begin with approximately 180–220 leaves. The final number depends on your gauge, finished dimensions, and overlap.
Can I make a smaller version?
Yes. Reduce the blanket foundation dimensions and the number of leaf motifs.
Can I use chunky yarn?
Yes, but chunky yarn produces larger, heavier leaves. Adjust your hook size and reduce the motif count accordingly.
How do I keep the leaves from curling?
Maintain even tension, distribute increases carefully, and gently block the finished motifs.
Can I make this blanket without a foundation?
Yes, but you will need to join the leaf motifs securely into a continuous fabric. A foundation is recommended for this layered design.
Can I use different shades of red?
Absolutely. Mixing crimson, burgundy, scarlet, and rust can create beautiful depth.
Is the finished blanket heavy?
It can be quite heavy because of the overlapping crochet motifs. Choose lightweight yarn and a mesh foundation if weight is a concern.
Can I make matching pillow covers?
Yes. Use the same leaf motif pattern on square crochet panels to create a coordinated bedroom set.
Can I sell finished blankets made from this pattern?
Yes. You may sell handmade items created using this pattern. Credit to the designer is appreciated.
Care Instructions
- Check the yarn manufacturer’s washing instructions.
- Hand wash or use a gentle machine cycle if the yarn permits.
- Use mild detergent.
- Avoid harsh bleach.
- Support the blanket’s weight when wet.
- Lay flat to dry whenever possible.
- Do not wring or twist the textured leaves.
- Gently reshape the leaf motifs while damp.
- Avoid high heat when drying or steaming.
- Store folded in a dry, clean location.
Final Thoughts
This crochet red leaf blanket is a remarkable handmade project that combines texture, color, and elegant craftsmanship. Its richly layered leaves, raised veins, cascading edges, and matching pillows create a beautiful statement piece for any bedroom.
Whether you make it in vibrant red, romantic burgundy, soft ivory, or autumn terracotta, this textured leaf bedspread is sure to become a treasured handmade creation.
Love this stunning crochet blanket? Save this free crochet red leaf blanket pattern to Pinterest and share it with your crochet friends for more beautiful handmade bedroom inspiration!