Elegant Crochet Snowflake Door Hanging – Free Christmas Winter Decoration Pattern
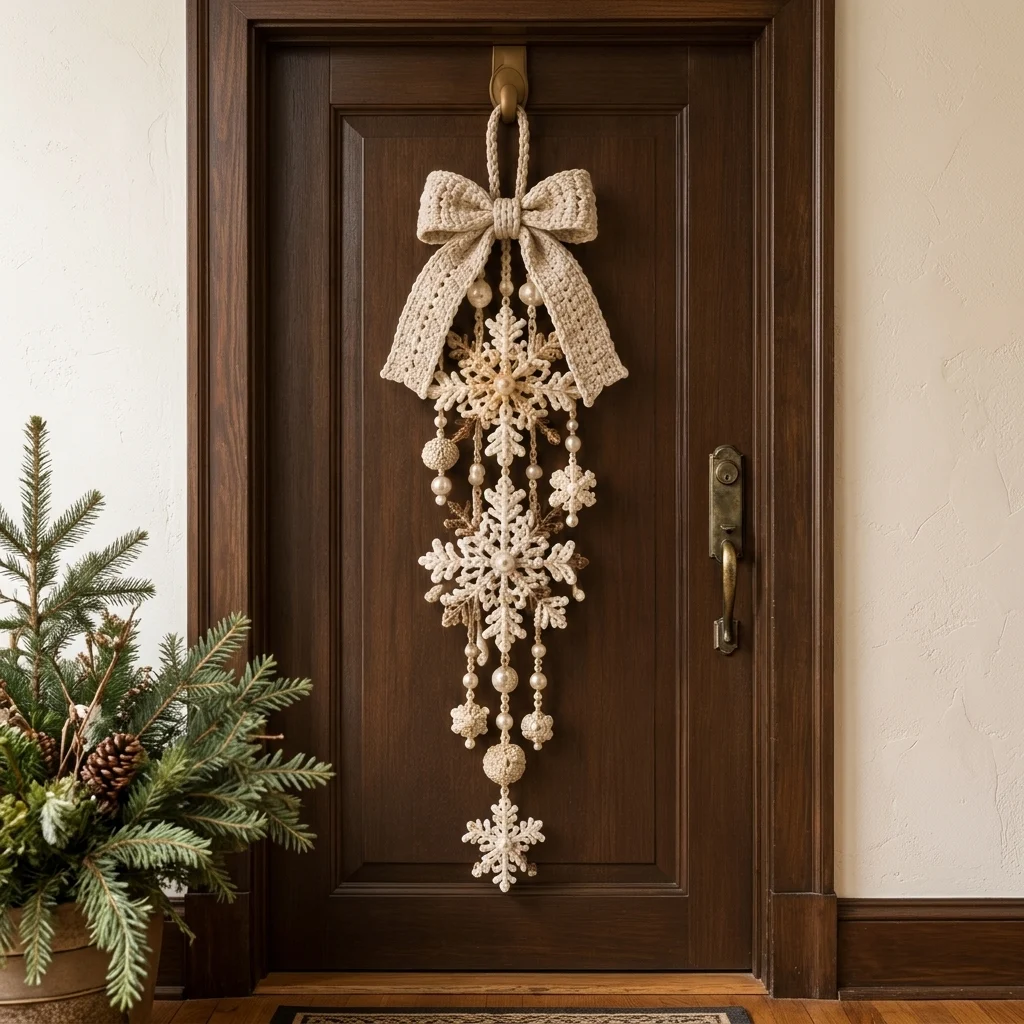
Bring timeless winter elegance to your home with this beautiful crochet snowflake door hanging. Featuring delicate ivory snowflakes, champagne gold accents, shimmering pearl beads, and a graceful crochet bow, this handmade decoration adds a sophisticated festive touch to any doorway.
Unlike traditional Christmas wreaths, this vertical hanging arrangement offers a refined and delicate silhouette. The design features two large decorative snowflakes, smaller snowflake accents, dangling pearl strands, textured crochet beads, and a beautiful cream-colored bow at the top.
Its soft ivory and champagne gold color palette creates a luxurious winter-inspired appearance that complements rustic wooden doors, farmhouse interiors, classic Christmas decorations, and elegant neutral holiday styling.
This free crochet tutorial will guide you through making the snowflakes, creating the decorative bow, assembling the hanging strands, adding pearl embellishments, and finishing the piece for a beautiful handmade winter decoration.
Pattern Information
- Skill Level: Intermediate
- Finished Length: Approximately 55–70 cm
- Maximum Width: Approximately 20–25 cm
- Large Snowflakes: Approximately 13–16 cm across
- Small Snowflakes: Approximately 5–8 cm across
- Yarn Weight: Sport or DK cotton yarn
- Crochet Hook: 2.5 mm and 3 mm
- Terminology: US crochet terms
- Construction: Individual snowflakes joined with decorative hanging cords
- Style: Elegant Christmas, winter farmhouse, neutral holiday décor
Design Note: This is an original crochet interpretation inspired by the pictured decoration. The pattern recreates the layered ivory snowflakes, long vertical arrangement, cream bow, pearl accents, and subtle gold details. The exact arrangement and stitch structure may differ from the photograph.
Materials Needed
- Ivory cotton yarn – approximately 150–200 m
- Champagne gold cotton yarn – approximately 40–60 m
- Small amount of cream yarn for decorative crochet beads
- 2.5 mm crochet hook
- 3 mm crochet hook
- White or ivory pearl beads in assorted sizes
- Gold or champagne-colored decorative beads
- Strong cotton thread or jewelry cord
- Yarn needle
- Scissors
- Stitch markers
- Measuring tape
- Fabric stiffener or diluted craft glue
- Blocking mat
- Rustproof pins
- Optional clear fishing line
- Optional small metal hanging ring
Crochet Abbreviations
- ch: Chain
- sc: Single crochet
- hdc: Half double crochet
- dc: Double crochet
- tr: Treble crochet
- sl st: Slip stitch
- st: Stitch
- sp: Space
- sk: Skip
- rep: Repeat
- picot: Decorative pointed loop
- FO: Fasten off
Part 1: Crochet the Large Snowflakes
Make two large snowflakes using ivory cotton yarn and a 2.5 mm crochet hook.
Each snowflake features six symmetrical arms with delicate pointed details.
Round 1: Center Ring
Make a magic ring.
Ch 3 (counts as first dc).
Work 11 dc into the ring.
Pull the ring closed.
Join with a sl st to the top of the beginning ch-3.
(12 dc)
Round 2: Create Six Sections
Ch 3.
Dc in the same stitch.
Ch 3.
Sk 1 stitch.
*Work 2 dc in the next stitch, ch 3, sk 1 stitch.*
Repeat around.
Join with a sl st.
You should have six groups of double crochet separated by six chain spaces.
Round 3: Snowflake Foundation
Sl st into the first ch-3 space.
Ch 3.
Work 2 dc, ch 3, and 3 dc into the same space.
Ch 2.
*Work (3 dc, ch 3, 3 dc) into the next ch-3 space, ch 2.*
Repeat around.
Join with a sl st.
Round 4: Snowflake Arms
Sl st into the first corner ch-3 space.
Ch 1.
Sc into the corner space.
Ch 6.
Sl st into the second chain from the hook.
Sc into the next chain.
Hdc into the next chain.
Dc into the next two chains.
Sl st back into the same corner space.
Ch 3.
Sc into the next ch-2 space.
Ch 3.
Repeat this process around all six corners.
Join with a sl st.
Round 5: Decorative Branches
Work along each snowflake arm.
Attach yarn near the base of the first arm.
Ch 4.
Sl st into the second chain from the hook.
Sl st into the remaining chains.
Sl st into the arm.
Repeat on both sides of each arm to create smaller branches.
At the tip of each arm, add a picot by chaining 3 and slip stitching into the first chain.
FO and weave in the ends.
Repeat to create the second large snowflake.
Part 2: Crochet the Small Snowflakes
Make three to five smaller snowflakes to decorate the hanging strands.
Round 1
Make a magic ring.
Ch 1.
Work 12 sc into the ring.
Join with a sl st.
Round 2
*Ch 5, sl st into the second chain from the hook, sc in the next chain, hdc in the next chain, dc in the next chain, sk 1 stitch, sl st into the next stitch.*
Repeat six times to form six pointed arms.
FO and weave in the ends.
Optional Gold Accents
Using champagne gold yarn, embroider a few delicate stitches near the center of selected snowflakes.
You may also add a small pearl bead to the center of each snowflake.
Part 3: Block and Stiffen the Snowflakes
Blocking is an important step because it helps the snowflakes maintain their delicate shape.
Step 1
Lightly dampen each completed snowflake.
Step 2
Place it on a blocking mat.
Step 3
Stretch each arm gently into a symmetrical six-pointed shape.
Step 4
Secure the points using rustproof pins.
Step 5
Apply a small amount of fabric stiffener if desired.
Step 6
Allow the snowflakes to dry completely before removing the pins.
For a more structured decoration, repeat the stiffening process once the first layer has dried.
Part 4: Crochet the Elegant Ivory Bow
The large ivory bow forms the decorative centerpiece at the top of the hanging arrangement.
Bow Main Piece
Using ivory yarn and a 3 mm hook:
Ch 16.
Row 1
Hdc in the third chain from the hook.
Hdc in each remaining chain across.
Turn. (14 hdc)
Rows 2–12
Ch 2.
Hdc in each stitch across.
Turn.
Continue until the rectangle measures approximately 15–17 cm long.
FO and weave in the ends.
Shape the Bow
Fold both short ends toward the center so they meet at the back.
Pinch the center to create two rounded bow loops.
Wrap ivory yarn tightly around the center several times.
Secure the wrapping at the back.
Bow Center Band
Ch 7.
Sc in the second chain from the hook and across.
Continue for approximately 8 rows.
Wrap this narrow strip around the center of the bow.
Sew the ends together at the back.
Part 5: Crochet the Bow Tails
Make two matching decorative tails.
Foundation
Ch 13.
Row 1
Hdc in the third chain from the hook.
Hdc across.
Turn.
Rows 2–20
Ch 2.
Hdc in each stitch across.
Turn.
Create the Pointed End
Decrease one stitch at each end of the next few rows until the tail forms a soft point.
FO and weave in the ends.
Repeat for the second tail.
Attach both tails behind the bow center.
Arrange them so they hang naturally on either side of the upper snowflake.
Part 6: Crochet the Hanging Cord
The main hanging cord supports the decoration and connects it to the door hook.
Using ivory yarn:
Ch 65.
Sl st into the second chain from the hook.
Sl st into each remaining chain.
FO, leaving long tails.
Fold the cord in half to create a hanging loop.
Secure the ends behind the crochet bow.
For additional strength, thread a separate piece of strong cotton cord through the crocheted loop.
Part 7: Make the Decorative Hanging Strands
The decoration features several vertical strands of different lengths.
Prepare approximately five to seven strands.
Suggested Strand Lengths
- Center strand: 45–50 cm
- Inner left strand: 30–35 cm
- Inner right strand: 30–35 cm
- Outer left strand: 20–25 cm
- Outer right strand: 20–25 cm
Use ivory cotton yarn, champagne gold yarn, or a combination of both.
For a delicate appearance, create simple chain cords or twisted yarn cords.
Basic Chain Cord
Make a chain slightly longer than the desired finished length.
Sl st back along the chain for additional strength.
FO, leaving long tails for assembly.
Part 8: Crochet Decorative Beads
Small crochet-covered beads add texture between the pearl accents.
Round 1
Make a magic ring.
Work 6 sc into the ring.
Round 2
Work 2 sc into each stitch around. (12 sc)
Rounds 3–4
Sc in each stitch around.
Round 5
Work 6 decreases evenly around. (6 sc)
Insert a small amount of fiberfill before closing.
FO and close the opening.
Make four to six crochet beads.
Part 9: Add the Pearl and Gold Beads
Arrange pearl beads along the hanging strands to create an elegant cascading effect.
Step 1
Lay the crochet cords flat on a table.
Step 2
Position the large snowflakes first.
Step 3
Place smaller snowflakes near the outer strands.
Step 4
Arrange pearl beads above and below the snowflakes.
Step 5
Add crochet-covered beads between selected pearls.
Step 6
Use champagne gold beads sparingly for subtle festive sparkle.
Step 7
Secure every bead with strong thread and tight knots.
Keep the arrangement balanced while allowing each strand to have a slightly different length.
Part 10: Assemble the Snowflake Door Hanging
Step 1: Position the Bow
Place the finished crochet bow at the top of the decoration.
Secure the hanging loop behind the bow.
Step 2: Attach the Main Snowflakes
Attach one large snowflake approximately 12–15 cm below the bow.
Position the second large snowflake approximately 15–18 cm below the first.
Step 3: Add the Small Snowflakes
Attach the smaller snowflakes to the outer strands.
Place one small snowflake near the bottom of the central strand.
Step 4: Add the Pearl Strands
Attach the pearl-decorated cords behind the bow.
Allow the strands to hang freely around the large snowflakes.
Step 5: Add Champagne Gold Details
Use a few small gold crochet branches or gold yarn accents behind the large snowflakes.
These details should complement the ivory design without overwhelming it.
Step 6: Secure the Connections
Check every knot and attachment point.
Reinforce the hanging loop and any strands supporting heavier beads.
Step 7: Final Arrangement
Hang the decoration on a door hook.
Adjust the strands so they cascade naturally.
Make sure the bow remains centered and the snowflakes face forward.
Creative Color Variations
Classic Winter White
Use pure white yarn, silver beads, and clear crystals for a frosty winter-inspired decoration.
Champagne Christmas
Combine warm ivory, champagne gold, and pearl accents for an elegant neutral holiday look.
Rustic Farmhouse
Use oatmeal yarn, wooden beads, and natural cotton cords for a cozy handmade style.
Silver Snowfall
Combine light gray, white, and silver metallic thread for a delicate icy appearance.
Vintage Christmas
Use cream, antique gold, and deep burgundy accents for a traditional festive decoration.
Soft Blush Winter
Combine ivory snowflakes, dusty pink ribbons, and champagne pearls for a romantic winter look.
Helpful Tips for Best Results
- Use cotton yarn for clearly defined snowflake stitches.
- Keep all six arms of each snowflake symmetrical.
- Block the snowflakes before assembling the decoration.
- Use fabric stiffener for a more structured finish.
- Choose lightweight beads to avoid stretching the cords.
- Secure decorative pearls with strong thread.
- Reinforce the main hanging loop.
- Arrange the strands before attaching them permanently.
- Use matching ivory thread to hide visible knots.
- Keep gold accents subtle for an elegant appearance.
- Allow different strand lengths for natural movement.
- Make the bow slightly oversized for a beautiful focal point.
- Check the overall balance before hanging.
- Avoid placing the decoration where it may catch in the door.
- Keep the finished piece away from open flames and excessive moisture.
Frequently Asked Questions
Is this crochet snowflake decoration beginner-friendly?
This project is best suited for intermediate crocheters who are comfortable with working in rounds, making picots, and assembling decorative pieces.
What yarn works best for crochet snowflakes?
Cotton yarn is ideal because it provides excellent stitch definition and holds its shape well after blocking.
Can I use acrylic yarn?
Yes, although cotton generally produces firmer and more defined snowflakes.
Do I need to stiffen the snowflakes?
Stiffening is optional but recommended if you want the snowflakes to maintain their pointed shape while hanging.
Can I make the decoration longer?
Yes. Add more hanging cords, additional small snowflakes, or longer pearl strands.
Can I make the decoration shorter?
Absolutely. Reduce the cord lengths and use fewer decorative elements.
Can I use real pearls?
Yes, but lightweight imitation pearls are generally more practical for a hanging crochet decoration.
Can I make the bow removable?
Yes. Attach the bow using small hidden ties or a detachable clip.
Can I hang this decoration on a front door?
Yes, provided the door is protected from rain, strong wind, and excessive moisture.
Can I use this as a wall hanging?
Yes. It also works beautifully as a winter wall decoration, window ornament, or festive interior accent.
How long does this project take?
Depending on your crochet experience, allow approximately 6–10 hours, plus drying time if you stiffen the snowflakes.
Can I sell finished decorations made from this pattern?
Yes. You may sell your handmade finished decorations. Please credit the original tutorial when sharing the pattern online.
Care Instructions
- Dust gently using a soft brush.
- Avoid pulling on the hanging strands.
- Keep away from excessive moisture.
- Do not machine wash decorations with attached beads.
- Spot clean carefully when necessary.
- Allow the decoration to air dry completely.
- Store flat or loosely wrapped.
- Avoid crushing the snowflake arms.
- Keep pearls and decorative beads protected during storage.
- Reblock the snowflakes if they lose their shape.
Final Thoughts
This elegant crochet snowflake door hanging is a beautiful way to celebrate winter with timeless handmade charm. Its delicate ivory snowflakes, cascading pearl strands, champagne gold details, and graceful crochet bow create a sophisticated Christmas decoration that feels both festive and refined.
Whether displayed on a wooden front door, used as an interior wall hanging, or given as a thoughtful handmade gift, this winter crochet project adds warmth and elegance to seasonal decorating.
Love this beautiful winter crochet decoration? Save this free crochet snowflake pattern to Pinterest and share it with your crochet friends for more elegant handmade Christmas decorations, festive crochet ornaments, and creative holiday inspiration!