Brown and Cream Crochet Patchwork Bedspread with Matching Pillows – Free Pattern
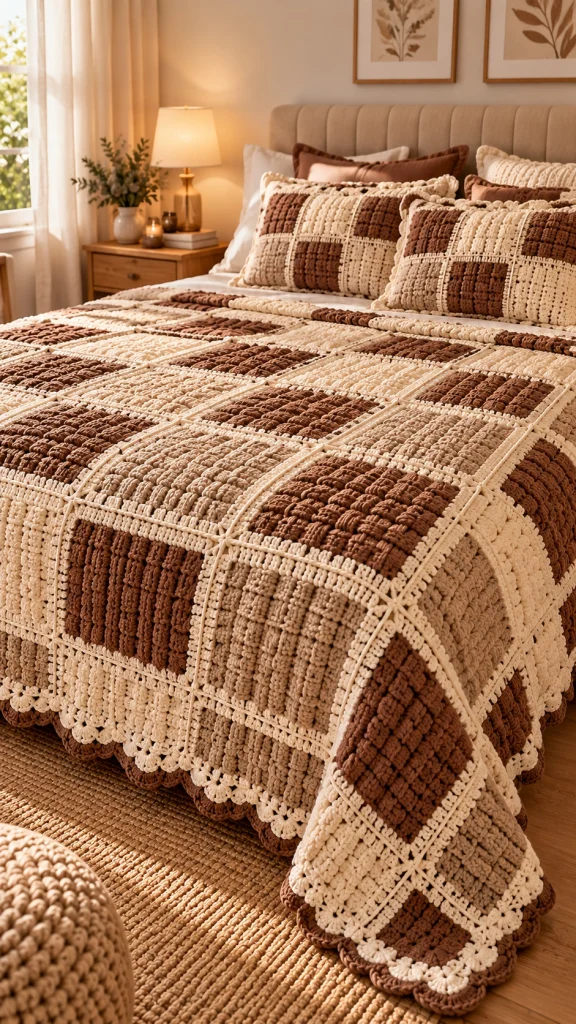
Bring warmth, texture, and timeless elegance into your bedroom with this beautiful brown and cream crochet patchwork bedspread. Featuring a sophisticated combination of chocolate brown, caramel, taupe, and soft ivory, this handmade bedding set creates a cozy and luxurious atmosphere.
The design features large textured crochet squares arranged in a patchwork layout, delicate ivory joining seams, and a decorative scalloped border. Matching rectangular crochet pillows complete the coordinated look, making this set a wonderful addition to farmhouse, rustic, neutral, or classic bedroom interiors.
In this free crochet tutorial, you will learn how to make the individual textured squares, join them into a beautiful bedspread, crochet the scalloped edging, and create coordinating pillow covers.
Pattern Information
- Skill Level: Intermediate
- Finished Size: Approximately 220 × 240 cm (87 × 94 inches)
- Recommended Bed Size: Queen
- Yarn Weight: Worsted weight yarn (Category 4)
- Crochet Hook: 5 mm (H/8)
- Terminology: US crochet terms
- Construction: Individual textured squares joined together
- Estimated Time: 50–70 hours
- Style: Farmhouse, neutral, elegant, cozy
Design Note: This pattern is an inspired interpretation of the pictured bedspread. It recreates the overall patchwork appearance, textured square motifs, warm neutral colors, ivory joining seams, and scalloped border. Exact stitch placement may differ from the reference image.
Materials Needed
- Worsted weight yarn in chocolate brown – approximately 1,200 m
- Worsted weight yarn in caramel brown – approximately 1,000 m
- Worsted weight yarn in warm taupe – approximately 1,000 m
- Worsted weight yarn in ivory cream – approximately 1,600 m
- 5 mm crochet hook
- 4.5 mm crochet hook for decorative edging (optional)
- Yarn needle
- Scissors
- Stitch markers
- Measuring tape
- Blocking mats and rustproof pins (optional)
- Two rectangular pillow inserts, approximately 40 × 60 cm
Yarn Recommendation: Choose a soft, durable, washable acrylic or cotton-blend yarn. A slightly textured yarn works beautifully for this design, but smooth yarn provides clearer stitch definition.
Crochet Abbreviations
- ch: Chain
- sc: Single crochet
- hdc: Half double crochet
- dc: Double crochet
- tr: Treble crochet
- sl st: Slip stitch
- st: Stitch
- sk: Skip
- sp: Space
- rep: Repeat
- RS: Right side
- WS: Wrong side
- FO: Fasten off
- FPdc: Front post double crochet
- BPdc: Back post double crochet
Special Crochet Stitches
Front Post Double Crochet (FPdc)
Yarn over, insert the hook from front to back and then to front around the post of the indicated stitch, yarn over and pull up a loop, then complete a double crochet.
Back Post Double Crochet (BPdc)
Yarn over, insert the hook from back to front and then to back around the post of the indicated stitch, yarn over and pull up a loop, then complete a double crochet.
Bobble Stitch
Yarn over, insert the hook into the indicated stitch, yarn over and pull up a loop.
Yarn over and pull through two loops.
Repeat four more times in the same stitch.
Yarn over and pull through all remaining loops.
Shell Stitch
Work 5 double crochet stitches into the same stitch or space.
Part 1: Plan the Patchwork Layout
The bedspread is made from large textured crochet squares arranged in a repeating checkerboard-inspired pattern.
For a queen-size bedspread, make approximately 30 squares arranged in 5 columns and 6 rows.
Each finished square should measure approximately 40 × 40 cm before joining.
The final size will depend on the joining method, border width, and blocking.
Suggested Color Distribution
- 8 chocolate brown squares
- 7 caramel brown squares
- 7 taupe squares
- 8 ivory cream squares
Arrange the squares so that the darker and lighter colors alternate throughout the bedspread.
For a balanced appearance, avoid placing too many identical colors next to one another.
Part 2: Make the Textured Crochet Squares
Each square is worked in rows using a combination of double crochet, raised post stitches, and bobble textures.
Foundation
Using your selected square color and a 5 mm hook:
Ch 59.
Row 1
Dc in the fourth chain from the hook.
Dc in each remaining chain across.
Turn. (56 dc)
Row 2
Ch 2 (does not count as a stitch).
Hdc in each stitch across.
Turn. (56 hdc)
Row 3
Ch 3 (counts as first dc).
Dc in each remaining stitch across.
Turn. (56 dc)
Row 4
Ch 3.
Alternate FPdc and BPdc across the row.
Turn.
Row 5
Ch 3.
Alternate BPdc and FPdc across the row.
Turn.
Row 6
Ch 2.
Hdc in each stitch across.
Turn.
Row 7
Ch 1.
Sc in the first 2 stitches.
*Work a bobble stitch in the next stitch, sc in the next 3 stitches.*
Repeat across, working sc in any remaining stitches.
Turn.
Row 8
Ch 2.
Hdc in each stitch across.
Turn.
Rows 9–16
Repeat Rows 3–8, then Rows 3–4.
Continue working this textured stitch sequence until the square measures approximately 40 cm in height.
FO, leaving a tail for weaving in.
Part 3: Add a Decorative Border to Each Square
Using ivory cream yarn:
Round 1
Join yarn at any corner.
Ch 1.
Work sc evenly around all four sides of the square.
Work 3 sc in each corner.
Join with a sl st.
Round 2
Ch 3.
Dc evenly around the square.
Work (2 dc, ch 2, 2 dc) in each corner.
Join with a sl st.
Round 3
Ch 1.
Sc in each stitch around.
Work 3 sc in each corner space.
Join with a sl st.
FO and weave in the ends.
Repeat for every square.
This ivory border creates the delicate contrasting grid visible throughout the bedspread.
Part 4: Arrange the Squares
Lay all finished squares on a clean floor or large table.
Arrange them into 5 columns and 6 rows.
Alternate the colors to create a balanced patchwork effect.
Place chocolate brown squares beside ivory or taupe squares whenever possible.
Distribute caramel squares throughout the arrangement for warmth.
Take a photograph of the layout before joining so you can maintain the correct order.
Part 5: Join the Crochet Squares
Using ivory cream yarn and a 5 mm hook:
Step 1
Place two squares together with wrong sides facing.
Step 2
Insert the hook through the corresponding edge stitches of both squares.
Step 3
Join with single crochet along the entire edge.
Step 4
Continue joining squares to complete each horizontal row.
Step 5
Join the completed rows together using the same single crochet method.
Step 6
Check that all corners align correctly.
The raised ivory seams should remain visible on the right side of the bedspread, creating a decorative patchwork grid.
Part 6: Add the Outer Bedspread Border
Once all squares are joined, crochet a continuous border around the entire bedspread.
Border Round 1
Join ivory yarn at any corner.
Ch 1.
Sc evenly around the blanket.
Work 3 sc in each corner.
Join with a sl st.
Border Round 2
Ch 3.
Dc in each stitch around.
Work (2 dc, ch 2, 2 dc) in each corner.
Join with a sl st.
Border Round 3
Ch 1.
Sc in each stitch around.
Work 3 sc in each corner space.
Join with a sl st.
Part 7: Crochet the Scalloped Edging
The scalloped border gives the bedspread its romantic, decorative finish.
Scallop Round
Using ivory cream yarn:
Ch 1.
*Sk 2 stitches, work 5 dc in the next stitch, sk 2 stitches, sc in the next stitch.*
Repeat around the blanket.
Adjust the stitch spacing near the corners to keep the scallops evenly distributed.
Join with a sl st.
FO and weave in the ends.
Optional Contrast Edging
For a richer finish, join chocolate brown yarn and work one round of slip stitches along the outer edge of the scallops.
Keep your tension relaxed so the border does not curl.
Part 8: Make the Matching Rectangular Pillows
The coordinating pillows feature the same brown and cream patchwork colors and raised textures.
Suggested pillow size: 40 × 60 cm.
Pillow Front Panel
Create six smaller crochet squares measuring approximately 20 × 20 cm.
Use a combination of chocolate brown, caramel, taupe, and ivory.
Work each square using the textured stitch pattern from Part 2, adjusting the foundation chain and number of rows to achieve the smaller size.
Arrange the squares into 3 columns and 2 rows.
Join them using ivory single crochet seams.
Pillow Back Panel
Using ivory or chocolate brown yarn, crochet a rectangular panel measuring approximately 40 × 60 cm.
Use double crochet rows for a simple, comfortable backing.
Assemble the Pillow
Place the front and back panels together with wrong sides facing.
Join three sides using single crochet.
Insert the pillow form.
Close the final side with single crochet, or create an envelope-style opening for easy removal.
Decorative Pillow Border
Work one round of single crochet around the pillow edges.
Add a second round of small shells if desired.
Repeat to create a matching pair.
Part 9: Add Decorative Surface Details
To enhance the patchwork effect, add optional raised ivory lines across selected squares.
Surface Slip Stitch Method
Insert your hook from the right side of the fabric.
Pull a loop of ivory yarn through the fabric.
Insert the hook into the next stitch space.
Pull the yarn through the fabric and the loop on your hook.
Continue along the desired line.
This creates a raised decorative line that highlights the square construction.
Keep the surface stitches loose enough to preserve the fabric’s flexibility.
Part 10: Block the Finished Bedspread
Blocking helps the individual squares settle into a uniform shape.
Step 1
Lay the completed bedspread flat on a clean surface.
Step 2
Lightly mist with water if your yarn care instructions permit.
Step 3
Gently straighten the joining seams.
Step 4
Shape the corners and scalloped border.
Step 5
Allow the bedspread to dry completely.
Do not stretch the textured squares excessively.
Creative Color Variations
Chocolate Brown and Ivory
Use deep chocolate brown and warm ivory for a classic, elegant two-tone design.
Caramel and Beige
Combine caramel, beige, cream, and taupe for a soft neutral farmhouse look.
Sage Green and Cream
Replace the brown shades with sage green, olive, ivory, and pale beige for a calming botanical-inspired bedroom.
Dusty Rose and Cream
Use blush pink, dusty rose, warm ivory, and soft mauve for a romantic bedroom aesthetic.
Gray and White
Combine charcoal, medium gray, light gray, and white for a modern monochrome bedding set.
Terracotta and Sand
Choose terracotta, rust, warm sand, and cream for a cozy autumn-inspired design.
Helpful Tips for Best Results
- Make a gauge swatch before starting the full project.
- Use the same yarn weight for every square.
- Maintain consistent crochet tension.
- Measure each square before adding its border.
- Block individual squares if necessary.
- Use stitch markers to identify corners.
- Arrange all squares before joining.
- Take a photograph of your chosen layout.
- Join squares with the right sides facing outward.
- Keep joining seams even and relaxed.
- Weave in yarn ends securely.
- Use washable yarn for everyday bedding.
- Make matching pillows with the same color palette.
- Adjust the number of squares to fit your bed.
- Block the finished bedspread for a polished appearance.
Frequently Asked Questions
Is this crochet bedspread beginner-friendly?
This project is best for intermediate crocheters. However, confident beginners who are familiar with basic stitches can complete it with patience and practice.
How many squares do I need?
For the suggested queen-size layout, make approximately 30 squares arranged in 5 columns and 6 rows.
Can I make this bedspread larger?
Yes. Add more columns and rows of squares to create a larger bedspread.
Can I make a smaller blanket?
Absolutely. Reduce the number of squares to create a throw blanket or smaller bed covering.
How much yarn will I need?
Plan for approximately 4,800 meters of worsted weight yarn for the suggested queen-size design. Actual usage depends on gauge, stitch texture, and finished dimensions.
Can I use cotton yarn?
Yes. Cotton yarn provides excellent stitch definition, but a large cotton bedspread may be heavy.
Can I use acrylic yarn?
Yes. Soft acrylic yarn is a popular option for blankets because it is generally affordable, lightweight, and easy to care for.
Can I make the squares in different stitch patterns?
Yes. You can combine bobble stitch, basketweave, ribbed, and simple double crochet squares for additional texture, provided all squares finish at the same dimensions.
Do I have to use the scalloped border?
No. A simple single crochet or double crochet border also looks beautiful.
How long does this project take?
Allow approximately 50–70 hours for a queen-size bedspread, depending on your experience and crochet speed.
Can I machine wash the finished bedspread?
Follow the washing instructions on your yarn label. Many acrylic and cotton-blend yarns are machine washable on a gentle cycle.
Can I sell finished bedspreads made from this pattern?
Yes. You may sell your own handmade finished items. Please credit the original tutorial when sharing the pattern online.
Care Instructions
- Follow the care instructions on your yarn label.
- Use a gentle washing cycle when permitted.
- Wash with similar colors.
- Use mild detergent.
- Avoid bleach.
- Air dry flat whenever possible.
- Avoid high heat.
- Reshape the squares while damp.
- Gently straighten the scalloped border.
- Store in a clean, dry place.
Final Thoughts
This brown and cream crochet patchwork bedspread combines rich neutral colors, beautiful raised textures, decorative joining seams, and delicate scalloped edging to create a timeless handmade bedroom centerpiece.
The matching crochet pillows add the perfect finishing touch, making this set ideal for anyone who loves elegant farmhouse décor, cozy neutral interiors, and handmade home accessories.
Whether you create it for your own bedroom, as a wedding gift, or as a special handmade present, this crochet bedding set is a meaningful project that brings warmth and charm into any home.
Love this crochet bedspread? Save this free crochet pattern to Pinterest and share it with your crochet friends for more beautiful handmade blankets, bedspreads, and home décor inspiration!