Blue Crochet Floral Bedspread with Matching Pillow Covers – Free Pattern
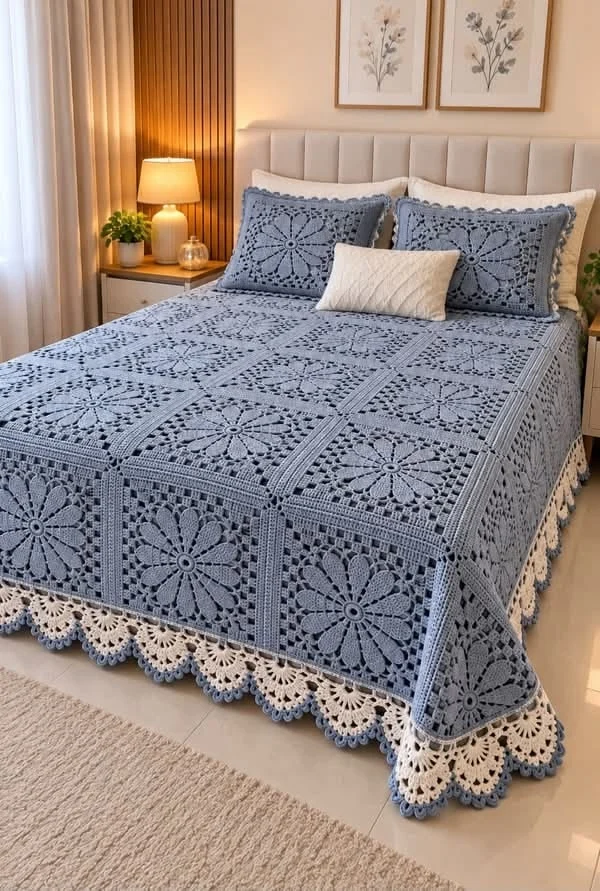
Transform your bedroom into a peaceful and elegant retreat with this beautiful blue crochet floral bedspread. Featuring large floral lace motifs, delicate openwork details, a sophisticated dusty blue color, and an ivory scalloped border, this handmade bedspread brings timeless charm to any bedroom.
The matching crochet pillow covers complete the coordinated look, making this project perfect for anyone who loves romantic cottage-style decor, vintage crochet designs, and luxurious handmade bedding.
This free crochet pattern shows you how to create the floral square motifs, join them into a beautiful bedspread, add the decorative lace edging, and make matching pillow covers inspired by the pictured design.
Pattern Information
- Skill Level: Intermediate to Advanced
- Finished Bedspread Size: Approximately 220 × 240 cm
- Pillow Cover Size: Approximately 45 × 45 cm each
- Yarn Weight: DK weight yarn (Category 3)
- Hook Size: 3.5 mm or 4 mm
- Terminology: US crochet terms
- Construction: Individual floral lace squares joined together
- Main Color: Dusty blue
- Accent Color: Ivory cream
- Estimated Time: 45–65 hours
Design Note: The bedspread is inspired by the photographed design, with oversized flower motifs, square lace panels, neat joining strips, and a contrasting scalloped border. The exact number of motifs may vary depending on your yarn, tension, and desired bed size.
Materials Needed
- Approximately 2,500–3,000 g dusty blue DK cotton or cotton-blend yarn
- Approximately 350–500 g ivory DK yarn for the border
- 3.5 mm crochet hook
- 4 mm crochet hook if needed to obtain gauge
- Yarn needle
- Scissors
- Stitch markers
- Measuring tape
- Blocking mats
- Rustproof blocking pins
- Two 45 × 45 cm pillow inserts
- Optional buttons or zipper closures for the pillow covers
Yarn Recommendation: Choose a soft cotton or cotton-blend yarn with good stitch definition. This will help the floral motifs maintain their shape while keeping the finished bedspread comfortable and breathable.
Crochet Abbreviations
- MR: Magic ring
- ch: Chain
- sc: Single crochet
- hdc: Half double crochet
- dc: Double crochet
- tr: Treble crochet
- sl st: Slip stitch
- st: Stitch
- sp: Space
- rep: Repeat
- FO: Fasten off
Part 1: Crochet the Large Floral Lace Square
The main feature of this bedspread is its oversized floral lace motif. Each square contains a central flower surrounded by an airy openwork frame.
Use dusty blue yarn and a 3.5 mm hook.
Round 1: Create the Flower Center
Make a magic ring.
Ch 3 (counts as first dc), work 15 dc into the ring.
Sl st into the top of the beginning ch-3 to join.
You should have 16 dc.
Round 2: Create the Petal Foundations
Ch 1.
Sc in the same stitch.
*Ch 5, skip 1 stitch, sc in the next stitch.*
Repeat around.
Join with a sl st.
You should have 8 chain loops.
Round 3: Crochet the First Petal Layer
Sl st into the first ch-5 space.
Work the following into each chain space:
- 1 sc
- 1 hdc
- 5 dc
- 1 hdc
- 1 sc
Repeat in each ch-5 space.
Join with a sl st.
You now have eight rounded flower petals.
Round 4: Create the Openwork Behind the Petals
Working behind the petals, attach the yarn at the base of a petal.
Ch 7.
Sc into the base between the next two petals.
Repeat around to create eight larger chain loops behind the first petal layer.
Round 5: Crochet the Large Outer Petals
Sl st into the first ch-7 space.
Work into each loop:
- 1 sc
- 1 hdc
- 3 dc
- 3 tr
- 3 dc
- 1 hdc
- 1 sc
Repeat around.
Join with a sl st.
The flower now has eight large outer petals surrounding the center.
Part 2: Turn the Flower into a Square
The next step is to transform the round flower motif into a square lace panel.
Round 6: Establish the Square Corners
Attach yarn between two outer petals.
Ch 4.
Work a series of chain spaces around the flower, positioning four larger chain spaces evenly around the motif to establish the square corners.
Use ch-7 spaces for the corners and ch-4 spaces between them.
Join with a sl st.
Round 7: Build the Square Frame
Work dc stitches into the chain spaces.
At each corner, work:
(3 dc, ch 3, 3 dc).
Continue around the motif, keeping the sides even.
Join with a sl st.
Round 8: Create the Lace Openwork
Ch 3.
Work alternating dc groups and ch-2 spaces along each side.
At each corner, work:
(2 dc, ch 3, 2 dc).
Repeat around.
Round 9: Add the Decorative Square Border
Work one round of dc around the entire square.
At each corner, work:
(2 dc, ch 2, 2 dc).
Join with a sl st.
Round 10: Finish the Square
Work one round of sc around the entire motif.
Place 3 sc into each corner space.
FO and weave in the ends.
Block the finished square into a neat shape.
Target Motif Size: Approximately 28–30 cm square after blocking.
Part 3: Make the Bedspread Panels
For a bedspread measuring approximately 220 × 240 cm, arrange your floral squares in a rectangular layout.
A suggested arrangement is:
- 7 floral squares across
- 8 floral squares down
- 56 floral squares total
Adjust the number of motifs according to your finished square size and the dimensions of your bed.
For a smaller bedspread, reduce the number of rows or columns.
For a larger king-size bedspread, add additional floral squares.
Part 4: Join the Floral Squares
The photographed bedspread features neat joining strips that create a beautiful grid between the flower motifs.
Step 1: Arrange the Squares
Lay all completed motifs on a flat surface.
Position them with the right sides facing upward.
Check that the floral centers are aligned consistently.
Step 2: Join the Squares
Place two squares with right sides together.
Using dusty blue yarn, join the corresponding edge stitches with slip stitches or single crochet.
Continue joining the squares into horizontal rows.
Step 3: Join the Rows
Connect the completed rows using the same joining method.
Keep the joins relaxed so the bedspread lies flat.
Step 4: Add Raised Joining Strips
For a decorative raised effect, work one row of sc along each joining seam.
This creates a defined grid that frames the floral motifs beautifully.
Part 5: Crochet the Outer Blue Border
Once all squares are joined, work a continuous border around the entire bedspread.
Round 1
Attach dusty blue yarn at any corner.
Work sc evenly around all four sides.
At each corner, work 3 sc.
Round 2
Ch 3.
Work dc in each stitch around.
At each corner, work (2 dc, ch 2, 2 dc).
Round 3
Work alternating dc groups and ch-2 spaces around the border to create a decorative openwork effect.
Maintain even spacing at the corners.
Round 4
Work one final round of sc to stabilize the border.
FO and weave in the ends.
Part 6: Crochet the Ivory Scalloped Lace Edging
The beautiful ivory lace edging adds a romantic finishing touch and creates a lovely contrast with the dusty blue floral squares.
Use ivory yarn and a 3.5 mm hook.
Round 1: Ivory Foundation
Attach ivory yarn at one corner.
Work sc evenly around the entire bedspread.
At each corner, work 3 sc.
Round 2: Create the Lace Loops
Ch 1.
*Sc in the next stitch, ch 5, skip 3 stitches.*
Repeat around.
Adjust spacing at the corners to keep the edging flat.
Round 3: Crochet the Scallops
Sl st into the first ch-5 space.
Work:
- 1 sc
- 2 hdc
- 5 dc
- 2 hdc
- 1 sc
Repeat in each chain space.
Round 4: Add the Blue Accent
Switch back to dusty blue yarn.
Work a delicate round of slip stitches or single crochet along the outer edge of the scallops.
FO and weave in the ends.
Block the edging gently to define the scalloped shape.
Part 7: Crochet the Matching Floral Pillow Covers
Complete the bedroom set with two matching crochet pillow covers featuring the same elegant floral lace design.
Step 1: Crochet the Front Panels
For each pillow cover, make one large floral square using the same pattern as the bedspread motifs.
Add extra border rounds until the square measures approximately 45 × 45 cm.
Step 2: Crochet the Back Panels
Using dusty blue yarn, crochet a solid square using rows of hdc.
Continue until the panel measures approximately 45 × 45 cm.
Alternatively, create an envelope-style closure using two overlapping rectangular panels.
Step 3: Join the Pillow Panels
Place the front and back panels together with the right sides facing outward.
Join three sides using sc.
Insert the pillow form.
Close the final side or add a removable closure.
Step 4: Add Decorative Edging
Work one round of sc around the pillow edges.
Add a delicate scalloped edging if desired.
Repeat for the second pillow cover.
How to Customize the Bedspread Size
This floral crochet bedspread can be adapted to fit different bed sizes.
Single Bed
Suggested finished size: 150 × 220 cm.
Use fewer floral squares and a narrower border.
Double Bed
Suggested finished size: 200 × 230 cm.
Increase the number of floral motifs as needed.
Queen Bed
Suggested finished size: 220 × 240 cm.
Use the full floral square arrangement described in this pattern.
King Bed
Suggested finished size: 260 × 260 cm.
Add additional rows and columns of motifs.
Important: Always measure your bed and completed crochet motifs before deciding on the final number of squares.
Beautiful Color Variations
Dusty Blue & Ivory
Recreate the elegant look of the photographed bedspread with soft dusty blue flowers and a delicate ivory lace border.
Sage Green & Cream
Choose muted sage green yarn with warm cream edging for a peaceful botanical bedroom.
Blush Pink & White
Create a romantic cottage-style bedspread using dusty pink floral squares and crisp white scallops.
Lavender & Ivory
Use soft lavender yarn and an ivory border for a charming vintage-inspired bedroom.
Classic White
Make the entire bedspread in white or ivory for a timeless heirloom-style crochet design.
Beige & Champagne
Combine warm beige floral motifs with champagne-colored edging for an elegant neutral bedroom.
Helpful Crochet Tips
- Make one complete floral square before beginning the full bedspread.
- Measure and block the first motif to establish the finished size.
- Use the same hook size and yarn throughout the project.
- Keep your tension consistent for evenly sized squares.
- Block all motifs before joining.
- Arrange the motifs on a flat surface to check the overall design.
- Use stitch markers to align corners during joining.
- Avoid pulling joining stitches too tightly.
- Keep the outer border relaxed to prevent curling.
- Block the finished scalloped edging gently.
- Use washable yarn for easier maintenance.
- Keep leftover yarn for future repairs.
Frequently Asked Questions
Is this crochet bedspread suitable for beginners?
This project is recommended for intermediate crocheters who are comfortable with lace stitches, floral motifs, joining squares, and decorative borders.
How long does it take to crochet?
A full queen-size bedspread may take approximately 45–65 hours or longer, depending on your experience, yarn choice, and finished dimensions.
How much yarn do I need?
For a large bedspread and two matching pillow covers, plan for approximately 2,500–3,000 g of dusty blue yarn and 350–500 g of ivory yarn. Actual quantities depend on your gauge and stitch density.
Can I use acrylic yarn?
Yes. Soft acrylic or acrylic-blend yarn can work well, although cotton yarn often provides sharper stitch definition for lace motifs.
Can I make this bedspread without the ivory border?
Absolutely. You can finish the entire bedspread in dusty blue for a monochromatic design.
Can I make a matching blanket instead?
Yes. Reduce the number of floral squares to create a smaller throw blanket for a sofa or armchair.
Should I block the floral squares?
Yes. Blocking helps the motifs become uniform in size and makes joining easier.
Can I make the pillow covers removable?
Yes. An envelope-style back or button closure allows the pillow inserts to be removed for washing.
Can I change the size of the flower motifs?
Yes. Using thinner yarn and a smaller hook creates smaller motifs, while thicker yarn and a larger hook produce larger squares.
Care Instructions
- Follow the washing instructions on your yarn label.
- Hand washing is recommended for delicate lace designs.
- Use cool water and a gentle detergent.
- Avoid bleach and harsh cleaning products.
- Do not twist or wring the wet bedspread.
- Lay flat to dry whenever possible.
- Reshape the floral motifs while damp.
- Avoid hanging the wet bedspread because its weight may stretch the stitches.
- Store folded in a clean, dry location.
- Keep away from prolonged direct sunlight to preserve the dusty blue color.
Final Thoughts
This blue crochet floral bedspread with matching pillow covers is a beautiful handmade project that brings elegance, warmth, and timeless charm to any bedroom. The oversized floral lace motifs, delicate openwork panels, and romantic ivory scalloped edging create a stunning design that looks like a treasured family heirloom.
Whether you are decorating your own bedroom, creating a thoughtful wedding gift, or making a special handmade keepsake, this crochet bedding set is a wonderful way to showcase your creativity and crochet skills.
Love this crochet bedspread? Save this free floral bedspread pattern to Pinterest and share it with your crochet friends for more beautiful handmade home decor inspiration!