Crochet Thanksgiving Turkey Door Hanger with Pumpkin and Fall Leaves – Free Pattern
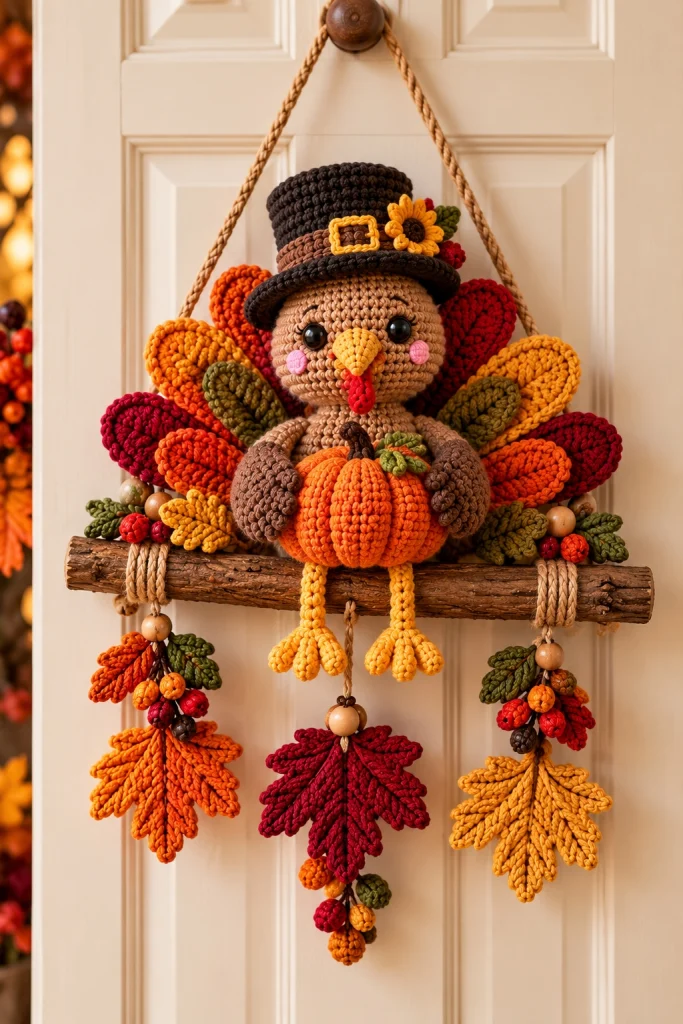
Welcome autumn into your home with this adorable crochet Thanksgiving turkey door hanger! Featuring a cheerful amigurumi turkey wearing a pilgrim hat, holding a bright orange pumpkin, and surrounded by colorful fall feathers, this handmade decoration brings warmth and personality to your seasonal décor.
The turkey sits on a rustic wooden branch, surrounded by crocheted autumn leaves, berries, and decorative wooden beads. Three beautiful hanging oak-leaf ornaments complete the arrangement, making it a charming decoration for front doors, entryways, kitchens, or Thanksgiving celebrations.
This free crochet pattern guides you through making the turkey, pumpkin, pilgrim hat, colorful tail feathers, autumn leaves, and decorative hanging elements. The finished piece is perfect for celebrating fall or giving as a thoughtful handmade Thanksgiving gift.
Pattern Information
- Skill Level: Intermediate to Advanced
- Finished Size: Approximately 40–45 cm wide × 55–65 cm tall, including hanging leaves
- Turkey Height: Approximately 20 cm
- Yarn Weight: Worsted weight cotton yarn (Category 4)
- Hook Size: 3.5 mm for amigurumi; 4 mm for leaves and decorations
- Terminology: US crochet terms
- Construction: Separate crocheted pieces assembled onto a wooden branch
- Estimated Time: 12–18 hours
- Season: Autumn and Thanksgiving
Design Note: This pattern is inspired by the pictured Thanksgiving decoration. It includes a brown turkey with a black pilgrim hat, a yellow beak, red wattle, orange pumpkin, colorful fan-shaped feathers, and three dangling autumn leaf ornaments. Adjust the number of leaves and berries to achieve your preferred fullness.
Materials Needed
- Medium brown cotton yarn for the turkey head and body
- Dark brown yarn for the wings and details
- Black yarn for the pilgrim hat
- Rust brown yarn for the hatband
- Golden yellow yarn for the hat buckle, beak, and feet
- Bright orange yarn for the pumpkin and feathers
- Mustard yellow yarn for autumn leaves
- Burgundy red yarn for feathers and leaves
- Olive green yarn for leaves and pumpkin vines
- Red yarn for the wattle and berries
- Small amounts of pink yarn for the cheeks
- 3.5 mm and 4 mm crochet hooks
- Two 10–12 mm black safety eyes
- Polyester fiberfill stuffing
- Yarn needle
- Scissors
- Stitch markers
- Approximately 35–40 cm natural wooden branch
- Strong cotton cord or braided rope
- Assorted wooden beads
- Optional floral wire for shaping leaves
- Optional fabric glue for securing small decorative elements
Crochet Abbreviations
- MR: Magic ring
- ch: Chain
- sc: Single crochet
- hdc: Half double crochet
- dc: Double crochet
- tr: Treble crochet
- sl st: Slip stitch
- inc: Increase (2 sc in one stitch)
- dec: Invisible decrease
- BLO: Back loop only
- FO: Fasten off
- st: Stitch
- rep: Repeat
Part 1: Crochet the Turkey Head
Using medium brown yarn and a 3.5 mm crochet hook, work in continuous rounds.
Round 1
6 sc in MR. (6)
Round 2
Inc in each stitch around. (12)
Round 3
*1 sc, inc* repeat 6 times. (18)
Round 4
*2 sc, inc* repeat 6 times. (24)
Round 5
*3 sc, inc* repeat 6 times. (30)
Round 6
*4 sc, inc* repeat 6 times. (36)
Round 7
*5 sc, inc* repeat 6 times. (42)
Rounds 8–15
Sc in each stitch around. (42)
Insert the safety eyes between rounds 11 and 12, approximately 8 stitches apart.
Round 16
*5 sc, dec* repeat 6 times. (36)
Round 17
*4 sc, dec* repeat 6 times. (30)
Round 18
*3 sc, dec* repeat 6 times. (24)
Stuff the head firmly with polyester fiberfill.
Round 19
*2 sc, dec* repeat 6 times. (18)
Round 20
*1 sc, dec* repeat 6 times. (12)
Round 21
Dec around. (6)
FO, close the opening, and weave in the end.
Part 2: Crochet the Turkey Body
Using medium brown yarn, begin with a magic ring.
Round 1
6 sc in MR. (6)
Round 2
Inc around. (12)
Round 3
*1 sc, inc* repeat 6 times. (18)
Round 4
*2 sc, inc* repeat 6 times. (24)
Round 5
*3 sc, inc* repeat 6 times. (30)
Round 6
*4 sc, inc* repeat 6 times. (36)
Rounds 7–12
Sc around. (36)
Round 13
*4 sc, dec* repeat 6 times. (30)
Round 14
Sc around. (30)
Round 15
*3 sc, dec* repeat 6 times. (24)
Round 16
*2 sc, dec* repeat 6 times. (18)
Stuff firmly.
Round 17
*1 sc, dec* repeat 6 times. (12)
Round 18
Dec around. (6)
FO and close the opening.
Sew the turkey head securely to the upper body.
Part 3: Crochet the Turkey Beak
Using golden yellow yarn:
Round 1
4 sc in MR. (4)
Round 2
*1 sc, inc* repeat twice. (6)
Round 3
*2 sc, inc* repeat twice. (8)
Round 4
Sc around. (8)
FO, leaving a long tail.
Lightly stuff and sew the beak between the eyes.
Part 4: Crochet the Red Wattle
Using red yarn:
Ch 7.
Sc in the second chain from the hook.
Sc in each remaining chain.
FO, leaving a long tail.
Sew the wattle beneath one side of the beak.
Part 5: Add the Turkey Cheeks
Using pink yarn, make two small circles.
Round 1
6 sc in MR.
FO and leave a tail for sewing.
Attach one cheek beneath each eye.
Part 6: Crochet the Turkey Wings
Make two using dark brown yarn.
Round 1
6 sc in MR. (6)
Round 2
*1 sc, inc* repeat 3 times. (9)
Round 3
*2 sc, inc* repeat 3 times. (12)
Rounds 4–7
Sc around. (12)
Round 8
*2 sc, dec* repeat 3 times. (9)
Lightly stuff the wings.
Flatten the opening and sew closed.
Attach the wings to both sides of the turkey body.
Position them slightly forward so the turkey appears to be holding the pumpkin.
Part 7: Crochet the Colorful Turkey Tail Feathers
The colorful fan-shaped feathers create the beautiful autumn background behind the turkey.
Make approximately 9–11 feathers using orange, mustard yellow, burgundy, rust, and olive green yarn.
Feather Pattern
Ch 13.
Row 1
Sc in the second chain from the hook.
Hdc in the next 2 chains.
Dc in the next 6 chains.
Hdc in the next 2 chains.
Work 3 sc in the final chain.
Continue along the opposite side of the foundation chain.
Hdc in the next 2 chains.
Dc in the next 6 chains.
Hdc in the next 2 chains.
Sc in the final stitch.
Round 2
Work sc evenly around the feather.
At the rounded tip, work 3 sc in the center stitch.
FO, leaving a long tail for sewing.
Assembly
Arrange the feathers in a semicircular fan behind the turkey.
Alternate the colors for a balanced autumn appearance.
Sew the feather bases together securely.
Attach the completed feather fan behind the turkey body.
Part 8: Crochet the Pilgrim Hat
Use black yarn and a 3.5 mm hook.
Round 1
6 sc in MR. (6)
Round 2
Inc around. (12)
Round 3
*1 sc, inc* repeat 6 times. (18)
Round 4
*2 sc, inc* repeat 6 times. (24)
Round 5
*3 sc, inc* repeat 6 times. (30)
Round 6
Sc in BLO around. (30)
Rounds 7–12
Sc around. (30)
Round 13: Hat Brim
Working in front loops, *4 sc, inc* repeat 6 times. (36)
Round 14
*5 sc, inc* repeat 6 times. (42)
Round 15
Sc around. (42)
FO and weave in the ends.
Hatband
Using rust brown yarn, crochet a narrow strip long enough to wrap around the hat.
Sew it just above the brim.
Golden Buckle
Using golden yellow yarn, ch 12 and join to form a ring.
Work sc evenly around the chain ring.
Shape into a small rectangle and sew to the front of the hatband.
Sunflower Decoration
Make a small sunflower using mustard yellow petals and a dark brown center.
Sew it beside the buckle.
Attach the finished hat to the turkey head.
Part 9: Crochet the Pumpkin
Using bright orange yarn:
Round 1
6 sc in MR. (6)
Round 2
Inc around. (12)
Round 3
*1 sc, inc* repeat 6 times. (18)
Round 4
*2 sc, inc* repeat 6 times. (24)
Round 5
*3 sc, inc* repeat 6 times. (30)
Round 6
*4 sc, inc* repeat 6 times. (36)
Rounds 7–12
Sc around. (36)
Round 13
*4 sc, dec* repeat 6 times. (30)
Round 14
*3 sc, dec* repeat 6 times. (24)
Round 15
*2 sc, dec* repeat 6 times. (18)
Stuff firmly.
Round 16
*1 sc, dec* repeat 6 times. (12)
Round 17
Dec around. (6)
FO, leaving a long tail.
Create the Pumpkin Ridges
Thread the long yarn tail through a needle.
Pass the needle through the pumpkin center from top to bottom.
Wrap the yarn around the outside and pull gently to create a groove.
Repeat 6–8 times around the pumpkin.
Pumpkin Stem
Using dark brown yarn, make a small cylindrical stem.
Sew it to the pumpkin top.
Pumpkin Leaves
Using olive green yarn, crochet two small leaves and attach them beside the stem.
Position the pumpkin between the turkey wings and sew it securely in place.
Part 10: Crochet the Turkey Legs and Feet
Make two using golden yellow yarn.
Legs
Ch 16.
Sc in the second chain from the hook and in each chain across.
FO, leaving a long tail.
Toes
For each foot, make three short crocheted cords.
Ch 7 for each toe.
Sc across.
Sew the three toes together at one end.
Attach the foot to the bottom of the leg.
Repeat for the second leg.
Sew the legs to the lower turkey body so they hang naturally over the wooden branch.
Part 11: Crochet the Autumn Oak Leaves
Make several decorative leaves using mustard yellow, burnt orange, burgundy, and olive green yarn.
Leaf Foundation
Ch 18.
Row 1
Sc in the second chain from the hook.
Hdc in the next 2 chains.
Dc in the next 10 chains.
Hdc in the next 2 chains.
Work 3 sc in the final chain.
Continue along the opposite side.
Hdc in the next 2 chains.
Dc in the next 10 chains.
Hdc in the next 2 chains.
Sc in the final stitch.
Create the Oak Leaf Lobes
Work around the leaf edge.
*Ch 4, sc in the second chain from the hook, hdc in the next chain, dc in the next chain, sl st into the next available edge stitch.*
Repeat along both sides to create the characteristic oak-leaf shape.
FO and weave in the ends.
Leaf Veins
Using a contrasting yarn color, embroider a central vein and small branching veins.
Make approximately 12–15 leaves in assorted autumn colors.
Part 12: Crochet the Small Autumn Berries
Using red, orange, or burgundy yarn:
Round 1
6 sc in MR. (6)
Round 2
Inc around. (12)
Round 3
Sc around. (12)
Round 4
Dec around. (6)
Lightly stuff.
FO and close the opening.
Make approximately 12–18 berries.
Group them in clusters of three or four for a natural autumn arrangement.
Part 13: Prepare the Wooden Branch
Choose a clean, dry wooden branch approximately 35–40 cm long.
Remove any loose bark or sharp edges.
Lightly sand rough areas if necessary.
Make sure the branch is sturdy enough to support the decoration.
Attach the Hanging Rope
Cut approximately 80–100 cm of strong braided cotton cord.
Tie one end securely around the left side of the branch.
Tie the opposite end around the right side.
Adjust the cord to form a triangular hanging loop.
Secure both knots firmly.
Part 14: Make the Three Hanging Leaf Ornaments
The three dangling ornaments create beautiful movement beneath the turkey.
Step 1
Prepare three crocheted oak leaves in different colors:
- Burnt orange
- Burgundy red
- Golden mustard yellow
Step 2
Cut three lengths of strong cotton cord.
Use different lengths to create a staggered hanging arrangement.
Step 3
Thread wooden beads onto each cord.
Step 4
Attach one large oak leaf to the end of each cord.
Step 5
Add small crocheted berries and leaves above or below the main leaf.
Step 6
Secure the cords to the wooden branch.
Position one ornament on the left, one in the center, and one on the right.
Part 15: Assemble the Thanksgiving Door Hanger
Step 1: Position the Turkey
Place the completed turkey in the center of the wooden branch.
Secure the turkey body to the branch using strong yarn or hidden stitches.
Step 2: Arrange the Tail Feathers
Spread the colorful feathers behind the turkey in a wide fan shape.
Secure them so they remain evenly positioned.
Step 3: Add the Pumpkin
Make sure the pumpkin is positioned naturally between the turkey wings.
Step 4: Add the Autumn Leaves
Arrange crocheted leaves around both sides of the turkey.
Use larger leaves near the center and smaller leaves toward the edges.
Step 5: Add the Berries
Attach small berry clusters between the leaves.
Step 6: Attach the Hanging Ornaments
Secure the three dangling leaf ornaments beneath the branch.
Step 7: Check the Balance
Lift the decoration by its hanging rope.
Adjust the position of the turkey and ornaments until the branch hangs evenly.
Step 8: Final Details
Weave in any remaining yarn ends.
Check that all decorative elements are securely attached.
Fluff the feathers and arrange the leaves for a full, balanced appearance.
Creative Customization Ideas
Rustic Farmhouse Version
Use muted mustard, burnt orange, olive green, and warm brown yarn for a traditional farmhouse look.
Neutral Thanksgiving Version
Choose cream, beige, taupe, and soft caramel for an elegant neutral autumn decoration.
Bright Harvest Version
Use vibrant orange, sunflower yellow, deep red, and forest green for a cheerful seasonal display.
Mini Turkey Ornament
Use thinner yarn and a smaller crochet hook to create a miniature version for hanging on a cabinet or wall.
Personalized Family Decoration
Add a small crocheted banner with your family name or a seasonal greeting.
Thanksgiving Gift Version
Pair the finished decoration with a handmade gift tag and a matching crocheted pumpkin.
Helpful Tips for Best Results
- Use cotton yarn for well-defined stitches.
- Keep amigurumi stitches tight to prevent stuffing from showing.
- Stuff the turkey head and body firmly but evenly.
- Use stitch markers when working in continuous rounds.
- Secure the safety eyes before closing the head.
- Use matching yarn colors when sewing pieces together.
- Arrange the tail feathers before permanently attaching them.
- Keep the turkey centered on the branch.
- Reinforce the hanging rope knots.
- Use a strong wooden branch that can support the decoration.
- Attach the hanging leaves at slightly different heights.
- Check the decoration’s balance before displaying it.
- Use floral wire only if additional leaf shaping is needed.
- Keep small beads securely attached and away from young children.
Frequently Asked Questions
Is this Thanksgiving crochet pattern suitable for beginners?
This project is best suited to intermediate or advanced crocheters because it includes amigurumi construction, several decorative components, and detailed assembly.
How long does it take to make?
Allow approximately 12–18 hours, depending on your experience and the number of decorative elements you create.
Can I use acrylic yarn instead of cotton?
Yes. Acrylic yarn works well, although cotton provides firmer stitches and better structural definition.
Can I make the turkey without the pilgrim hat?
Absolutely. The turkey will still look adorable without the hat.
Can I replace the pumpkin with another decoration?
Yes. You can substitute a crocheted sunflower, apple, acorn, or small harvest basket.
Can I make the decoration smaller?
Yes. Use thinner yarn, smaller hooks, and a shorter wooden branch.
Can this door hanger be displayed outdoors?
It is best displayed indoors or on a covered porch protected from rain, wind, and prolonged direct sunlight.
Can I use a wooden dowel instead of a natural branch?
Yes. A smooth wooden dowel provides a neat alternative and works well for modern farmhouse décor.
Can I wash the finished decoration?
Spot cleaning is recommended because the decoration contains stuffing, wooden beads, and a natural wooden branch.
Can I sell finished decorations made from this pattern?
Yes, you may sell your own handmade finished pieces. Please link to the original tutorial when sharing the pattern rather than republishing the written instructions.
Care Instructions
- Dust gently with a soft brush.
- Spot clean with a slightly damp cloth.
- Avoid soaking the wooden branch.
- Do not machine wash the assembled decoration.
- Keep away from open flames and excessive heat.
- Avoid prolonged direct sunlight to preserve yarn colors.
- Store flat in a clean, dry box after the season.
- Use tissue paper to help protect the crocheted feathers and leaves.
- Check the hanging cord before each seasonal display.
Final Thoughts
This crochet Thanksgiving turkey door hanger is a delightful way to celebrate the beauty of autumn with handmade creativity. From the turkey’s cheerful expression and charming pilgrim hat to the colorful tail feathers, bright orange pumpkin, and dangling oak leaves, every detail adds warmth and seasonal personality.
Whether displayed on your front door, in your entryway, or as part of your Thanksgiving decorations, this handcrafted turkey is sure to bring smiles to family and guests.
Love this crochet Thanksgiving decoration? Save this free crochet pattern to Pinterest and share it with your crochet friends for more beautiful fall and holiday crochet ideas!