Boho Crochet Crossbody Bag with Fringe and Tassels – Free Pattern
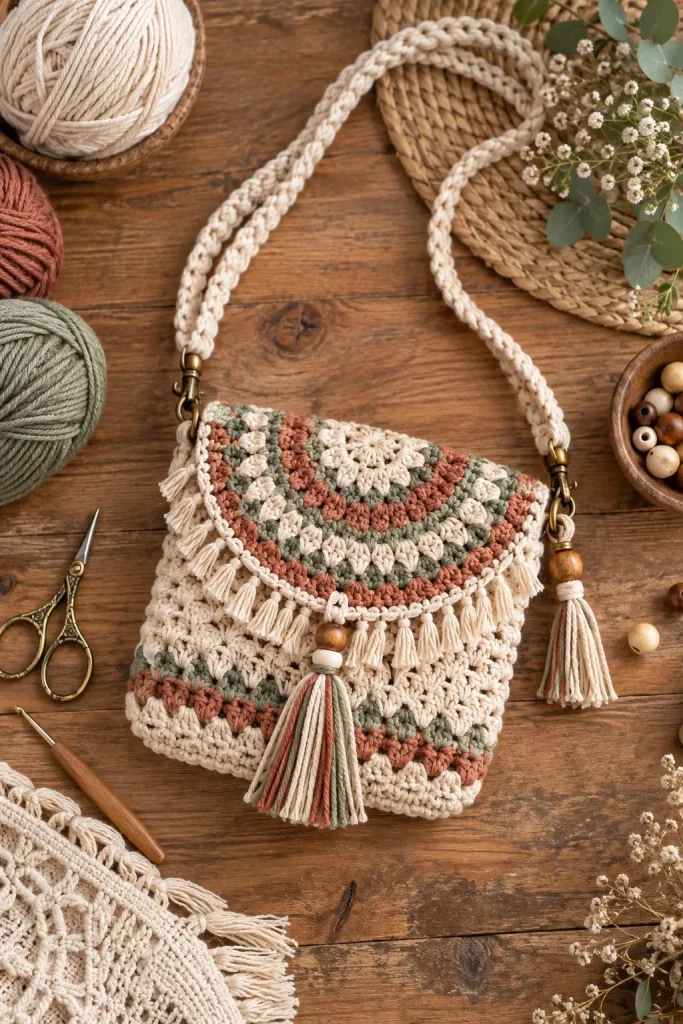
Add a touch of handmade bohemian charm to your wardrobe with this beautiful boho crochet crossbody bag. Featuring warm cream, muted sage green, and earthy terracotta yarn, this stylish shoulder bag combines textured crochet stitches, a decorative semicircular flap, playful fringe, a braided strap, and elegant tassel accents.
Perfect for everyday outings, weekend markets, vacations, and thoughtful handmade gifts, this crochet purse is both practical and fashionable. Its compact shape is ideal for carrying your phone, wallet, keys, and small essentials while keeping your hands free.
In this free crochet tutorial, you’ll learn how to create the textured bag body, crochet the colorful decorative flap, make the braided shoulder strap, and add the beautiful fringe and tassel details inspired by the pictured design.
Pattern Information
- Skill Level: Intermediate
- Finished Bag Size: Approximately 24 cm wide × 22 cm high
- Depth: Approximately 5 cm
- Strap Length: Approximately 110–120 cm, adjustable
- Yarn Weight: Worsted weight cotton yarn (Category 4)
- Hook Size: 4 mm
- Terminology: US crochet terms
- Construction: Crocheted bag body with attached semicircular flap
- Main Color: Natural cream
- Accent Colors: Sage green and terracotta
- Estimated Time: 8–12 hours
Design Note: This pattern is inspired by the pictured crochet bag. It uses a structured rectangular body, textured stitches, a rounded striped flap, a cream braided shoulder strap, and decorative fringe and tassels. Exact stitch counts may require small adjustments depending on your yarn and tension.
Materials Needed
- Approximately 200 g natural cream worsted cotton yarn
- Approximately 70 g muted sage green cotton yarn
- Approximately 70 g terracotta cotton yarn
- 4 mm crochet hook
- Yarn needle
- Scissors
- Stitch markers
- Measuring tape
- Two antique brass swivel clasps
- Two matching metal D-rings
- Four to six wooden beads
- Optional magnetic snap closure
- Optional cotton fabric for lining
- Optional sewing needle and matching thread
Yarn Recommendation: Choose a sturdy cotton or cotton-blend yarn that holds its shape well. Cotton yarn provides excellent stitch definition and makes the bag durable enough for everyday use.
Crochet Abbreviations
- ch: Chain
- sc: Single crochet
- hdc: Half double crochet
- dc: Double crochet
- sl st: Slip stitch
- st: Stitch
- sp: Space
- inc: Increase
- rep: Repeat
- FO: Fasten off
- BLO: Back loop only
Part 1: Crochet the Bag Base
Begin with natural cream yarn and a 4 mm crochet hook.
Round 1
Ch 37.
Sc in the second chain from the hook.
Sc in the next 34 chains.
Work 3 sc into the last chain.
Continue along the opposite side of the foundation chain.
Sc in the next 34 chains.
Work 2 sc into the final chain.
Join with a sl st.
You should have 74 sc.
Round 2
Ch 1.
Work 1 sc in each stitch around, increasing evenly at both rounded ends.
Join with a sl st.
Round 3
Ch 1.
Work 1 sc in BLO around the entire base.
This creates a defined edge and helps the sides of the bag stand upright.
Join with a sl st.
Part 2: Crochet the Textured Bag Body
The bag body features alternating textured rows in cream, sage green, and terracotta.
Rounds 4–8: Cream Foundation
Using natural cream yarn, work sc evenly around the bag.
Join each round with a sl st.
These rounds create a strong foundation for the decorative textured section.
Round 9: Sage Green Accent
Change to sage green yarn.
Ch 2.
Work hdc in each stitch around.
Join with a sl st.
Round 10: Textured Cluster Row
Continue with sage green.
Ch 3.
*Skip 1 stitch, work 3 dc into the next stitch.*
Repeat around.
Join with a sl st.
Round 11: Terracotta Accent
Change to terracotta yarn.
Work one round of sc evenly around the bag.
Round 12: Terracotta Cluster Row
Ch 3.
*Skip 1 stitch, work 3 dc into the next stitch.*
Repeat around.
Join with a sl st.
Rounds 13–18: Cream Textured Section
Change back to cream yarn.
Alternate one round of sc with one round of textured dc clusters.
Continue until the bag reaches approximately 17 cm in height.
Rounds 19–22: Upper Bag Section
Work four rounds of sc using cream yarn.
This creates a neat, sturdy upper edge.
FO and weave in the ends.
Part 3: Crochet the Semicircular Flap
The rounded decorative flap is the centerpiece of this boho crossbody bag. It features colorful crochet rows that create a beautiful fan-shaped design.
Begin with cream yarn.
Row 1
Make a magic ring.
Ch 3.
Work 6 dc into the ring.
Turn.
Row 2
Ch 3.
Work 2 dc into each stitch across.
Turn.
Row 3
Change to sage green yarn.
Ch 3.
*Work 1 dc in the next stitch, 2 dc in the following stitch.*
Repeat across.
Turn.
Row 4
Continue with sage green.
Ch 3.
Work dc across, increasing evenly to maintain the semicircular shape.
Turn.
Row 5
Change to terracotta yarn.
Ch 3.
Work alternating dc groups and ch-1 spaces across the row.
Increase evenly to keep the flap flat.
Row 6
Continue with terracotta.
Work textured dc clusters across the row.
Increase at regular intervals.
Row 7
Change to cream yarn.
Work one row of dc, maintaining the rounded shape.
Row 8
Change to sage green yarn.
Work one row of textured clusters.
Row 9
Change to terracotta yarn.
Work one row of dc.
Row 10
Change to cream yarn.
Work one final row of sc along the curved edge.
FO and weave in the ends.
Target Flap Size: Approximately 24 cm wide and 12 cm deep.
Block gently to create a smooth semicircular shape.
Part 4: Attach the Flap
Step 1
Place the finished flap against the upper back edge of the bag.
Make sure the rounded section falls evenly over the front.
Step 2
Using cream yarn and a yarn needle, sew the straight edge of the flap securely to the back of the bag.
Step 3
Check that the flap opens and closes smoothly.
Step 4
Optional: Sew a magnetic snap closure beneath the flap for additional security.
Part 5: Add the Decorative Fringe
The delicate cream fringe gives the bag its beautiful bohemian appearance.
Step 1: Cut the Yarn
Cut multiple strands of cream yarn approximately 12–14 cm long.
Step 2: Fold the Strands
Fold two strands of yarn in half.
Step 3: Attach to the Flap
Insert your crochet hook through a stitch along the curved flap edge.
Pull the folded yarn loop through the stitch.
Pass the loose ends through the loop and tighten gently.
Step 4: Repeat
Continue attaching fringe evenly along the entire curved edge.
Step 5: Trim
Trim the fringe to approximately 4–5 cm in length.
Keep the fringe consistent for a neat, professional finish.
Part 6: Crochet the Braided Shoulder Strap
The bag features a comfortable cream braided shoulder strap with antique brass hardware.
Step 1: Create the Crochet Cords
Using cream yarn, make three long crochet cords.
For each cord:
Ch 180–200, depending on your desired strap length.
Work one row of sc across the foundation chain.
FO, leaving long tails.
Step 2: Braid the Cords
Place the three crochet cords together.
Secure one end.
Braid the cords evenly until you reach the opposite end.
Step 3: Attach the Hardware
Thread each end through an antique brass swivel clasp.
Fold the ends back and sew securely.
Step 4: Attach to the Bag
Sew a metal D-ring securely to each upper side of the bag.
Clip the finished strap onto the D-rings.
The detachable strap makes the bag easier to clean and store.
Part 7: Make the Decorative Tassels
The long cream tassels with wooden bead accents add an elegant finishing touch.
Step 1: Cut the Yarn
Cut approximately 25–30 strands of cream yarn, each measuring 22 cm long.
Add a few sage green and terracotta strands for subtle color accents.
Step 2: Form the Tassel
Gather the strands together.
Fold them in half.
Wrap a separate piece of yarn tightly around the bundle approximately 2 cm below the folded top.
Step 3: Secure the Tassel
Tie the wrapping yarn securely.
Hide the ends inside the tassel.
Step 4: Add Wooden Beads
Thread one or two wooden beads onto the hanging cord above the tassel.
Step 5: Attach to the Bag
Attach one tassel to the center of the flap.
Attach another tassel near one side of the shoulder strap.
Trim the tassel ends evenly.
Part 8: Add an Optional Fabric Lining
A fabric lining helps prevent small belongings from slipping through the crochet stitches and gives the bag additional structure.
Step 1
Measure the inside of your finished bag.
Step 2
Cut two rectangular pieces of cotton fabric, allowing approximately 1 cm for seam allowances.
Step 3
Sew the fabric pieces together along the sides and bottom.
Step 4
Turn the lining right side out.
Step 5
Insert the lining into the crochet bag.
Step 6
Fold the upper fabric edge inward and hand-sew it to the inside of the crochet bag.
Optional: Add a small interior pocket for keys or cards.
How to Customize Your Crochet Bag
Make a Larger Crossbody Bag
Increase the foundation chain and add more body rounds to create a larger bag suitable for carrying a small notebook or tablet.
Make a Mini Crochet Purse
Reduce the foundation chain and overall height to create a small bag for your phone and essentials.
Use Different Color Combinations
Try cream and dusty rose for a romantic look, olive green and beige for an earthy style, or black and cream for a classic modern design.
Make the Strap Adjustable
Add adjustable bag hardware to customize the shoulder strap length.
Add a Zipper Closure
Install a zipper beneath the flap for extra security.
Make a Matching Wallet
Use leftover yarn to crochet a small matching coin purse or card holder.
Beautiful Color Variations
Cream, Sage Green & Terracotta
Recreate the warm earthy color palette of the pictured bag for a timeless bohemian look.
Ivory & Dusty Pink
Create a soft feminine version with ivory yarn, blush pink accents, and cream tassels.
Mustard & Olive Green
Choose mustard yellow, olive green, and natural beige for an autumn-inspired accessory.
Sand & Chocolate Brown
Combine warm sand tones with chocolate brown accents for a sophisticated neutral bag.
White & Sky Blue
Use crisp white and soft blue yarn for a fresh summer crossbody bag.
Black & Cream
Create a modern monochromatic version with black crochet details and contrasting cream fringe.
Helpful Crochet Tips
- Use sturdy cotton yarn for the bag body.
- Keep your tension firm and consistent.
- Use stitch markers to identify the beginning of each round.
- Check the bag dimensions as you crochet.
- Block the flap before attaching it.
- Make sure the flap is centered on the bag.
- Trim fringe only after all strands are attached.
- Secure the shoulder strap firmly.
- Reinforce the D-ring attachment points.
- Use matching hardware for a coordinated finish.
- Add a fabric lining for everyday practicality.
- Weave in all yarn ends securely.
Frequently Asked Questions
Is this crochet crossbody bag suitable for beginners?
This project is recommended for intermediate crocheters who are comfortable working in rounds, changing colors, creating textured stitches, and assembling crochet accessories.
How long does it take to crochet this bag?
The project may take approximately 8–12 hours, depending on your experience and the amount of decorative detail.
What yarn is best for crochet bags?
Cotton yarn is an excellent choice because it is sturdy, durable, and provides good stitch definition.
Can I use acrylic yarn?
Yes, although acrylic yarn may stretch more than cotton. A fabric lining can help provide additional support.
Can I make the bag without fringe?
Absolutely. Simply omit the fringe for a cleaner, more minimalist design.
Can I make the shoulder strap longer?
Yes. Increase the length of the crochet cords before braiding them.
Is the shoulder strap removable?
Yes. The pattern uses swivel clasps so the strap can be detached.
Can I wash the finished bag?
Yes, depending on your yarn and hardware. Gentle hand washing is recommended.
Can I sell bags made from this pattern?
You may sell your own handmade finished bags. If sharing the pattern, please link to the original tutorial rather than copying the written instructions.
Care Instructions
- Spot clean whenever possible.
- Hand wash gently in cool water if needed.
- Use mild detergent.
- Avoid bleach and harsh chemicals.
- Do not twist or wring the bag.
- Reshape while damp.
- Lay flat to dry.
- Avoid hanging the wet bag by its strap.
- Protect wooden beads and metal hardware from prolonged moisture.
- Store in a clean, dry place.
Final Thoughts
This boho crochet crossbody bag with fringe and tassels is a beautiful handmade accessory that combines practical everyday use with charming vintage-inspired details. The soft cream yarn, earthy sage and terracotta accents, decorative semicircular flap, and braided shoulder strap make it a lovely addition to any handmade wardrobe.
Whether you’re making it for yourself, preparing a thoughtful handmade gift, or creating accessories for a craft market, this crochet bag is a rewarding project that lets you explore beautiful textures and creative color combinations.
Love this boho crochet bag? Save this free crochet pattern to Pinterest and share it with your crochet friends for more beautiful handmade bag ideas!