Blue and Cream Crochet Bedspread with Tassels and Matching Pillows – Free Pattern
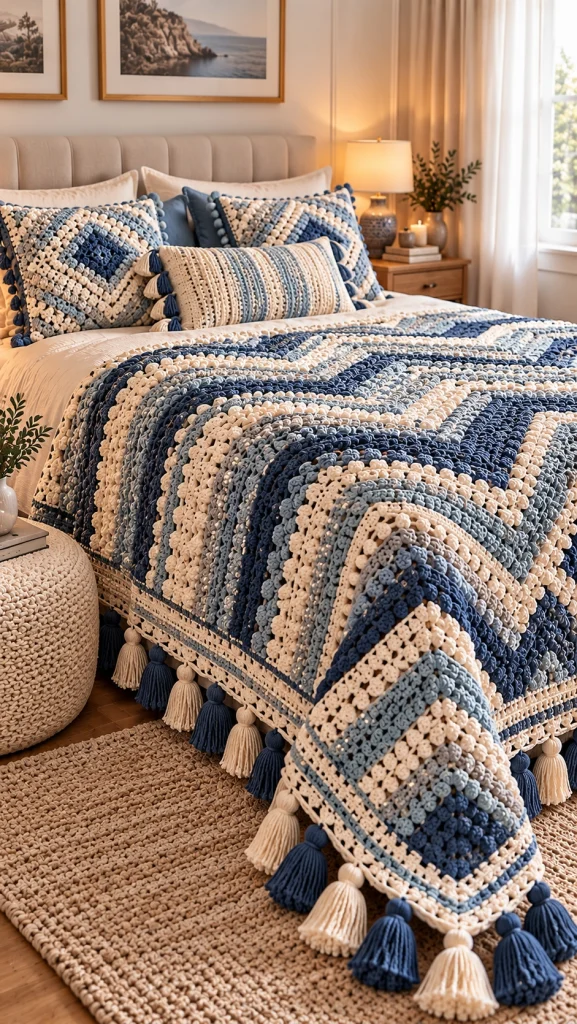
Transform your bedroom into a cozy, elegant retreat with this beautiful blue and cream crochet bedspread. Featuring richly textured stitches, alternating shades of navy blue, dusty blue, soft gray-blue, and warm ivory, this handmade blanket brings timeless charm to any bedroom.
The design combines textured crochet stripes, raised stitch details, decorative lace edging, and handmade tassels along the border. Coordinating crochet pillows complete the look, creating a sophisticated bedding set inspired by coastal farmhouse and classic handmade home décor.
This free crochet pattern will guide you through creating the textured bedspread, adding the decorative border and tassels, and making matching pillow covers. It is a rewarding project for crocheters who love beautiful, practical handmade pieces.
Pattern Information
- Skill Level: Intermediate
- Finished Bedspread Size: Approximately 220 × 240 cm (87 × 94 inches)
- Suggested Bed Size: Queen, adjustable for other sizes
- Yarn Weight: Worsted weight yarn (Category 4)
- Hook Size: 5 mm (H/8)
- Terminology: US crochet terms
- Construction: Worked in rows with a decorative border
- Estimated Time: 45–65 hours
- Style: Coastal farmhouse, classic, elegant
Design Note: This pattern recreates the overall look of the pictured bedspread using textured crochet stripes, alternating blue and ivory colors, a decorative border, and tassels. The finished appearance may vary depending on yarn choice, stitch tension, and customization.
Materials Needed
- Worsted weight yarn in navy blue – approximately 1,200 m
- Worsted weight yarn in dusty blue – approximately 1,100 m
- Worsted weight yarn in light blue-gray – approximately 900 m
- Worsted weight yarn in warm ivory – approximately 1,500 m
- 5 mm crochet hook
- 4.5 mm crochet hook for border details (optional)
- Yarn needle
- Scissors
- Stitch markers
- Measuring tape
- Cardboard approximately 12–15 cm wide for making tassels
- Optional blocking mats and rustproof pins
- Two square pillow inserts, approximately 50 × 50 cm
- One rectangular pillow insert, approximately 30 × 50 cm (optional)
Yarn Tip: Choose soft, machine-washable acrylic, cotton-blend, or easy-care yarn suitable for bedding. Purchase additional yarn if you plan to increase the size or create multiple matching pillows.
Crochet Abbreviations
- ch: Chain
- sc: Single crochet
- hdc: Half double crochet
- dc: Double crochet
- tr: Treble crochet
- sl st: Slip stitch
- st: Stitch
- sk: Skip
- sp: Space
- rep: Repeat
- RS: Right side
- WS: Wrong side
- FO: Fasten off
- FPdc: Front post double crochet
- BPdc: Back post double crochet
Special Crochet Stitches
Bobble Stitch
Yarn over, insert the hook into the indicated stitch, yarn over, and pull up a loop.
Yarn over and pull through two loops.
Repeat this process four more times in the same stitch.
Yarn over and pull through all remaining loops on the hook.
This creates a raised textured bobble.
Front Post Double Crochet (FPdc)
Yarn over and insert the hook from front to back and then to front around the post of the indicated stitch.
Yarn over, pull up a loop, and complete a double crochet.
Back Post Double Crochet (BPdc)
Yarn over and insert the hook from back to front and then to back around the post of the indicated stitch.
Yarn over, pull up a loop, and complete a double crochet.
V-Stitch
Work (dc, ch 1, dc) into the same stitch or space.
Part 1: Determine Your Bedspread Size
Before beginning, measure your bed and decide how far you want the finished bedspread to hang over the sides.
For a queen-size bed, a finished measurement of approximately 220 × 240 cm provides generous coverage.
For a smaller bed, reduce the foundation chain and number of rows.
For a king-size bed, increase both the width and length.
Suggested Finished Sizes
- Twin: 170 × 220 cm
- Full: 200 × 230 cm
- Queen: 220 × 240 cm
- King: 260 × 260 cm
Part 2: Make a Gauge Swatch
Using your chosen yarn and a 5 mm hook, crochet a 15 × 15 cm sample using the basic double crochet stitch.
Measure the number of stitches and rows across the center 10 cm.
For this project, aim for approximately:
- 14 double crochet stitches = 10 cm
- 8 double crochet rows = 10 cm
Adjust your hook size if necessary.
Because textured stitches can change the fabric dimensions, check your gauge again after completing the first full pattern repeat.
Part 3: Crochet the Foundation
Using ivory yarn and a 5 mm hook:
Ch 309.
This gives 306 stitches after working the first double crochet row.
Row 1
Dc in the fourth chain from the hook.
Dc in each remaining chain across.
Turn. (306 dc)
Row 2
Ch 2 (does not count as a stitch).
Hdc in each stitch across.
Turn. (306 hdc)
Row 3
Ch 3 (counts as first dc).
Dc in each remaining stitch across.
Turn. (306 dc)
These three rows create a stable foundation for the textured design.
Part 4: Crochet the Textured Stripe Pattern
The bedspread is created by alternating different textured sections and colors.
Repeat the following 16-row pattern throughout the blanket.
Rows 1–4: Ivory Textured Base
Row 1: Ch 2, hdc in each stitch across. Turn.
Row 2: Ch 3, dc in each stitch across. Turn.
Row 3: Ch 2, hdc in each stitch across. Turn.
Row 4: Ch 3, dc in each stitch across. Turn.
Rows 5–8: Dusty Blue Raised Texture
Change to dusty blue yarn.
Row 5: Ch 3, dc in each stitch across. Turn.
Row 6: Ch 3, alternate FPdc and BPdc across, working around the posts of the previous row. Turn.
Row 7: Ch 3, alternate BPdc and FPdc across. Turn.
Row 8: Ch 3, dc in each stitch across. Turn.
Rows 9–12: Navy Blue Bobble Texture
Change to navy blue yarn.
Row 9: Ch 2, hdc in each stitch across. Turn.
Row 10: Ch 1, sc in the first 2 stitches, *bobble in the next stitch, sc in the next 3 stitches* repeat across, ending with sc in the remaining stitches. Turn.
Row 11: Ch 2, hdc in each stitch across. Turn.
Row 12: Ch 3, dc in each stitch across. Turn.
Rows 13–16: Light Blue and Ivory Openwork
Change to light blue-gray yarn.
Row 13: Ch 3, dc in each stitch across. Turn.
Row 14: Ch 3, dc in the next stitch, *ch 1, sk 1, dc in the next 2 stitches* repeat across, adjusting the final repeat to maintain straight edges. Turn.
Row 15: Ch 3, dc in each stitch and chain space across. Turn.
Row 16: Change to ivory yarn, ch 2, hdc in each stitch across. Turn.
Part 5: Continue the Bedspread
Repeat the 16-row textured stripe pattern until the bedspread reaches your desired length.
For a queen-size blanket, continue until the main fabric measures approximately 225–230 cm before adding the border.
Maintain the same stitch count across each row.
Alternate the colors consistently to create the layered blue-and-cream effect.
For a more varied appearance, occasionally reverse the order of the dusty blue and light blue-gray sections.
Part 6: Add Decorative Raised Stripes
To create extra texture similar to the pictured blanket, add narrow raised stripes between selected color sections.
Raised Stripe Row
Using ivory yarn:
Ch 3.
Alternate FPdc and BPdc across the row.
Turn.
Second Raised Stripe Row
Ch 3.
Work FPdc around each FPdc and BPdc around each BPdc from the previous row.
Turn.
Continue with the next color section.
These raised stripes add dimension and create a more luxurious handmade texture.
Part 7: Crochet the Decorative Bedspread Border
The border frames the entire blanket and provides a beautiful foundation for the tassels.
Border Round 1
Join ivory yarn at any corner.
Ch 1.
Work sc evenly around the entire blanket.
Work 3 sc in each corner.
Join with a sl st.
Border Round 2
Ch 3.
Dc in each stitch around.
Work (2 dc, ch 2, 2 dc) in each corner.
Join with a sl st.
Border Round 3
Ch 1.
Sc in each stitch around.
Work 3 sc in each corner space.
Join with a sl st.
Border Round 4: Openwork Lace
Ch 3.
*Sk 2 stitches, work (2 dc, ch 2, 2 dc) in the next stitch, sk 2 stitches, sc in the next stitch.*
Repeat around the blanket, adjusting spacing near the corners.
Join with a sl st.
Border Round 5
Ch 1.
Sc evenly around the border.
Work additional stitches in the corners as necessary to keep the edging flat.
FO and weave in the ends.
Part 8: Make the Decorative Tassels
The alternating navy blue and ivory tassels give the bedspread its elegant finishing touch.
Step 1
Cut a piece of cardboard approximately 12–15 cm wide.
Step 2
Wrap navy blue yarn around the cardboard approximately 35–45 times.
Step 3
Slide a separate piece of yarn beneath the wrapped strands.
Tie securely at the top.
Step 4
Remove the yarn from the cardboard.
Step 5
Wrap another piece of yarn around the upper section to form the tassel head.
Step 6
Cut the bottom loops and trim the strands evenly.
Step 7
Repeat using ivory yarn.
Make approximately 30–40 tassels, depending on the spacing and finished blanket size.
Step 8
Attach the tassels along the lower and side edges of the bedspread.
Alternate navy blue and ivory tassels.
Space them approximately 12–15 cm apart.
Secure each tassel firmly to the border.
Part 9: Crochet Matching Square Pillow Covers
Make two coordinating pillow covers using the same blue-and-cream color palette.
Suggested finished size: 50 × 50 cm.
Front Panel
Using ivory yarn, make a foundation chain suitable for a 50 cm square based on your gauge.
Work alternating rows of double crochet, bobble stitches, and raised post stitches.
Change colors every 4–6 rows.
Continue until the panel measures approximately 50 × 50 cm.
Back Panel
Using dusty blue yarn, crochet a simple square panel in double crochet.
Match the dimensions of the front panel.
Assembly
Place the front and back panels together with wrong sides facing.
Join three sides using single crochet.
Insert the pillow form.
Close the final side using single crochet or create a removable closure if preferred.
Decorative Pillow Border
Work a round of single crochet around the pillow edges.
Add small bobbles or pom-poms along the corners for extra texture.
Part 10: Crochet the Rectangular Accent Pillow
For an additional decorative accent, make a rectangular pillow approximately 30 × 50 cm.
Use alternating ivory, dusty blue, and navy blue stripes.
Front Panel
Work rows of half double crochet and double crochet until the panel reaches the desired size.
Add narrow openwork rows for visual interest.
Back Panel
Crochet a matching rectangular panel in a solid color.
Assembly
Join the panels around three sides.
Insert the pillow form.
Close the remaining side.
Finishing
Add small tassels to the corners or along the short edges.
Part 11: Block the Finished Bedspread
Blocking helps the textured stitches relax and gives the bedspread a more polished appearance.
Step 1
Lay the bedspread flat on a clean surface.
Step 2
Lightly mist the fabric with water if your yarn care instructions allow it.
Step 3
Gently shape the edges and corners.
Step 4
Allow the blanket to dry completely.
Step 5
Fluff and straighten the tassels.
Avoid excessive stretching, especially around the textured stitch sections.
Creative Color Variations
Coastal Blue and White
Use navy blue, sky blue, soft gray, and bright white for a fresh coastal-inspired bedroom.
Neutral Farmhouse
Replace the blues with beige, taupe, cream, and warm gray for a timeless farmhouse look.
Blush and Ivory
Use dusty rose, blush pink, ivory, and soft mauve for a romantic bedroom.
Sage Green and Cream
Choose sage green, olive green, warm ivory, and soft beige for a calming botanical-inspired design.
Classic Navy and Gold
Combine navy blue, cream, muted gold, and pale gray for an elegant traditional appearance.
Helpful Tips for Best Results
- Use yarn from the same weight category throughout the project.
- Check your gauge before beginning the full-size blanket.
- Count stitches regularly to keep the edges straight.
- Use stitch markers at the beginning and end of each row.
- Maintain consistent tension when changing colors.
- Weave in yarn ends securely after each color section.
- Keep bobble stitches evenly spaced.
- Avoid pulling post stitches too tightly.
- Measure the blanket periodically.
- Adjust the number of stripe repeats to reach your preferred length.
- Make all tassels using the same cardboard template.
- Secure tassels with strong knots.
- Use washable yarn for practical everyday bedding.
- Block the finished blanket gently for a polished result.
- Make matching pillows using the same stitch textures for a coordinated set.
Frequently Asked Questions
Is this crochet bedspread suitable for beginners?
This pattern is best suited to intermediate crocheters who are comfortable with basic stitches, color changes, and textured stitch techniques.
How much yarn do I need?
A queen-size bedspread may require approximately 4,700 meters of worsted weight yarn, depending on stitch tension, dimensions, and the amount of textured detailing.
Can I make this bedspread for a king-size bed?
Yes. Increase the foundation chain and work additional rows until the desired dimensions are reached.
Can I use cotton yarn?
Yes. Cotton yarn creates beautiful stitch definition, although a large cotton bedspread can become quite heavy.
Can I use acrylic yarn?
Yes. Soft acrylic yarn is a practical option because it is generally lightweight, affordable, and easy to maintain.
Can I remove the tassels?
Absolutely. The bedspread looks elegant with or without decorative tassels.
Can I use only two colors?
Yes. Navy blue and ivory create a classic, high-contrast design.
How long does this project take?
Allow approximately 45–65 hours for a queen-size bedspread, depending on your crochet speed and the complexity of your chosen textures.
Can I machine wash the finished blanket?
Follow the care instructions on your yarn label. Many acrylic and cotton-blend yarns are machine washable on a gentle cycle.
Can I sell finished blankets made from this pattern?
Yes. You may sell your own handmade finished items. Please credit the original tutorial when sharing the pattern online.
Care Instructions
- Follow the washing instructions on your yarn label.
- Use a gentle cycle when machine washing is permitted.
- Wash with similar colors.
- Use mild detergent.
- Avoid bleach.
- Air dry flat whenever possible.
- Avoid high heat to protect the yarn fibers.
- Gently reshape the blanket while damp.
- Comb or straighten tassels after washing.
- Store in a clean, dry location.
Final Thoughts
This blue and cream crochet bedspread with tassels is a beautiful combination of texture, comfort, and timeless handmade style. The layered blue tones, warm ivory stripes, decorative edging, and matching pillows create a cozy yet sophisticated bedroom look.
Whether you make it for your own home, as a wedding gift, or as a special handmade present, this crochet bedding set is a rewarding project that can be enjoyed for years.
Love this crochet bedspread? Save this free crochet pattern to Pinterest and share it with your crochet friends for more beautiful handmade blankets, bedspreads, and home décor inspiration!