Boho Floral Crochet Shoulder Bag – Free Colorful Textured Bag Pattern
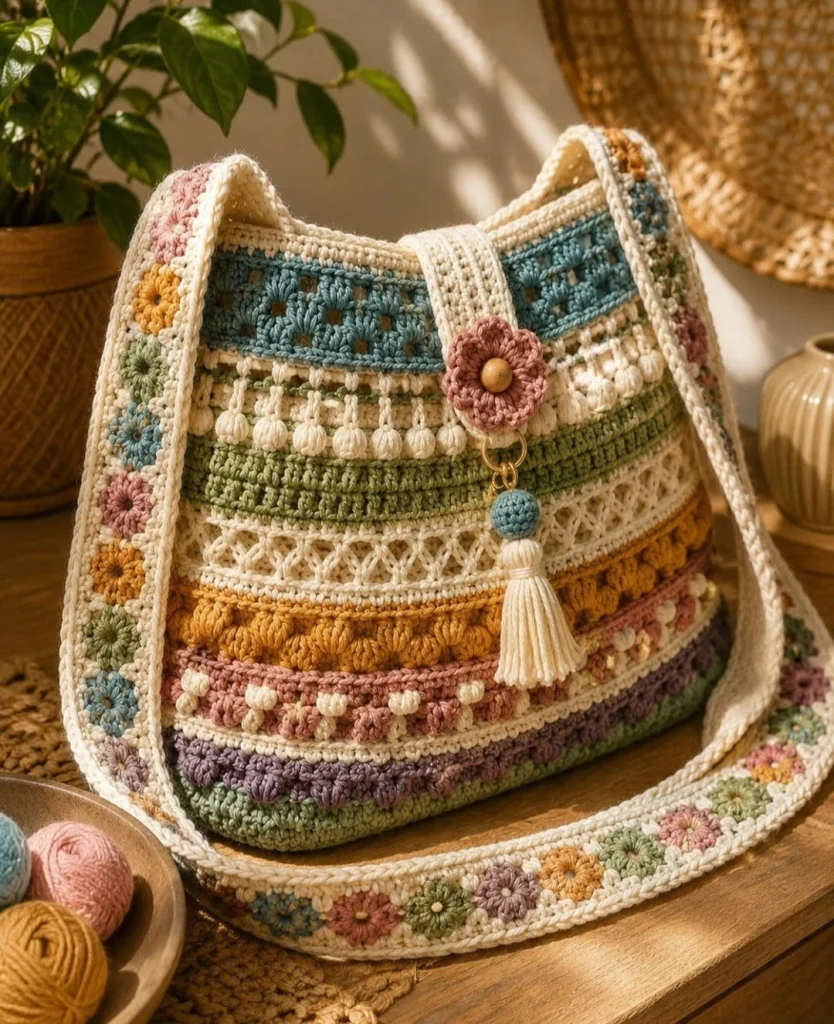
Add a touch of handmade charm to your wardrobe with this beautiful boho floral crochet shoulder bag. Featuring soft vintage-inspired colors, decorative textured stitches, delicate flower motifs, and a long floral strap, this bag is the perfect combination of practicality and creativity.
The design brings together dusty blue, sage green, mustard yellow, blush pink, lavender, and warm ivory in a stunning arrangement of horizontal crochet patterns. From playful bobble stitches to delicate openwork lace, every section adds unique texture and personality.
A small pink crochet flower closure, wooden bead, and elegant cream tassel complete the look. The wide shoulder strap features colorful miniature flower motifs, making this bag a beautiful accessory for everyday outings, shopping trips, vacations, and thoughtful handmade gifts.
In this free crochet tutorial, you will learn how to create the textured bag body, add decorative colorwork, make the floral shoulder strap, assemble the bag, and finish it with a charming flower-and-tassel embellishment.
Pattern Information
- Skill Level: Intermediate to Advanced
- Finished Bag Size: Approximately 30 cm wide × 27 cm high × 9 cm deep
- Shoulder Strap: Approximately 105–115 cm long
- Yarn Weight: DK or light worsted cotton yarn
- Crochet Hook: 3.5 mm and 4 mm
- Terminology: US crochet terms
- Construction: Textured rectangular panels with a separate gusset and decorative strap
- Style: Bohemian, vintage, cottagecore, colorful floral
Design Note: This pattern is an inspired interpretation of the pictured crochet bag. It recreates the colorful horizontal textures, floral strap, soft vintage palette, flower closure, and tassel. Exact stitch arrangements may vary from the reference.
Materials Needed
- DK cotton yarn in warm ivory – approximately 250 m
- DK cotton yarn in dusty blue – approximately 100 m
- DK cotton yarn in sage green – approximately 150 m
- DK cotton yarn in mustard yellow – approximately 90 m
- DK cotton yarn in dusty pink – approximately 90 m
- DK cotton yarn in lavender – approximately 60 m
- Small amounts of coordinating yarn for floral motifs
- 3.5 mm crochet hook
- 4 mm crochet hook
- Two metal D-rings
- Two metal swivel clasps (optional)
- One wooden button or bead, approximately 15–20 mm
- One small metal ring for the tassel
- Yarn needle
- Scissors
- Stitch markers
- Measuring tape
- Optional cotton fabric for lining
- Optional magnetic snap closure
Crochet Abbreviations
- ch: Chain
- sc: Single crochet
- hdc: Half double crochet
- dc: Double crochet
- tr: Treble crochet
- sl st: Slip stitch
- st: Stitch
- sp: Space
- sk: Skip
- rep: Repeat
- RS: Right side
- WS: Wrong side
- FO: Fasten off
- FLO: Front loop only
- BLO: Back loop only
Special Crochet Stitches
Bobble Stitch
Yarn over, insert your hook into the indicated stitch, yarn over and pull up a loop.
Yarn over and pull through two loops.
Repeat this process four more times in the same stitch.
Yarn over and pull through all remaining loops.
Work one chain to secure the bobble if required.
Puff Stitch
Yarn over, insert your hook into the indicated stitch, yarn over and pull up a long loop.
Repeat three more times in the same stitch.
Yarn over and pull through all loops on the hook.
Ch 1 to secure.
Shell Stitch
Work 5 dc into the same stitch or space.
V-Stitch
Work (dc, ch 1, dc) into the same stitch or space.
Part 1: Crochet the Front Bag Panel
The front panel is created using horizontal bands of different crochet textures and colors.
Each band is worked separately within the same continuous panel.
Foundation
Using sage green yarn and a 4 mm hook:
Ch 61.
Row 1
Sc in the second chain from the hook.
Sc in each remaining chain across.
Turn. (60 sc)
Rows 2–5: Sage Green Base
Ch 1.
Sc in each stitch across.
Turn.
Repeat until Row 5 is complete.
Rows 6–9: Lavender Bobble Band
Change to lavender yarn.
Row 6: Ch 1, sc in each stitch across.
Row 7: Ch 1, sc in first 2 stitches, *bobble in next stitch, sc in next 3 stitches*. Repeat across, ending with sc in remaining stitches.
Row 8: Ch 1, sc in each stitch across.
Row 9: Ch 1, sc in each stitch across.
Rows 10–14: Dusty Pink Textured Band
Change to dusty pink yarn.
Row 10: Ch 2, hdc in each stitch across.
Row 11: Ch 1, sc in each stitch across.
Row 12: Work evenly spaced puff stitches across the row, separating each puff with 2 sc.
Rows 13–14: Sc in each stitch across.
Rows 15–19: Mustard Yellow Bobble Band
Change to mustard yellow yarn.
Rows 15–16: Sc in each stitch across.
Row 17: Work bobble stitches at regular intervals across the row.
Rows 18–19: Sc in each stitch across.
Rows 20–25: Ivory Lace Band
Change to ivory yarn.
Row 20: Dc in each stitch across.
Row 21: Ch 3, sk 1 stitch, *V-stitch in next stitch, sk 2 stitches*. Repeat across, adjusting the final stitches to maintain the panel width.
Row 22: Work V-stitches into the chain spaces from the previous row.
Row 23: Repeat Row 22.
Rows 24–25: Work sc evenly across, maintaining 60 stitches.
Rows 26–31: Sage Green Raised Texture
Change to sage green yarn.
Rows 26–27: Hdc in each stitch across.
Row 28: Work alternating front-loop and back-loop hdc stitches across.
Row 29: Repeat Row 28.
Rows 30–31: Sc in each stitch across.
Rows 32–36: Ivory Hanging Bobble Band
Change to ivory yarn.
Row 32: Sc in each stitch across.
Row 33: Work a bobble stitch every fourth stitch.
Row 34: Sc in each stitch across.
Rows 35–36: Hdc in each stitch across.
Rows 37–43: Dusty Blue Openwork Band
Change to dusty blue yarn.
Row 37: Dc in each stitch across.
Row 38: Ch 3, *sk 1 stitch, dc in next stitch, ch 1*. Repeat across.
Row 39: Dc into each chain space and dc stitch across.
Rows 40–41: Repeat Rows 38–39.
Rows 42–43: Sc in each stitch across.
Rows 44–47: Ivory Top Border
Change to ivory yarn.
Ch 1.
Sc in each stitch across.
Repeat for four rows.
FO and weave in the ends.
Important: Measure the panel as you work. Adjust the number of plain rows if necessary to achieve the desired height of approximately 27 cm.
Part 2: Crochet the Back Panel
Repeat the instructions from Part 1 to create a matching back panel.
You may use the same color arrangement or slightly change the order of the textured bands.
For a coordinated look, keep the top dusty blue section and ivory border identical on both panels.
Ensure the front and back panels have the same finished dimensions.
Part 3: Crochet the Side and Bottom Gusset
The gusset gives the shoulder bag depth and allows it to hold everyday essentials.
Foundation
Using sage green yarn:
Ch 19.
Row 1
Sc in the second chain from the hook.
Sc in each remaining chain across.
Turn. (18 sc)
Row 2
Ch 1.
Sc in each stitch across.
Turn.
Remaining Rows
Repeat Row 2 until the strip is long enough to run down one side of the bag, across the bottom, and up the opposite side.
Measure the front panel to determine the exact gusset length.
FO, leaving a long tail for assembly.
Part 4: Assemble the Bag Body
Step 1
Place the front panel and gusset together with right sides facing outward.
Step 2
Join the pieces using ivory yarn and single crochet stitches.
Step 3
Continue joining along the side, bottom, and opposite side.
Step 4
Attach the back panel to the remaining edge of the gusset.
Step 5
Check that all seams are secure and evenly aligned.
Step 6
Turn the bag right side out if you prefer hidden seams, or leave the ivory joining stitches visible for a decorative handmade finish.
Part 5: Crochet the Floral Shoulder Strap
The floral shoulder strap is one of the most distinctive features of this design.
It combines an ivory crochet band with miniature colorful flower motifs.
Strap Foundation
Using ivory yarn and a 3.5 mm hook:
Ch 11.
Row 1
Sc in the second chain from the hook.
Sc in each remaining chain across.
Turn. (10 sc)
Rows 2–4
Ch 1.
Sc in each stitch across.
Turn.
Continue the Strap
Repeat Row 2 until the strap measures approximately 105–115 cm.
FO and weave in the ends.
Strap Edging
Join ivory yarn along one long edge.
Work one row of single crochet evenly along the edge.
Repeat along the opposite side.
Part 6: Crochet the Miniature Flowers
Make approximately 20–24 small flowers using dusty pink, mustard yellow, sage green, dusty blue, and lavender yarn.
Flower Round 1
Make a magic ring.
Ch 1.
Work 10 sc into the ring.
Pull tight and join with a sl st.
Flower Round 2
*Ch 2, work 2 dc into the next stitch, ch 2, sl st into the following stitch.*
Repeat around to create five petals.
FO, leaving a long tail for sewing.
Attach the Flowers
Position the flowers evenly along the center of the ivory strap.
Alternate colors for a playful vintage-inspired effect.
Sew each flower securely using its yarn tail.
For additional texture, add a small French knot or wooden bead to the center of selected flowers.
Part 7: Attach the Shoulder Strap
Attach a metal D-ring to each upper side of the bag.
Fold the end of the crochet strap around the D-ring.
Sew the folded end securely using matching yarn.
Repeat on the opposite side.
For a removable strap, attach metal swivel clasps instead.
Check that the strap is firmly secured before using the bag.
Part 8: Make the Crochet Flower Closure
The front closure features a beautiful dusty pink flower with a wooden bead center.
Flower Center
Using dusty pink yarn:
Make a magic ring.
Ch 1.
Work 10 sc into the ring.
Join with a sl st.
Flower Petals
*Ch 3, work 3 dc into the next stitch, ch 3, sl st into the following stitch.*
Repeat around to create five rounded petals.
FO, leaving a long tail.
Add the Wooden Bead
Sew a wooden bead securely into the flower center.
Attach the flower to a short ivory crochet tab at the top front of the bag.
Add a matching button or loop on the opposite side if you want a functional closure.
Part 9: Make the Decorative Tassel
The cream tassel adds movement and a beautiful bohemian finishing touch.
Step 1
Cut approximately 25–30 strands of ivory yarn, each measuring 25 cm.
Step 2
Fold the strands in half.
Step 3
Tie a separate strand tightly around the folded center.
Step 4
Wrap another strand around the upper section to form the tassel head.
Step 5
Trim the bottom strands evenly.
Step 6
Attach a dusty blue crochet bead or wooden bead above the tassel.
Step 7
Connect the tassel to the flower closure using a small metal ring.
The finished tassel should hang naturally against the front of the bag.
Part 10: Add an Optional Fabric Lining
A fabric lining helps protect the crochet stitches and prevents small objects from slipping through the openwork sections.
Step 1
Measure the inside dimensions of the finished bag.
Step 2
Cut cotton fabric panels with approximately 1 cm seam allowance.
Step 3
Sew the fabric pieces together to create a lining that matches the bag shape.
Step 4
Fold the upper edge of the lining inward.
Step 5
Place the lining inside the crochet bag.
Step 6
Hand-sew the lining along the inside upper edge using small, discreet stitches.
For additional convenience, add a small interior pocket or magnetic snap closure.
Creative Color Variations
Soft Pastel Boho
Combine blush pink, lavender, pale blue, mint green, and ivory for a delicate spring-inspired bag.
Earthy Autumn
Use terracotta, mustard, olive green, chocolate brown, and cream for a warm rustic look.
Coastal Blue
Combine dusty blue, turquoise, sandy beige, soft white, and seafoam green.
Vintage Rose
Choose dusty rose, burgundy, sage green, warm ivory, and muted mauve.
Neutral Cottagecore
Use oatmeal, cream, taupe, sage, and caramel for an elegant understated design.
Bright Summer Garden
Combine sunflower yellow, coral, turquoise, pink, and fresh green for a cheerful statement bag.
Helpful Tips for Best Results
- Use cotton yarn for a sturdy, structured bag.
- Maintain consistent tension across all color bands.
- Keep the front and back panels the same size.
- Use stitch markers when working textured sections.
- Weave in yarn ends securely after each color change.
- Avoid pulling bobble stitches too tightly.
- Keep lace stitches evenly spaced.
- Reinforce the shoulder strap attachment points.
- Use a fabric lining for added durability.
- Choose washable yarn for everyday use.
- Arrange the strap flowers before sewing them down.
- Secure decorative beads firmly.
- Use matching thread for the fabric lining.
- Block the panels lightly before assembly.
- Test the finished strap before carrying heavy items.
Frequently Asked Questions
Is this crochet shoulder bag suitable for beginners?
This pattern is recommended for intermediate crocheters because it combines several stitch textures, color changes, decorative motifs, and assembly techniques.
What type of yarn works best?
DK cotton yarn is recommended because it provides good stitch definition and helps the bag maintain its shape.
Can I use acrylic yarn?
Yes, but acrylic yarn may stretch more easily. A fabric lining and reinforced strap can improve durability.
Can I make the bag larger?
Yes. Increase the foundation chain and add more rows to create larger panels. Adjust the gusset and strap accordingly.
Can I make the strap shorter?
Absolutely. Measure your preferred shoulder or crossbody length before finishing the strap.
Do I need to add a fabric lining?
A lining is optional but highly recommended because the design includes openwork crochet sections.
Can I use different flower colors?
Yes. The miniature flowers can be made in any combination of colors to match your personal style.
Can I make the bag without the tassel?
Yes. The tassel is decorative and can be omitted for a simpler look.
Can I add a zipper?
Yes. A zipper can be sewn into the lining or attached to a separate crochet top band.
How long does this bag take to make?
Depending on your experience, allow approximately 12–18 hours for the bag, including the decorative strap and finishing details.
Can I wash the finished bag?
Follow the care instructions for your yarn. Hand washing is generally recommended for bags with decorative beads, metal accessories, or delicate floral embellishments.
Can I sell bags made from this pattern?
Yes. You may sell your handmade finished bags. Please credit the original tutorial when sharing the pattern online.
Care Instructions
- Spot clean when possible.
- Hand wash gently in cool water if needed.
- Use mild detergent.
- Avoid bleach.
- Do not wring or twist the bag.
- Reshape while damp.
- Lay flat to dry.
- Avoid direct heat.
- Store in a clean, dry place.
- Keep decorative tassels and flowers untangled.
Final Thoughts
This boho floral crochet shoulder bag is a beautiful celebration of color, texture, and handmade creativity. Its combination of vintage-inspired shades, textured horizontal stitch patterns, delicate floral strap, and charming tassel creates a truly eye-catching accessory.
Whether you make it for yourself, as a birthday gift, or as a special handmade present, this crochet bag is a rewarding project that combines practical everyday use with artistic detail.
Love this colorful crochet bag? Save this free crochet pattern to Pinterest and share it with your crochet friends for more beautiful handmade bags, floral crochet accessories, and creative DIY inspiration!