Crochet Thanksgiving Turkey with Pumpkin – Free Amigurumi Pattern
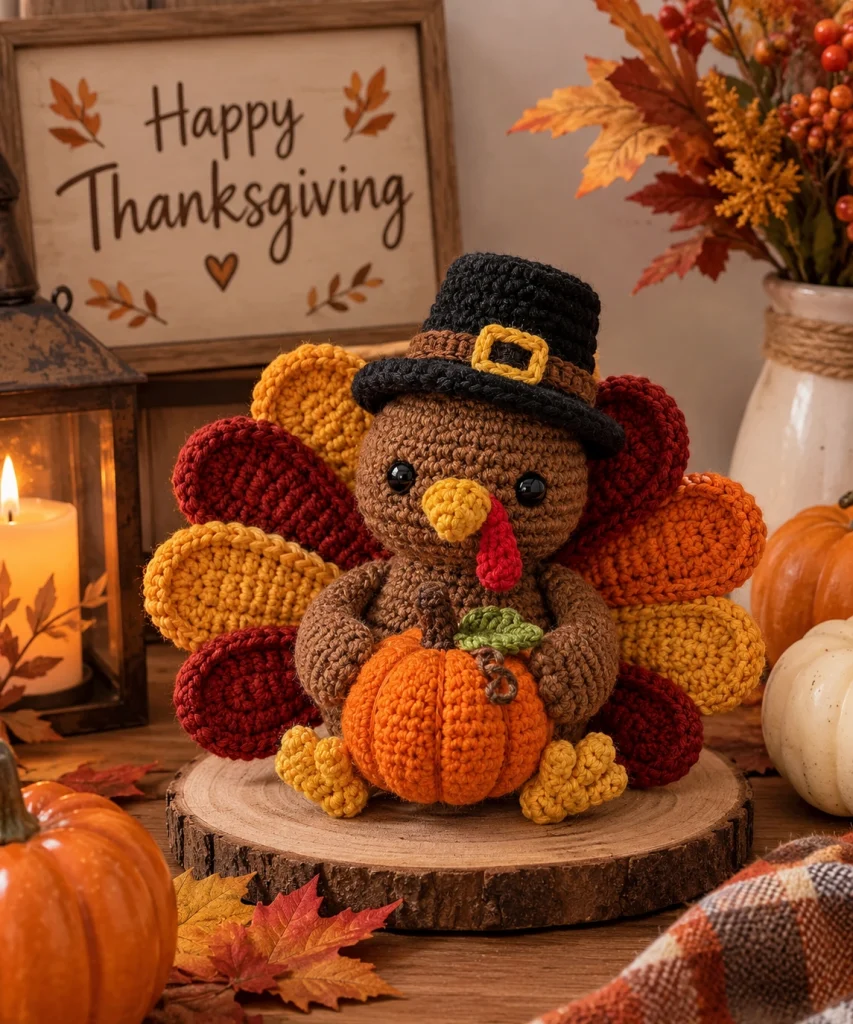
Celebrate the cozy beauty of autumn with this adorable crochet Thanksgiving turkey amigurumi! Wearing a charming black pilgrim hat with a golden buckle and holding a bright orange pumpkin, this handmade turkey makes a delightful addition to your Thanksgiving decorations.
With its round brown body, colorful fan-shaped tail feathers, tiny yellow feet, and sweet expression, this festive crochet turkey brings warmth and personality to any fall display. The rich shades of burgundy, pumpkin orange, golden yellow, and warm brown perfectly capture the spirit of the harvest season.
Whether you’re decorating your Thanksgiving table, creating a handmade autumn centerpiece, or preparing a thoughtful seasonal gift, this free crochet turkey pattern is a fun and rewarding project.
Follow this step-by-step tutorial to crochet the turkey’s body, colorful feathers, pilgrim hat, miniature pumpkin, wings, and adorable finishing details.
Pattern Information
- Skill Level: Intermediate
- Finished Height: Approximately 20–24 cm including the hat
- Finished Width: Approximately 22–26 cm including the tail feathers
- Yarn Weight: Worsted weight (medium #4)
- Crochet Hook: 3.5 mm
- Terminology: US crochet terms
- Construction: Individual amigurumi pieces sewn together
- Style: Thanksgiving, autumn farmhouse, harvest décor
- Estimated Time: 7–10 hours
Design Note: This original pattern is inspired by the pictured Thanksgiving turkey. It recreates the warm brown body, colorful rounded feathers, black pilgrim hat, yellow beak, red wattle, and orange pumpkin. Exact proportions and stitch placement may vary slightly from the reference image.
Materials Needed
- Medium brown worsted-weight yarn – approximately 100 g
- Dark brown yarn – approximately 20 g
- Black yarn – approximately 30 g
- Golden yellow yarn – approximately 25 g
- Bright orange yarn – approximately 40 g
- Burgundy red yarn – approximately 25 g
- Rust orange yarn – approximately 25 g
- Olive green yarn – small amount
- Red yarn – small amount for the wattle
- 3.5 mm crochet hook
- Two 10–12 mm black safety eyes
- Polyester fiberfill stuffing
- Yarn needle
- Scissors
- Stitch markers
- Straight pins
- Optional cardboard or plastic support for the hat brim
- Optional wooden display base
Crochet Abbreviations
- MR: Magic ring
- ch: Chain
- sc: Single crochet
- hdc: Half double crochet
- dc: Double crochet
- sl st: Slip stitch
- inc: Increase (2 sc in one stitch)
- dec: Invisible decrease
- BLO: Back loop only
- FO: Fasten off
- st: Stitch
- rep: Repeat
Unless otherwise stated, work amigurumi pieces in continuous spiral rounds and use a stitch marker to identify the beginning of each round.
Part 1: Crochet the Turkey Body
Using medium brown yarn and a 3.5 mm crochet hook:
Round 1
6 sc in MR. (6)
Round 2
Inc in each stitch around. (12)
Round 3
(1 sc, inc) repeat 6 times. (18)
Round 4
(2 sc, inc) repeat 6 times. (24)
Round 5
(3 sc, inc) repeat 6 times. (30)
Round 6
(4 sc, inc) repeat 6 times. (36)
Round 7
(5 sc, inc) repeat 6 times. (42)
Rounds 8–14
Sc in each stitch around. (42)
Round 15
(5 sc, dec) repeat 6 times. (36)
Round 16
Sc around. (36)
Round 17
(4 sc, dec) repeat 6 times. (30)
Round 18
Sc around. (30)
Round 19
(3 sc, dec) repeat 6 times. (24)
Begin stuffing the body firmly, keeping the bottom slightly flattened so the turkey can sit.
Round 20
(2 sc, dec) repeat 6 times. (18)
Round 21
(1 sc, dec) repeat 6 times. (12)
Round 22
Dec around. (6)
FO, close the opening, and weave in the yarn tail.
Part 2: Crochet the Turkey Head
Using medium brown yarn:
Round 1
6 sc in MR. (6)
Round 2
Inc around. (12)
Round 3
(1 sc, inc) repeat 6 times. (18)
Round 4
(2 sc, inc) repeat 6 times. (24)
Round 5
(3 sc, inc) repeat 6 times. (30)
Round 6
(4 sc, inc) repeat 6 times. (36)
Rounds 7–12
Sc around. (36)
Insert the safety eyes between rounds 9 and 10, approximately 7 stitches apart.
Round 13
(4 sc, dec) repeat 6 times. (30)
Round 14
(3 sc, dec) repeat 6 times. (24)
Round 15
(2 sc, dec) repeat 6 times. (18)
Stuff the head firmly.
Round 16
(1 sc, dec) repeat 6 times. (12)
Round 17
Dec around. (6)
FO and close the opening.
Sew the head securely to the top front of the turkey body.
Part 3: Crochet the Yellow Beak
Using golden yellow yarn:
Round 1
4 sc in MR. (4)
Round 2
(1 sc, inc) repeat twice. (6)
Round 3
(2 sc, inc) repeat twice. (8)
Round 4
Sc around. (8)
FO, leaving a long tail for sewing.
Lightly stuff the beak and sew it between the eyes, slightly below their center.
Part 4: Crochet the Red Wattle
Using red yarn:
Ch 9.
Starting in the second chain from the hook, work 2 sc in each chain across.
The strip will curl naturally.
FO, leaving a long tail.
Sew the wattle to one side of the beak so it hangs downward.
Part 5: Crochet the Turkey Wings
Make two wings using medium brown yarn.
Round 1
6 sc in MR. (6)
Round 2
(1 sc, inc) repeat 3 times. (9)
Round 3
(2 sc, inc) repeat 3 times. (12)
Rounds 4–6
Sc around. (12)
Round 7
(2 sc, dec) repeat 3 times. (9)
Rounds 8–9
Sc around. (9)
Stuff lightly.
Flatten the opening and crochet through both layers using 4 sc to close.
FO, leaving a long sewing tail.
Make the second wing.
Sew the wings to the sides of the turkey body, angled slightly forward so they appear to hold the pumpkin.
Part 6: Crochet the Colorful Tail Feathers
The colorful tail is one of the most eye-catching features of this Thanksgiving turkey.
Make approximately 10–12 individual feathers in a combination of:
- Golden yellow
- Pumpkin orange
- Rust orange
- Deep burgundy
Feather Pattern
Using your chosen feather color:
Round 1
6 sc in MR. (6)
Round 2
(1 sc, inc) repeat 3 times. (9)
Round 3
(2 sc, inc) repeat 3 times. (12)
Round 4
(3 sc, inc) repeat 3 times. (15)
Rounds 5–8
Sc around. (15)
Round 9
(3 sc, dec) repeat 3 times. (12)
Round 10
Sc around. (12)
Round 11
(2 sc, dec) repeat 3 times. (9)
Round 12
Sc around. (9)
Stuff lightly, keeping each feather relatively flat.
Flatten the opening and close with 4 sc through both layers.
FO, leaving a long tail for sewing.
Arrange the Feathers
Lay the feathers in a semicircular fan shape.
Alternate colors to create a warm autumn palette.
Position golden yellow feathers near the upper edges, with burgundy and orange feathers distributed throughout.
Sew the narrow ends of the feathers together.
Attach the assembled feather fan securely to the back of the turkey body.
For extra stability, sew the feather bases to a small brown crochet backing piece before attaching them to the body.
Part 7: Crochet the Pilgrim Hat
Use black yarn and a 3.5 mm crochet hook.
Hat Crown
Round 1
6 sc in MR. (6)
Round 2
Inc around. (12)
Round 3
(1 sc, inc) repeat 6 times. (18)
Round 4
(2 sc, inc) repeat 6 times. (24)
Round 5
(3 sc, inc) repeat 6 times. (30)
Round 6
(4 sc, inc) repeat 6 times. (36)
Round 7
Sc in BLO around. (36)
Rounds 8–13
Sc around. (36)
Hat Brim
Round 14
Working in the front loops only, (5 sc, inc) repeat 6 times. (42)
Round 15
(6 sc, inc) repeat 6 times. (48)
Round 16
(7 sc, inc) repeat 6 times. (54)
Round 17
Sc around. (54)
FO and weave in the ends.
Shape the brim gently with your fingers.
Part 8: Crochet the Hatband and Golden Buckle
Brown Hatband
Using dark brown yarn:
Ch 39.
Sc in the second chain from the hook and across. (38)
FO, leaving a sewing tail.
Wrap the strip around the base of the hat crown and sew the ends together.
Golden Buckle
Using golden yellow yarn:
Ch 16.
Join with a sl st to form a ring.
Work 4 sc, ch 2, 4 sc, ch 2, 4 sc, ch 2, 4 sc, ch 2 around the chain ring, distributing the stitches into four sides.
Join and FO.
Shape the buckle into a small rectangle and sew it to the front of the hatband.
Position the completed hat on the turkey’s head and sew it securely in place.
Part 9: Crochet the Miniature Pumpkin
Using bright orange yarn:
Round 1
6 sc in MR. (6)
Round 2
Inc around. (12)
Round 3
(1 sc, inc) repeat 6 times. (18)
Round 4
(2 sc, inc) repeat 6 times. (24)
Round 5
(3 sc, inc) repeat 6 times. (30)
Round 6
(4 sc, inc) repeat 6 times. (36)
Rounds 7–12
Sc around. (36)
Round 13
(4 sc, dec) repeat 6 times. (30)
Round 14
(3 sc, dec) repeat 6 times. (24)
Round 15
(2 sc, dec) repeat 6 times. (18)
Stuff firmly.
Round 16
(1 sc, dec) repeat 6 times. (12)
Round 17
Dec around. (6)
FO, leaving a long yarn tail.
Create the Pumpkin Ridges
Thread the long yarn tail through a yarn needle.
Insert the needle through the center of the pumpkin from top to bottom.
Bring the yarn around the outside and pull gently to create a ridge.
Repeat approximately six times around the pumpkin.
Secure the yarn at the bottom.
Part 10: Crochet the Pumpkin Stem and Leaf
Stem
Using dark brown yarn:
Ch 7.
Sc in the second chain from the hook and across.
FO and roll the strip into a short stem.
Sew to the top of the pumpkin.
Leaf
Using olive green yarn:
Ch 8.
Starting in the second chain from the hook, work:
Sl st, sc, hdc, dc, dc, hdc, sc.
Ch 1 and work along the opposite side of the foundation chain:
Sc, hdc, dc, dc, hdc, sc, sl st.
FO and sew the leaf beside the pumpkin stem.
Optional Curly Vine
Ch 12 using olive green yarn.
Work 2 sc into each chain across.
The vine will curl naturally.
Attach it beside the stem.
Part 11: Crochet the Yellow Feet
Make two feet using golden yellow yarn.
Round 1
6 sc in MR. (6)
Round 2
(1 sc, inc) repeat 3 times. (9)
Rounds 3–5
Sc around. (9)
Flatten the opening.
FO, leaving a sewing tail.
For a simple decorative toe effect, use a yarn needle to make two small indentations along the rounded edge.
Repeat for the second foot.
Sew both feet to the front bottom of the turkey body.
Part 12: Assemble the Thanksgiving Turkey
Step 1: Attach the Head
Sew the stuffed head to the upper front of the turkey body.
Make sure the eyes and beak face forward.
Step 2: Attach the Tail Feathers
Position the colorful feathers behind the body in a wide fan shape.
Sew the feather bases securely to the back of the turkey.
Step 3: Attach the Wings
Sew one wing to each side of the body.
Angle them slightly inward.
Step 4: Attach the Feet
Sew the yellow feet to the lower front of the body.
Step 5: Position the Pumpkin
Place the finished pumpkin in front of the turkey’s belly.
Use hidden stitches to secure it to the body.
Step 6: Position the Wings Around the Pumpkin
Bring the wing tips forward so the turkey appears to be holding the pumpkin.
Secure the wing tips with a few stitches.
Step 7: Attach the Pilgrim Hat
Place the hat slightly forward on the turkey’s head.
Sew it securely along the lower edge of the crown.
Step 8: Final Shaping
Adjust the tail feathers into a balanced semicircle.
Check that the turkey sits upright.
Gently reshape the pumpkin and wings.
Weave in all remaining yarn ends.
Creative Color Variations
Classic Thanksgiving Turkey
Use warm brown, golden yellow, pumpkin orange, and burgundy for a traditional harvest-inspired design.
Rustic Farmhouse Turkey
Combine oatmeal, taupe, muted terracotta, and olive green for a softer neutral appearance.
Pastel Autumn Turkey
Use dusty rose, cream, peach, and sage green for a sweet modern farmhouse look.
Vintage Harvest Turkey
Choose mustard yellow, burnt orange, dark chocolate brown, and deep cranberry.
Mini Thanksgiving Turkey
Use thinner yarn and a smaller crochet hook to create a miniature version for shelf decorations or handmade gifts.
Colorful Children’s Turkey
Use bright rainbow feathers for a cheerful Thanksgiving decoration.
Helpful Crochet Tips
- Use a smaller hook than recommended on the yarn label for tight amigurumi stitches.
- Stuff the head firmly to maintain its rounded shape.
- Keep the body slightly flattened at the bottom for stability.
- Arrange the tail feathers before sewing them together.
- Use long sewing tails to secure each feather.
- Keep the feathers lightly stuffed so they form a soft fan.
- Use stitch markers to track your rounds.
- Position the safety eyes before closing the head.
- Shape the hat brim gently for a neat finish.
- Use hidden stitches when attaching the pumpkin.
- Reinforce the wings so they can support the pumpkin.
- Use consistent yarn tension throughout the project.
- Secure all pieces firmly before displaying the turkey.
- For toys intended for children under three, embroider the eyes instead of using plastic safety eyes and omit detachable embellishments.
Frequently Asked Questions
Is this crochet Thanksgiving turkey suitable for beginners?
This pattern is best for intermediate crocheters, although confident beginners familiar with amigurumi basics can also try it.
What yarn is best for this project?
Medium-weight acrylic or cotton yarn works well. Cotton provides excellent stitch definition, while acrylic produces a softer finish.
Can I make the turkey larger?
Yes. Use thicker yarn and a larger crochet hook to increase the finished size.
Can I make the turkey smaller?
Yes. Use sport-weight yarn and a smaller crochet hook.
How many feathers should I crochet?
Approximately 10–12 feathers create a full, colorful fan-shaped tail.
Can I change the feather colors?
Absolutely. Choose any autumn-inspired palette that complements your Thanksgiving decorations.
Can I make the pilgrim hat removable?
Yes. Instead of sewing the hat permanently, attach it with a small hidden tie or removable fastening.
Can I make the pumpkin separately?
Yes. The miniature pumpkin also works beautifully as a standalone autumn decoration.
How long does this project take?
Most intermediate crocheters can complete the project in approximately 7–10 hours, depending on experience and assembly time.
Can I use this turkey as a Thanksgiving centerpiece?
Yes. Display it on a wooden tray or decorative base surrounded by autumn leaves, miniature pumpkins, and other seasonal decorations.
Can I sell finished turkeys made from this pattern?
Yes. You may sell your handmade finished items. Credit to the original pattern is appreciated when sharing your work online.
Care Instructions
- Spot clean gently using a damp cloth.
- Avoid machine washing if the hat or feathers contain support materials.
- Do not pull on the tail feathers.
- Allow the turkey to air dry completely.
- Keep away from direct flames and candles.
- Store in a clean, dry place.
- Avoid compressing the tail feathers during storage.
- Reshape the hat and pumpkin gently when needed.
Final Thoughts
This crochet Thanksgiving turkey with pumpkin is a charming handmade project that captures the warmth and joy of the autumn season. With its colorful tail feathers, adorable pilgrim hat, sweet little face, and festive pumpkin, this amigurumi turkey makes a beautiful addition to your Thanksgiving home décor.
Display it on a mantel, use it as a Thanksgiving table centerpiece, or give it as a thoughtful handmade gift to someone who loves seasonal crochet creations.
Love this adorable Thanksgiving turkey? Save this free crochet pattern to Pinterest and share it with your crochet friends for more handmade fall decorations, festive amigurumi projects, and creative Thanksgiving crochet inspiration!