Crochet Fall Pumpkin Door Hanging – Free Autumn Decoration Pattern
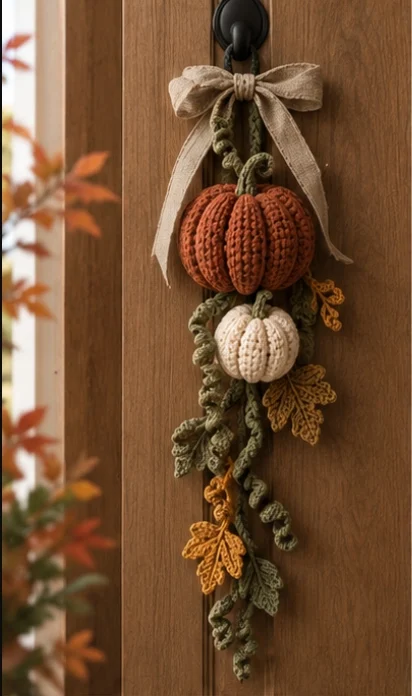
Welcome the cozy beauty of autumn into your home with this elegant crochet fall pumpkin door hanging! Featuring two adorable ribbed pumpkins, cascading olive-green vines, delicate golden leaves, and a rustic linen bow, this handmade decoration is the perfect way to celebrate the fall season.
Unlike a traditional circular wreath, this beautiful vertical autumn door decoration creates a graceful cascading arrangement. A rich burnt-orange pumpkin sits near the top, a smaller ivory pumpkin hangs beneath it, and textured crochet vines and leaves flow naturally toward the bottom.
The earthy color palette of terracotta, cream, olive green, and mustard yellow makes this project especially suitable for farmhouse interiors, Thanksgiving decorations, and cozy seasonal home styling.
In this free crochet tutorial, you’ll learn how to create the ribbed pumpkins, curly vines, autumn leaves, hanging cords, and decorative finishing details.
Pattern Information
- Skill Level: Intermediate
- Finished Length: Approximately 55–65 cm
- Finished Width: Approximately 18–22 cm
- Yarn Weight: Worsted weight (#4)
- Crochet Hook: 3.5 mm and 4 mm
- Terminology: US crochet terms
- Construction: Separate crochet pieces assembled into a vertical hanging
- Style: Rustic farmhouse, autumn, Thanksgiving
- Estimated Time: 5–8 hours
Design Note: This pattern is inspired by the reference image and recreates its main elements: one large burnt-orange pumpkin, one smaller cream pumpkin, olive-green curling vines, mustard and sage autumn leaves, and a neutral fabric bow. Exact stitch placement and finished proportions may vary.
Materials Needed
- Burnt-orange worsted-weight yarn – approximately 50 g
- Ivory or cream yarn – approximately 35 g
- Olive-green yarn – approximately 45 g
- Sage-green yarn – approximately 15 g
- Mustard-yellow yarn – approximately 20 g
- Dark brown yarn – small amount for stems
- 3.5 mm crochet hook
- 4 mm crochet hook
- Polyester fiberfill stuffing
- Yarn needle
- Scissors
- Stitch markers
- Rustic linen or burlap ribbon, approximately 4 cm wide
- Strong cotton cord for hanging
- Optional wooden beads
- Optional floral wire for shaping decorative vines
Crochet Abbreviations
- MR: Magic ring
- ch: Chain
- sc: Single crochet
- hdc: Half double crochet
- dc: Double crochet
- tr: Treble crochet
- sl st: Slip stitch
- inc: Increase
- dec: Decrease
- BLO: Back loop only
- FO: Fasten off
- st: Stitch
- rep: Repeat
Part 1: Crochet the Large Burnt-Orange Pumpkin
This pumpkin forms the main focal point of the door hanging. The ribbed texture is created by working rows of single crochet through the back loops.
Using burnt-orange yarn and a 4 mm hook:
Row 1
Ch 27. Starting in the second chain from the hook, sc across. (26)
Rows 2–42
Ch 1, turn. Sc in BLO across. (26)
The repeated back-loop stitches create raised vertical ridges.
Joining the Pumpkin
Fold the rectangle so the first and last rows meet.
Slip stitch through both edges to form a tube.
FO, leaving a long yarn tail.
Shape the Bottom
Thread the yarn tail through a yarn needle.
Weave the needle through the stitches around one open end.
Pull tightly to gather the opening closed.
Secure with several stitches.
Stuff the Pumpkin
Turn the pumpkin right side out.
Fill with polyester stuffing, distributing the stuffing evenly.
Avoid overstuffing so the pumpkin retains its soft ribbed shape.
Close the Top
Weave a second yarn tail around the remaining opening.
Pull tightly and secure.
Pass the yarn needle through the pumpkin’s center from top to bottom and pull gently to flatten the shape.
Secure the yarn at the bottom.
The finished pumpkin should be approximately 13–15 cm wide, depending on yarn tension.
Part 2: Crochet the Small Ivory Pumpkin
Using cream yarn and a 3.5 mm hook:
Row 1
Ch 21. Starting in the second chain from the hook, sc across. (20)
Rows 2–32
Ch 1, turn. Sc in BLO across. (20)
Assembly
Fold the rectangle and slip stitch the short edges together to create a tube.
Gather the bottom opening with a yarn needle.
Stuff lightly.
Gather the top opening and secure.
Pass the yarn through the center to flatten the pumpkin slightly.
The finished ivory pumpkin should be approximately 9–11 cm wide.
Part 3: Crochet the Pumpkin Stems
Make two stems using dark brown or olive-green yarn.
Round 1
6 sc in MR. (6)
Rounds 2–6
Sc around. (6)
FO, leaving a long sewing tail.
For the larger pumpkin, add two extra rounds if you prefer a taller stem.
Sew each stem securely to the center top of its pumpkin.
Part 4: Crochet the Curly Green Vines
The cascading curly vines give this autumn decoration its graceful vertical appearance.
Use olive-green and sage-green yarn.
Long Vine
Ch 65.
Starting in the second chain from the hook, work 2 sc in each chain across.
The vine will curl naturally as you crochet.
FO, leaving a long tail for assembly.
Medium Vine
Ch 45.
Work 2 sc in each chain across.
FO.
Short Vine
Ch 25.
Work 2 sc in each chain across.
FO.
Recommended Vine Quantities
- 2 long olive-green vines
- 2 medium olive-green vines
- 2 short sage-green vines
- 1 additional curling vine for the large pumpkin
- 1 additional curling vine for the small pumpkin
Vary the lengths slightly to create a natural cascading appearance.
Part 5: Crochet the Autumn Leaves
The hanging features delicate textured leaves in mustard yellow, olive green, and muted sage.
Make approximately 6–8 leaves in different colors.
Basic Autumn Leaf Pattern
Using your chosen yarn color and a 3.5 mm hook:
Step 1: Foundation
Ch 13.
Step 2: First Side
Starting in the second chain from the hook, work:
1 sl st, 1 sc, 1 hdc, 2 dc, 2 tr, 2 dc, 1 hdc, 1 sc, 1 sl st.
Work 3 sc into the final chain to turn around the end.
Step 3: Opposite Side
Working along the opposite side of the foundation chain, work:
1 sl st, 1 sc, 1 hdc, 2 dc, 2 tr, 2 dc, 1 hdc, 1 sc, 1 sl st.
Join with a sl st and FO.
Step 4: Add Leaf Veins
Thread a matching or slightly darker yarn through a needle.
Embroider a central vein from the base to the tip.
Add small diagonal stitches for decorative side veins.
Step 5: Shape the Leaves
Gently stretch the leaf into a pointed oval shape.
For a more oak-like autumn leaf, add small scalloped sections around the edges using short groups of hdc and dc stitches.
Make leaves in slightly different sizes for a more organic arrangement.
Part 6: Crochet Small Decorative Leaf Sprigs
These smaller leaves fill the spaces between the pumpkins and vines.
Using olive-green or mustard-yellow yarn:
Ch 9.
Starting in the second chain from the hook:
Sl st, sc, hdc, dc, dc, hdc, sc, sl st.
Ch 1 and work along the opposite side:
Sl st, sc, hdc, dc, dc, hdc, sc, sl st.
FO, leaving a sewing tail.
Make 4–6 small sprigs.
Part 7: Create the Hanging Cords
Use strong cotton yarn or cotton cord to support the pumpkins.
Main Hanging Cord
Cut a length of cord approximately 90 cm long.
Fold it in half to create a hanging loop.
Tie a secure knot beneath the loop.
This will form the central support of the decoration.
Decorative Crochet Cord
Using olive-green yarn:
Ch 75.
Sl st into the second chain from the hook and continue across.
FO.
Make two additional cords of approximately 45 and 55 chains.
These can be attached alongside the main support cord to create a fuller cascading effect.
Important: Use the strong cotton cord as the weight-bearing support. The decorative crochet vines should not carry the pumpkins’ full weight.
Part 8: Create the Rustic Linen Bow
The soft neutral bow gives the door hanging its elegant farmhouse appearance.
Materials
- Natural linen or burlap ribbon
- Scissors
- Matching thread
- Needle
Instructions
Cut approximately 55–65 cm of ribbon.
Form two symmetrical loops.
Cross the ribbon ends and tie a neat bow.
Adjust the loops to approximately 8–10 cm wide.
Allow the ribbon tails to hang naturally.
Trim the ends diagonally for a polished appearance.
Secure the bow with a few hidden stitches if needed.
Optional Crochet Bow
If you prefer an entirely crocheted decoration, use cream cotton yarn.
Ch 16.
Work 15 sc across.
Continue for 12 rows.
FO.
Wrap a narrow crocheted strip around the center to create the bow shape.
Make two separate ribbon tails and attach them beneath the bow.
Part 9: Assemble the Vertical Pumpkin Door Hanging
Step 1: Prepare the Hanging Loop
Secure the main cotton hanging cord to a sturdy door hook.
Check that the loop is strong enough to support the completed decoration.
Step 2: Attach the Large Pumpkin
Position the burnt-orange pumpkin approximately 12–15 cm below the hanging loop.
Pass the support cord through the pumpkin’s center using a large yarn needle.
Secure it beneath the pumpkin with a hidden knot or firm stitches.
Make sure the pumpkin hangs upright.
Step 3: Attach the Ivory Pumpkin
Position the cream pumpkin approximately 8–10 cm below the large pumpkin.
Secure it to the same central support cord.
Adjust the spacing until the pumpkins appear balanced.
Step 4: Attach the Long Vines
Position the longest olive-green vines behind and beside the pumpkins.
Allow them to extend below the smaller pumpkin.
Sew the upper ends securely to the central cord.
Step 5: Add Medium and Short Vines
Arrange medium vines along the center and sides.
Add short curling vines near the pumpkin stems.
Vary their lengths to create natural movement.
Step 6: Attach the Autumn Leaves
Position mustard-yellow leaves around the lower sides of the pumpkins.
Add sage-green and olive-green leaves between the curling vines.
Distribute the leaves unevenly for a natural autumn appearance.
Step 7: Add the Linen Bow
Attach the bow just below the hanging loop and above the large pumpkin.
Allow the ribbon tails to frame the upper pumpkin.
Step 8: Final Shaping
Gently adjust the vines so they cascade downward.
Arrange the leaves to face forward.
Check that both pumpkins remain centered.
Secure loose yarn ends.
Hang the finished decoration on your door and adjust the arrangement as needed.
Creative Color Variations
Classic Autumn Harvest
Combine burnt orange, ivory, olive green, and mustard yellow for a traditional fall appearance.
Neutral Farmhouse Autumn
Use beige, oatmeal, cream, and muted sage for a softer minimalist style.
Rustic Thanksgiving
Choose terracotta, chocolate brown, deep olive, and golden yellow.
Elegant White Pumpkin
Make both pumpkins in ivory and cream, paired with sage-green vines and champagne-colored ribbon.
Modern Cottagecore
Use dusty rose, muted peach, soft cream, and eucalyptus green.
Deep Autumn Woodland
Combine dark rust, forest green, copper, and warm brown.
Helpful Crochet Tips
- Use consistent yarn tension to create even pumpkin ribs.
- Work through the back loops to achieve a defined ribbed texture.
- Stuff the pumpkins lightly enough to preserve their shape.
- Use strong cotton cord to support the weight of the decoration.
- Attach the pumpkins before adding decorative vines.
- Vary vine lengths to create a natural cascading arrangement.
- Mix different shades of green for greater depth.
- Use mustard and sage leaves to balance the warm pumpkin colors.
- Keep the bow proportional to the upper pumpkin.
- Secure all decorative pieces with hidden stitches.
- Avoid overcrowding the arrangement with too many leaves.
- Check the balance before hanging the finished decoration.
- Use removable hooks suitable for your door material.
- Protect the decoration from prolonged rain and direct sunlight.
Frequently Asked Questions
Is this crochet pumpkin door hanging beginner-friendly?
The pumpkins are suitable for confident beginners, while assembling the cascading vines and leaves requires some intermediate crochet and sewing skills.
What type of yarn works best?
Worsted-weight cotton or acrylic yarn works well. Cotton offers crisp stitch definition, while acrylic creates softer pumpkins and flexible vines.
Can I make the decoration longer?
Yes. Increase the length of the central support cord and crochet longer vines.
Can I make it shorter?
Yes. Shorten the hanging cords and reduce the length of the decorative vines.
Can I use only one pumpkin?
Absolutely. A single large pumpkin surrounded by leaves and vines creates a simpler autumn decoration.
Can I add a third pumpkin?
Yes. Add a small pumpkin beneath the ivory one, ensuring the support cord can safely hold the extra weight.
How many leaves should I make?
Approximately 6–8 medium leaves and 4–6 small sprigs create a balanced arrangement.
Can I replace the linen bow with a crochet bow?
Yes. A cream or beige crocheted bow works beautifully and makes the decoration entirely handmade.
Can I hang this decoration outdoors?
It is best displayed indoors or on a covered porch protected from moisture and strong sunlight.
Can I use this for Thanksgiving decorations?
Yes. The pumpkins, autumn leaves, and warm seasonal colors make it perfect for Thanksgiving and harvest celebrations.
Can I sell finished door hangings made from this pattern?
Yes. You may sell your handmade finished items. Credit to the pattern designer is appreciated when sharing your creations.
Care Instructions
- Spot clean gently with a damp cloth.
- Avoid soaking the stuffed pumpkins.
- Allow the decoration to air dry completely.
- Keep away from open flames and heat sources.
- Store in a dry, dust-free place.
- Avoid crushing the pumpkins during storage.
- Gently reshape the vines and leaves before displaying.
- Keep the linen ribbon clean and dry.
Final Thoughts
This crochet fall pumpkin door hanging is a beautiful way to bring handmade autumn charm into your home. With its rich burnt-orange pumpkin, delicate ivory pumpkin, cascading green vines, golden leaves, and rustic bow, it creates an elegant seasonal decoration without the need for a traditional wreath.
Hang it on your front door, display it in an entryway, or give it as a thoughtful handmade gift to someone who loves farmhouse décor and autumn crochet projects.
Love this cozy autumn decoration? Save this free crochet pumpkin door hanging pattern to Pinterest and share it with your crochet friends for more seasonal handmade inspiration!