Sage Green and Cream Crochet Flower Tote Bag – Free Pattern
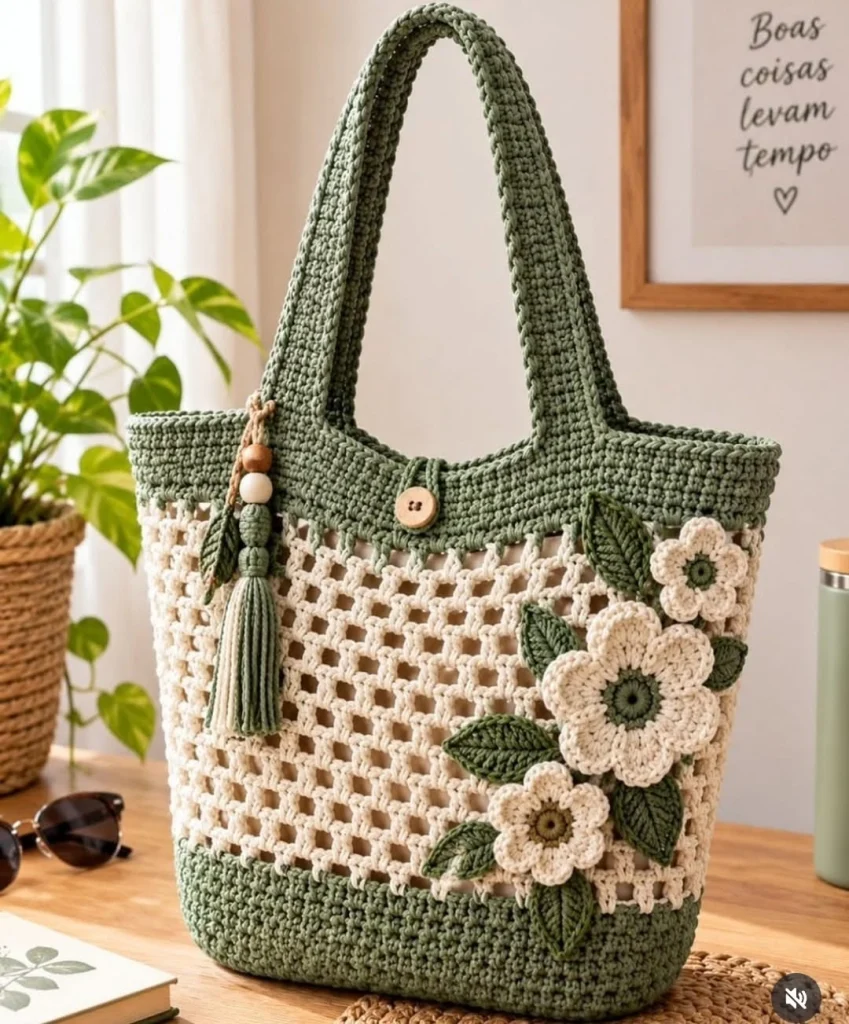
Create a beautiful handmade accessory with this sage green and cream crochet flower tote bag! Featuring a sturdy sage-green base, an airy ivory mesh body, elegant crocheted handles, and delicate white flowers with green leaves, this charming tote combines practical everyday style with timeless handmade beauty.
The soft botanical colors give the bag a fresh, natural appearance, while the decorative floral appliqués, wooden button closure, and matching tassel add a lovely finishing touch. Perfect for shopping, casual outings, summer adventures, or thoughtful handmade gifts, this crochet tote is both fashionable and functional.
In this free step-by-step crochet tutorial, you’ll learn how to create the solid base, work the open mesh body, crochet strong handles, make dimensional flowers and leaves, and assemble the finished bag.
Pattern Note: This is an original crochet pattern inspired by the pictured bag. It recreates the main design elements, although the exact stitch construction of the photographed item cannot be confirmed from the image alone.
Pattern Information
- Skill Level: Intermediate
- Finished Width: Approximately 36 cm (14 inches)
- Finished Height: Approximately 32 cm (12.5 inches), excluding handles
- Base Depth: Approximately 10 cm (4 inches)
- Handle Drop: Approximately 25 cm (10 inches)
- Yarn Weight: Worsted-weight cotton (#4)
- Hook Size: 4 mm
- Terminology: US crochet terms
- Construction: Oval base worked in continuous rounds, mesh body, attached handles, and sewn-on decorations
- Estimated Time: 12–18 hours
Materials Needed
- Approximately 250–300 g sage-green cotton yarn
- Approximately 200–250 g cream or ivory cotton yarn
- Small amount of darker olive-green yarn for flower centers and leaves
- 4 mm crochet hook
- 3.5 mm crochet hook for flower details
- Yarn needle
- Stitch markers
- Scissors
- Measuring tape
- One wooden button, approximately 20–25 mm
- Two or three decorative wooden beads
- Optional cotton fabric for lining
- Optional magnetic snap or zipper
Yarn Tip: Mercerized cotton or tightly twisted cotton yarn is ideal for this project because it helps the bag maintain its shape and reduces stretching during everyday use.
Crochet Abbreviations
- ch: Chain
- sc: Single crochet
- hdc: Half double crochet
- dc: Double crochet
- tr: Treble crochet
- sl st: Slip stitch
- st: Stitch
- sp: Space
- inc: Increase (2 sc in the same stitch)
- sc2tog: Single crochet two stitches together
- BLO: Back loop only
- FO: Fasten off
Part 1: Crochet the Sage-Green Oval Base
The base provides structure and helps the finished tote stand upright.
Using sage-green yarn and a 4 mm hook:
Round 1
Ch 35.
Sc in the second chain from the hook and in each of the next 32 chains.
Work 3 sc in the final chain.
Continue along the opposite side of the foundation chain, working 32 sc.
Work 2 additional sc in the first chain to complete the oval.
You should have 70 stitches.
Round 2
Work sc along the straight sides and increase evenly around both rounded ends.
Place a stitch marker at the beginning of the round.
Rounds 3–8
Continue working sc around, placing increases at the curved ends to keep the base flat.
Stop when the oval measures approximately 36 × 10 cm.
If the base begins to ripple, reduce the number of increases. If it curls upward prematurely, add increases around the ends.
Round 9
Work one round of sc in BLO without increasing.
This creates a defined edge between the base and the body of the bag.
Part 2: Build the Solid Sage-Green Lower Section
Continue using sage-green yarn.
Rounds 10–18
Work sc in every stitch around without increasing.
Keep your tension firm and even.
The sides should gradually rise from the oval base.
Continue until the solid lower section measures approximately 7–8 cm high.
This section gives the bag durability and provides a stable foundation for the openwork mesh.
Part 3: Crochet the Cream Mesh Body
Change to ivory or cream yarn.
The mesh section is the main decorative feature of the tote bag.
Mesh Round 1
Ch 4 (counts as dc and ch 1).
Skip the next stitch, dc in the following stitch, ch 1.
Repeat around.
Join with a sl st.
If necessary, adjust the final repeat to maintain an even stitch pattern.
Mesh Round 2
Sl st into the first chain space.
Ch 4.
Dc into the next chain space, ch 1.
Repeat around.
Join with a sl st.
Mesh Rounds 3–15
Repeat Mesh Round 2.
The repeated double crochet and chain spaces create an airy lattice pattern.
Continue until the cream mesh section measures approximately 17–19 cm high.
Keep the mesh openings uniform so the bag maintains a balanced appearance.
Part 4: Crochet the Upper Sage-Green Band
Change back to sage-green yarn.
Round 1
Work sc evenly around the top of the mesh section, placing one sc into each dc and chain space.
Rounds 2–7
Work sc in each stitch around.
This creates a strong upper band approximately 4–5 cm tall.
Round 8
Work one final round of sc.
FO and weave in the ends.
The upper band should feel firm enough to support the handles without stretching excessively.
Part 5: Crochet the Two Strong Handles
Using sage-green yarn and a 4 mm hook:
Handle 1
Ch 9.
Row 1: Sc in the second chain from the hook and across. You should have 8 sc.
Row 2: Ch 1, turn. Sc across.
Repeat Row 2 until the strap measures approximately 65–70 cm long.
FO, leaving a long tail for sewing.
Handle 2
Repeat the same instructions to make a second identical strap.
Reinforcing the Handles
For extra strength, crochet a row of slip stitches along both long edges of each strap.
Alternatively, sew a narrow strip of cotton webbing to the underside of each crocheted handle.
This is especially helpful if the bag will be used for shopping or carrying heavier items.
Part 6: Attach the Handles
Lay the tote flat with the front facing upward.
Position the first handle ends approximately 8–10 cm from each side edge of the front panel.
Attach the second handle in the same position on the back panel.
Use a yarn needle and matching sage-green yarn to sew the ends securely to the inside of the upper band.
Stitch each handle attachment in a rectangular shape with diagonal reinforcement stitches.
Make sure both handles are evenly positioned and the bag hangs symmetrically.
Part 7: Crochet the White Flower Appliqués
The three dimensional flowers give this tote its signature romantic botanical style.
Make three flowers in slightly different sizes.
Use cream yarn and a 3.5 mm crochet hook.
Flower Center
Using olive-green yarn:
Round 1: Make a magic ring and work 6 sc into the ring.
Pull tight and join with a sl st.
Round 2: Work 2 sc in each stitch around.
You should have 12 stitches.
FO and change to cream yarn.
Flower Petals
Work the following sequence into each pair of stitches:
Sl st into the first stitch.
Ch 3.
Work 2 dc, 1 tr, 2 dc into the next stitch.
Ch 3 and sl st into the following stitch.
Repeat around to form six rounded petals, distributing the repeats evenly.
FO and weave in the ends.
Large Flower
Use a 4 mm hook or add an additional petal round to create a flower approximately 9–10 cm wide.
Medium Flower
Follow the standard pattern for a flower approximately 7–8 cm wide.
Small Flower
Use a 3 mm hook and slightly thinner yarn for a flower approximately 5–6 cm wide.
Make one flower of each size.
Part 8: Crochet the Sage-Green Leaves
Using sage-green or olive-green yarn:
Leaf Foundation
Ch 12.
Leaf Row 1
Sc in the second chain from the hook.
Hdc in the next stitch.
Dc in the next 3 stitches.
Tr in the next 2 stitches.
Dc in the next 2 stitches.
Hdc in the next stitch.
Work 3 sc into the final chain.
Continue along the opposite side of the foundation chain, mirroring the stitch sequence.
Join with a sl st.
Leaf Edging
Work sc evenly around the leaf.
At the pointed tip, work ch 2 and sl st into the same stitch.
FO, leaving a long tail for sewing.
Make approximately 5–7 leaves in different shades of sage and olive green.
For extra texture, surface crochet a central vein along each leaf using a contrasting green yarn.
Part 9: Arrange the Floral Decorations
Lay the tote bag flat with the front facing upward.
Position the largest flower toward the lower-right side of the cream mesh section.
Place the medium flower slightly above it.
Position the smallest flower near the upper-right corner.
Arrange the crocheted leaves around the flowers, allowing some leaves to overlap naturally.
Use stitch markers or sewing pins to hold the arrangement in place.
Check that the design feels balanced and does not interfere with the bag handles.
Once satisfied, sew each flower and leaf securely onto the mesh using matching yarn.
Attach the appliqués at several points rather than only at their centers to prevent them from catching on objects.
Part 10: Crochet the Button Closure
The wooden button closure adds a practical and decorative finishing touch.
Button Loop
Using sage-green yarn, attach the yarn to the center of the upper back edge.
Ch approximately 15–20 stitches, adjusting the length to fit your chosen button.
Sl st into the starting stitch to form a loop.
Work sc around the chain loop for reinforcement.
FO and weave in the ends.
Attach the Button
Sew the wooden button to the center of the upper front band.
Test the closure to ensure the loop fits comfortably over the button without being too loose.
Part 11: Make the Decorative Tassel
The tassel adds movement and a playful handmade detail to the finished tote.
Step 1
Cut a piece of cardboard approximately 12 cm long.
Step 2
Wrap sage-green and cream yarn around the cardboard approximately 35–45 times.
Step 3
Slide a separate strand beneath the wrapped yarn and tie securely at the top.
Step 4
Cut the loops along the opposite edge.
Step 5
Wrap matching yarn around the bundle approximately 2 cm below the top to form the tassel head.
Step 6
Trim the ends evenly.
Step 7
Thread two or three wooden beads onto the hanging cord.
Step 8
Attach the tassel near the upper-left handle attachment.
The finished tassel should hang naturally against the cream mesh section.
Part 12: Add an Optional Fabric Lining
A fabric lining is recommended if you plan to carry small items such as keys, cosmetics, or a wallet.
Step 1
Measure the inside dimensions of the finished tote.
Step 2
Cut two rectangular pieces of cotton fabric, allowing approximately 1.5 cm for seam allowances.
Step 3
Sew the sides and bottom together.
Step 4
Shape the lower corners to match the depth of the crocheted base.
Step 5
Fold and press the upper edge of the lining.
Step 6
Insert the lining into the bag with the wrong sides facing.
Step 7
Hand-sew the lining to the inside of the upper sage-green band.
Keep the stitches small and discreet so they do not show on the outside.
Optional: Add an interior pocket for a phone or other small essentials.
Part 13: Finishing and Blocking
Step 1
Weave in all loose yarn ends.
Step 2
Check the handle attachments and reinforce them if necessary.
Step 3
Make sure the floral appliqués are firmly sewn in place.
Step 4
Gently shape the tote to the desired dimensions.
Step 5
Lightly steam-block according to the yarn manufacturer’s instructions.
Step 6
Allow the bag to dry completely before use.
Step 7
Attach the decorative tassel and wooden beads.
Your beautiful sage green and cream crochet flower tote bag is complete!
Creative Color Variations
Classic Botanical
Sage green, ivory, and olive green.
Romantic Cottagecore
Dusty pink, cream, and soft eucalyptus green.
Coastal Summer
Powder blue, white, and sandy beige.
Vintage Garden
Lavender, ivory, and muted forest green.
Elegant Neutral
Warm beige, cream, and caramel brown.
Autumn Meadow
Terracotta, mustard yellow, ivory, and moss green.
Modern Minimalist
Charcoal gray, white, and soft sage.
Helpful Crochet Tips
- Use cotton yarn for better structure and durability.
- Keep your stitches tight and consistent when working the base.
- Use stitch markers to track the beginning of each round.
- Check the base measurements before starting the mesh section.
- Maintain even spacing between the mesh openings.
- Avoid overly loose tension in the upper band.
- Reinforce the handles if the bag will carry heavier items.
- Use matching yarn when sewing on floral appliqués.
- Arrange the flowers before permanently attaching them.
- Use a smaller hook for delicate flower details.
- Make the leaves in different shades of green for added depth.
- Add a fabric lining to prevent small items from falling through the mesh.
- Choose a lightweight wooden button for the closure.
- Secure the tassel firmly to prevent it from coming loose.
- Block the finished tote for a polished appearance.
Frequently Asked Questions
Is this crochet tote bag suitable for beginners?
This pattern is best for intermediate crocheters, although confident beginners familiar with basic stitches, working in rounds, and sewing appliqués can also try it.
What yarn is best for this crochet bag?
Worsted-weight cotton yarn is recommended because it provides structure, durability, and a neat stitch definition.
Can I use acrylic yarn?
Yes, but acrylic yarn may stretch more than cotton. Consider adding a fabric lining and reinforcing the handles.
Can I make the tote bag larger?
Absolutely. Increase the foundation chain and add more base rounds, then continue the body until the desired dimensions are reached.
Can I make the bag smaller?
Yes. Reduce the starting chain and crochet fewer rounds in the base and body sections.
Are the flowers necessary?
No. The bag looks beautiful as a simple two-tone mesh tote, but the flowers add a lovely decorative touch.
Can I change the flower colors?
Yes. Try blush pink, lavender, yellow, or soft peach flowers for a different botanical look.
Does the bag need a lining?
A lining is optional, but it is recommended if you plan to carry smaller personal items.
How do I prevent the handles from stretching?
Use firm cotton yarn, tight stitches, and reinforced attachment points. You can also add cotton webbing to the underside of the handles.
Can I sell finished bags made from this pattern?
Yes. You may sell handmade bags created using this pattern. Credit to the pattern designer is appreciated.
Care Instructions
- Hand wash in cool water whenever possible.
- Use a mild detergent.
- Avoid bleach and harsh cleaning products.
- Do not twist or wring the bag.
- Gently squeeze out excess water using a clean towel.
- Reshape the bag while damp.
- Lay flat to dry.
- Avoid hanging the bag while wet, as this may stretch the handles.
- Keep away from excessive heat and direct sunlight during drying.
- Spot clean the floral appliqués when needed.
- Store in a clean, dry place.
Final Thoughts
This sage green and cream crochet flower tote bag is a wonderful combination of beauty, practicality, and handmade charm. The airy cream mesh, sturdy sage-green structure, delicate white flowers, and leafy accents create a timeless botanical accessory that works beautifully for spring, summer, and everyday use.
Whether you’re making it for yourself, giving it as a thoughtful handmade gift, or adding it to your crochet collection, this elegant tote is sure to become a favorite project.
Love this floral crochet tote? Save this free crochet bag pattern to Pinterest and share it with your crochet friends for more beautiful handmade accessories and creative inspiration!