Autumn Crochet Hanging Spiral Garland with Pumpkins, Maple Leaves & Acorns – Free Crochet Pattern
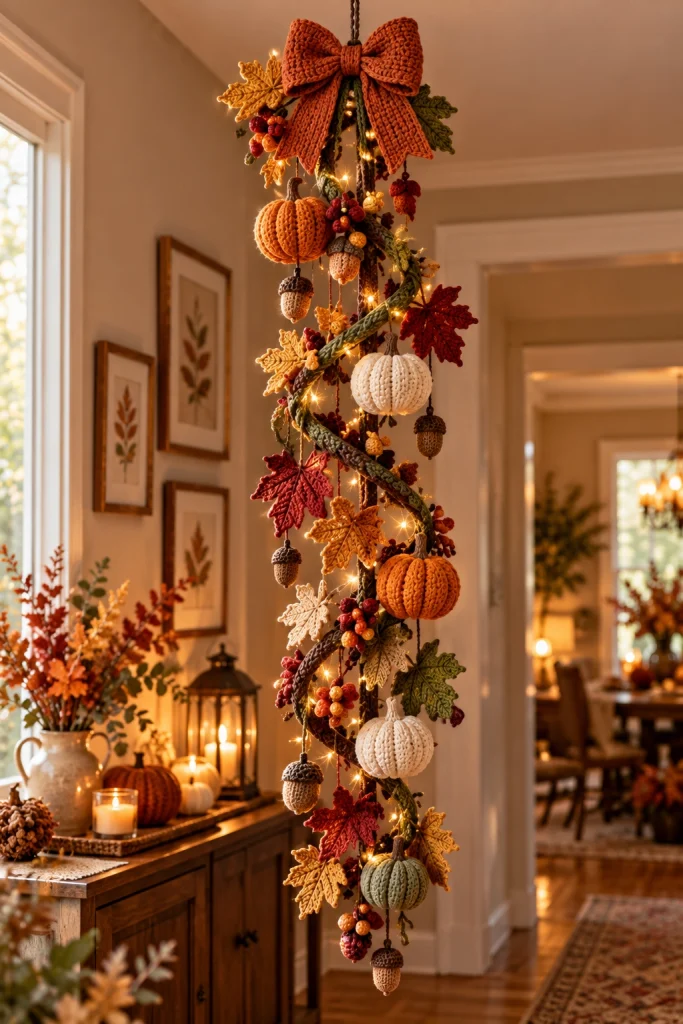
Bring the warmth and beauty of autumn into your home with this stunning autumn crochet hanging spiral garland. Featuring a cascading spiral of handmade pumpkins, colorful maple leaves, tiny acorns, clusters of berries, and a beautiful burnt-orange crochet bow, this seasonal decoration captures the cozy charm of fall.
The design combines rich autumn shades of burnt orange, mustard yellow, ivory, olive green, burgundy, and warm brown. A long, gently twisting vine creates an elegant vertical display, while small warm-white LED fairy lights add a magical golden glow.
Perfect for an entryway, living room corner, covered porch, or seasonal centerpiece, this decorative crochet hanging is a wonderful way to celebrate autumn with handmade charm.
Pattern Note: This original, photo-inspired pattern recreates the main design elements of the reference image. The hanging is constructed from a reinforced central cord, a flexible crocheted spiral vine, separately crocheted pumpkins, maple leaves, acorns, berries, and a large decorative bow. Finished dimensions and stitch details may vary from the pictured decoration.
Pattern Information
- Skill Level: Intermediate to Advanced
- Finished Length: Approximately 90–120 cm (35–47 inches)
- Finished Width: Approximately 20–30 cm (8–12 inches)
- Yarn Weight: DK or light worsted cotton yarn
- Crochet Hooks: 2.5 mm, 3 mm, and 3.5 mm
- Terminology: US crochet terms
- Construction: Individual motifs attached to a reinforced spiral hanging
- Estimated Time: 18–25 hours
- Recommended Use: Indoor seasonal decoration
Materials Needed
- DK cotton yarn in burnt orange
- DK cotton yarn in pumpkin orange
- DK cotton yarn in mustard yellow
- DK cotton yarn in ivory or cream
- DK cotton yarn in sage green
- DK cotton yarn in olive green
- DK cotton yarn in forest green
- DK cotton yarn in burgundy
- DK cotton yarn in warm brown
- DK cotton yarn in dark chocolate brown
- 2.5 mm crochet hook
- 3 mm crochet hook
- 3.5 mm crochet hook
- Polyester fiberfill stuffing
- Strong cotton cord for the central hanging support
- Flexible craft armature or soft plastic-coated wire for shaping the spiral
- Battery-operated warm-white LED fairy lights rated for decorative use
- Yarn needle
- Stitch markers
- Scissors
- Measuring tape
- Strong sewing thread
- Optional small wooden beads
Important Safety Note: This decoration is not a toy. If using internal wire, cover all ends securely and keep them inaccessible. Use only cool-running, battery-operated LED lights intended for decorative use. Do not use candles, incandescent bulbs, or lights that become hot. Keep the battery pack accessible, follow the light manufacturer’s instructions, and never leave the lights operating unattended.
Crochet Abbreviations
- MR: Magic ring
- ch: Chain
- sc: Single crochet
- hdc: Half double crochet
- dc: Double crochet
- tr: Treble crochet
- sl st: Slip stitch
- inc: Increase (2 sc in one stitch)
- dec: Invisible decrease
- BLO: Back loop only
- FLO: Front loop only
- st: Stitch
- FO: Fasten off
Unless otherwise stated, work amigurumi pieces in continuous rounds using a stitch marker to identify the beginning of each round.
Part 1: Make the Central Hanging Cord
The central cord supports the entire decoration and helps distribute the weight of the crocheted ornaments.
Step 1
Cut a length of strong cotton cord approximately 130–150 cm long.
Step 2
Fold the upper end to form a hanging loop approximately 8–10 cm long.
Step 3
Secure the loop with strong stitching or a suitable knot.
Step 4
Wrap the cord with dark-brown yarn using tight, even stitches.
Step 5
Continue covering the cord until the visible hanging section is completely wrapped.
Step 6
Secure the yarn at both ends and weave in the tails.
The cord should hang straight and be strong enough to support the pumpkins, leaves, berries, acorns, and decorative bow.
Part 2: Crochet the Main Spiral Vine
Use olive-green yarn and a 3.5 mm crochet hook.
The main vine forms a gently twisting spiral around the central hanging cord.
Round 1
6 sc in a magic ring. (6)
Round 2
Inc in every stitch around. (12)
Rounds 3 onward
Sc in every stitch around. (12)
Continue working until the tube measures approximately 180–220 cm, depending on the desired number of spiral turns.
Insert a lightweight flexible craft armature into the tube as you work, ensuring that all ends are covered and secured.
FO and close both ends securely.
Shape the Spiral
Wrap the crocheted tube around the central hanging cord to form a loose, descending spiral.
Leave approximately 18–25 cm between major spiral turns.
Secure the vine to the central cord at regular intervals using strong matching thread.
Adjust the spiral until it hangs naturally and evenly.
Part 3: Crochet the Large Orange Pumpkins
Make two large orange pumpkins using pumpkin-orange yarn and a 3 mm crochet hook.
Round 1
6 sc in a magic ring. (6)
Round 2
Inc around. (12)
Round 3
*Sc 1, inc.* Repeat around. (18)
Round 4
*Sc 2, inc.* Repeat around. (24)
Round 5
*Sc 3, inc.* Repeat around. (30)
Round 6
*Sc 4, inc.* Repeat around. (36)
Round 7
*Sc 5, inc.* Repeat around. (42)
Round 8
*Sc 6, inc.* Repeat around. (48)
Rounds 9–17
Sc around. (48)
Round 18
*Sc 6, dec.* Repeat around. (42)
Round 19
*Sc 5, dec.* Repeat around. (36)
Round 20
*Sc 4, dec.* Repeat around. (30)
Round 21
*Sc 3, dec.* Repeat around. (24)
Begin stuffing firmly.
Round 22
*Sc 2, dec.* Repeat around. (18)
Round 23
*Sc 1, dec.* Repeat around. (12)
Round 24
Dec around. (6)
FO, leaving a long yarn tail.
Create the Pumpkin Ridges
Thread the long yarn tail through a yarn needle.
Pass the needle through the center of the pumpkin from top to bottom.
Wrap the yarn around the outside and pull gently to form a deep ridge.
Repeat evenly around the pumpkin to create six or eight raised sections.
Secure the yarn at the bottom.
Part 4: Crochet the Ivory Pumpkins
Make two ivory pumpkins using cream yarn and a 3 mm crochet hook.
Follow the large orange pumpkin instructions.
For a slightly smaller pumpkin, stop increasing at 42 stitches instead of 48.
Work 8 rounds evenly before beginning the decreases.
Stuff firmly and shape six or eight ridges using the long yarn tail.
The ivory pumpkins create a beautiful contrast against the warm autumn colors.
Part 5: Crochet the Sage-Green Pumpkin
Use sage-green yarn and a 3 mm crochet hook.
Follow the same basic pumpkin construction.
Increase to 42 stitches.
Work 8 rounds evenly.
Decrease gradually, stuff, and close.
Shape the pumpkin into six raised sections.
This pumpkin will be positioned near the lower portion of the hanging decoration.
Part 6: Crochet the Pumpkin Stems
Use dark-brown yarn and a 2.5 mm crochet hook.
Round 1
6 sc in a magic ring. (6)
Rounds 2–6
Sc around. (6)
FO, leaving a long sewing tail.
Stuff very lightly if needed.
Sew one stem securely to the top center of each pumpkin.
Make five stems in total.
Part 7: Crochet the Large Maple Leaves
Make maple leaves in mustard yellow, burnt orange, burgundy, ivory, and olive green.
Use a 3 mm crochet hook.
Leaf Center
Ch 13.
Row 1
Sc in the second chain from the hook, hdc in the next 2 chains, dc in the next 6 chains, hdc in the next 2 chains, sc in the final chain.
Turn and work along the opposite side of the foundation chain.
Repeat the same stitch sequence.
First Side Point
Ch 8.
Sc in the second chain from the hook, hdc in the next 2 chains, dc in the next 3 chains, hdc in the final chain.
Sl st into the main leaf body.
Second Side Point
Ch 10.
Sc in the second chain from the hook, hdc in the next 2 chains, dc in the next 4 chains, hdc in the next 2 chains.
Sl st into the main leaf body.
Third Side Point
Ch 8.
Work back along the chain using sc, hdc, and dc stitches to create a pointed lobe.
Attach it to the main leaf body with a sl st.
Opposite Side
Repeat the three side points on the opposite edge of the leaf.
FO, leaving a long sewing tail.
Leaf Veins
Use a contrasting yarn shade to embroider a central vein and smaller branching veins.
Make approximately 12–16 maple leaves in different autumn colors.
Design Tip: Slightly vary the leaf sizes by changing the foundation-chain length and the number of stitches in each pointed lobe. Block the finished leaves gently so the points remain open and defined.
Part 8: Crochet the Small Oak Leaves
Use olive-green, mustard-yellow, and warm-brown yarn.
Use a 2.5 mm crochet hook.
Foundation
Ch 13.
Row 1
Sc in the second chain from the hook, hdc in the next 2 chains, dc in the next 6 chains, hdc in the next 2 chains, sc in the final chain.
Leaf Edging
Work along the outside edge.
*Sl st, ch 3, 2 dc in the next stitch, ch 3, sl st in the next stitch.*
Repeat at intervals to create rounded oak-leaf lobes.
Continue around the opposite side.
FO, leaving a long sewing tail.
Make approximately 8–10 small oak leaves.
Part 9: Crochet the Acorn Bodies
Make six to eight acorns using warm-beige yarn and a 2.5 mm crochet hook.
Round 1
6 sc in a magic ring. (6)
Round 2
Sc around. (6)
Round 3
*Sc 1, inc.* Repeat 3 times. (9)
Round 4
*Sc 2, inc.* Repeat 3 times. (12)
Round 5
*Sc 3, inc.* Repeat 3 times. (15)
Rounds 6–10
Sc around. (15)
Round 11
*Sc 3, dec.* Repeat 3 times. (12)
Stuff lightly.
Round 12
Dec around. (6)
FO and close the opening.
Part 10: Crochet the Acorn Caps
Use dark-chocolate-brown yarn and a 2.5 mm crochet hook.
Round 1
6 sc in a magic ring. (6)
Round 2
Inc around. (12)
Round 3
*Sc 1, inc.* Repeat around. (18)
Rounds 4–5
Sc around. (18)
FO, leaving a long sewing tail.
Position the cap over the wider end of the acorn.
Sew the cap securely in place.
Acorn Stem
Ch 5 using dark-brown yarn.
Sl st back along the chain.
Attach the stem to the top of the acorn cap.
Repeat for all acorns.
Part 11: Crochet the Berry Clusters
Use burgundy, burnt-orange, and mustard-yellow yarn.
Use a 2.5 mm crochet hook.
Round 1
6 sc in a magic ring. (6)
Round 2
Inc around. (12)
Round 3
Sc around. (12)
Round 4
Dec around. (6)
Stuff lightly and close.
Make approximately 24–36 berries.
Assemble the Berry Clusters
Cut short lengths of brown or green yarn.
Attach individual berries to the ends.
Gather three to five berries together to create a small cluster.
Wrap the stems with matching yarn.
Make approximately 8–10 berry clusters.
Part 12: Crochet the Large Burnt-Orange Bow
Use burnt-orange yarn and a 3.5 mm crochet hook.
Bow Rectangle
Ch 41.
Row 1
Hdc in the second chain from the hook and across. (40)
Rows 2–14
Ch 1, turn, hdc across. (40)
FO and weave in the ends.
Shape the Bow
Fold both short ends toward the center.
Sew the ends together at the back.
Pinch the center firmly to create two full bow loops.
Wrap matching yarn around the center several times.
Bow Center Band
Ch 11.
Sc in the second chain from the hook and across. (10)
Work 6 rows of sc.
Wrap the band around the center of the bow and sew securely at the back.
Bow Tails
Make two crochet strips approximately 18–22 cm long.
Work the strips in hdc rows.
Decrease along the final rows to create pointed ends.
Sew the tails behind the bow.
The completed bow should be approximately 20–25 cm wide.
Part 13: Add Decorative Leaves Behind the Bow
Step 1
Choose two mustard-yellow maple leaves.
Step 2
Choose two olive-green leaves.
Step 3
Arrange the leaves behind the bow so they extend outward from both sides.
Step 4
Add a small cluster of burgundy berries.
Step 5
Sew the leaves and berries to the back of the bow.
Step 6
Attach the entire bow arrangement to the top of the central hanging cord.
Make sure the bow remains centered and does not tilt forward.
Part 14: Attach the Pumpkins to the Spiral
Step 1
Position one large orange pumpkin near the upper section of the hanging.
Step 2
Attach an ivory pumpkin slightly lower on the opposite side.
Step 3
Position the second orange pumpkin near the middle section.
Step 4
Attach the second ivory pumpkin near the lower-middle section.
Step 5
Position the sage-green pumpkin near the bottom.
Step 6
Use strong yarn or sewing thread to attach each pumpkin securely to the spiral vine or central support.
Step 7
Allow the pumpkins to hang naturally while keeping their weight balanced.
Part 15: Arrange the Maple Leaves
Step 1
Spread the mustard-yellow leaves along the upper spiral.
Step 2
Place burnt-orange leaves around the middle section.
Step 3
Add burgundy leaves to create rich contrast.
Step 4
Position ivory leaves between the darker colors.
Step 5
Add olive-green leaves near the pumpkins and berry clusters.
Step 6
Sew each leaf to the spiral vine.
Step 7
Angle the leaves in different directions for a natural cascading appearance.
Part 16: Attach the Acorns
Step 1
Cut several lengths of dark-brown yarn measuring approximately 8–15 cm.
Step 2
Attach one acorn to the end of each cord.
Step 3
Secure the upper ends to different sections of the spiral vine.
Step 4
Alternate the hanging lengths to create visual movement.
Step 5
Place a few acorns near the pumpkins and others between the leaves.
Make sure the acorns hang freely without becoming tangled.
Part 17: Attach the Berry Clusters
Step 1
Position one berry cluster near the upper orange pumpkin.
Step 2
Add another near the first ivory pumpkin.
Step 3
Continue distributing berry clusters along the spiral.
Step 4
Mix burgundy, orange, and mustard-yellow berries for a natural autumn effect.
Step 5
Secure each cluster firmly with matching yarn.
Step 6
Adjust the berries so they remain visible between the larger leaves and pumpkins.
Part 18: Add Warm LED Fairy Lights
Optional warm-white LED fairy lights give the hanging decoration a beautiful cozy glow.
Step 1
Choose a lightweight, battery-operated LED light strand rated for decorative use.
Step 2
Starting near the top, loosely guide the light strand along the spiral vine.
Step 3
Position individual lights between the maple leaves, pumpkins, and berry clusters.
Step 4
Use small removable yarn ties to hold the light strand in place without pinching or damaging the wiring.
Step 5
Keep the battery pack accessible and separate from the crocheted ornaments.
Step 6
Switch on the lights and check that they illuminate the decoration evenly.
Safety Reminder: Never use hot-running lights or leave illuminated decorations unattended. Follow the light manufacturer’s instructions and do not cover the battery compartment with yarn.
Part 19: Final Assembly
Step 1
Hang the central cord from a sturdy hook.
Step 2
Check that the spiral vine maintains its shape.
Step 3
Adjust the position of the pumpkins.
Step 4
Spread the maple leaves naturally around the spiral.
Step 5
Reposition the acorns so they hang at different heights.
Step 6
Arrange the berry clusters between the larger decorations.
Step 7
Center the large burnt-orange bow at the top.
Step 8
Secure any loose yarn tails.
Step 9
Check all attachment points for stability.
Step 10
Switch on the LED fairy lights to reveal the finished autumn hanging decoration.
Autumn Color Variations
Classic Harvest
Use pumpkin orange, mustard yellow, burgundy, olive green, ivory, and warm brown for a traditional fall look.
Rustic Farmhouse
Combine cream, terracotta, sage green, chocolate brown, and muted gold for a cozy farmhouse style.
Elegant Neutral Autumn
Choose ivory, taupe, caramel, soft beige, and muted olive for a sophisticated seasonal decoration.
Woodland Autumn
Use forest green, dark brown, burnt orange, burgundy, and mustard yellow to create a rich woodland-inspired hanging.
Soft Cottagecore Fall
Combine dusty peach, cream, sage green, pale mustard, and warm beige for a gentle cottage-inspired look.
Thanksgiving Harvest
Use warm orange, cranberry red, golden yellow, cream, and deep green for a festive Thanksgiving-inspired display.
Helpful Crochet Tips
- Use cotton yarn for well-defined stitches and sturdy decorative pieces.
- Keep pumpkin stitches tight so the stuffing remains hidden.
- Use stitch markers when working in continuous rounds.
- Stuff pumpkins firmly but avoid overfilling them.
- Pull pumpkin ridge stitches evenly for a symmetrical shape.
- Use a contrasting yarn shade to embroider realistic leaf veins.
- Block the maple leaves gently to define their pointed edges.
- Use several autumn colors to create depth and visual interest.
- Make the acorns in slightly different sizes for a natural look.
- Vary the lengths of the hanging acorn cords.
- Use strong thread when attaching heavy pumpkins.
- Keep the central hanging cord reinforced.
- Cover all internal wire ends securely.
- Arrange decorations before permanently sewing them in place.
- Balance the pumpkins around the spiral to prevent twisting.
- Keep the bow centered at the top.
- Use removable ties for optional LED lights.
- Check that the battery pack remains accessible.
- Avoid placing the decoration near open flames or heat sources.
- Store the hanging carefully to preserve its spiral shape.
Frequently Asked Questions
Is this autumn crochet hanging suitable for beginners?
This project is best suited to intermediate or advanced crocheters who are comfortable with amigurumi, shaping decorative leaves, sewing multiple pieces together, and assembling larger crochet decorations.
Can I make the hanging shorter?
Yes. Reduce the length of the central cord and spiral vine, then use fewer pumpkins, leaves, berries, and acorns.
Can I make the pumpkins separately?
Absolutely. The crocheted pumpkins can be used as individual fall decorations, bowl fillers, or seasonal table accents.
Can I make this without fairy lights?
Yes. The hanging looks beautiful without lights and can be displayed as a purely crocheted autumn decoration.
Can I use acrylic yarn?
Yes. Acrylic yarn works well for the pumpkins and smaller motifs, although cotton yarn generally provides better structure for the leaves and spiral vine.
How do I keep the spiral shape?
Use a lightweight flexible armature inside the crocheted vine and secure it at regular intervals to the reinforced central cord.
Can I hang this on a door?
Yes, provided the hanging is securely supported and does not interfere with the door’s movement. For a frequently used door, a shorter and more compact version is recommended.
Can I use this decoration outdoors?
It is best suited to indoor use. Outdoor moisture, strong sunlight, and wind may damage the yarn and distort the hanging structure.
Can I use different leaf shapes?
Yes. Maple leaves, oak leaves, ivy leaves, and simple pointed leaves can all be combined to create a unique woodland-inspired decoration.
Can I sell finished decorations made from this pattern?
Yes. You may sell handmade decorations created using this original pattern. Credit to the designer is appreciated.
Care Instructions
- Dust gently using a soft brush.
- Spot clean with cool water and mild detergent.
- Do not soak the reinforced central structure.
- Remove detachable LED lights before cleaning.
- Do not bleach.
- Do not tumble dry.
- Allow all crochet pieces to air dry completely.
- Reshape leaves and pumpkins after cleaning.
- Avoid prolonged exposure to direct sunlight.
- Store in a large box without crushing the decorations.
Final Thoughts
This autumn crochet hanging spiral garland with pumpkins, maple leaves, and acorns is a beautiful way to celebrate the warmth and charm of fall with handmade creativity.
From the rich burnt-orange bow at the top to the cascading pumpkins, colorful leaves, tiny woodland acorns, and glowing fairy lights, every detail creates a cozy seasonal atmosphere.
Whether you display it in your entryway, living room, or favorite autumn decorating corner, this handmade crochet hanging is sure to become a treasured seasonal decoration.
Choose your favorite fall colors, enjoy crocheting each individual motif, and create a stunning autumn decoration that brings warmth and handmade beauty into your home.
Love this autumn crochet project? Save this free hanging spiral garland pattern to Pinterest and share it with your crochet-loving friends for more cozy fall crochet inspiration!