Christmas Crochet Santa Hat Cutlery Holders – Free Crochet Pattern
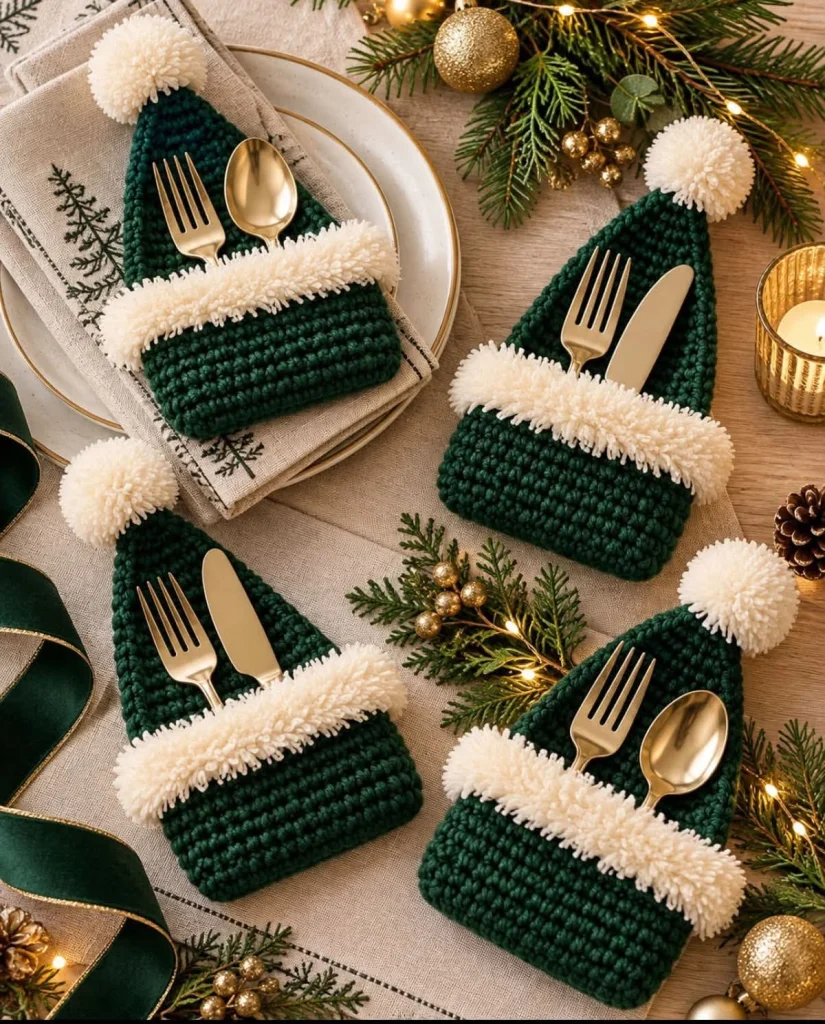
Add a charming handmade touch to your holiday dining table with these beautiful Christmas crochet Santa hat cutlery holders. Featuring deep forest-green crochet, fluffy ivory trim, and soft pom-poms, these miniature Christmas hats are designed to hold forks, spoons, and knives while creating an elegant festive table setting.
Inspired by traditional Santa hats with a sophisticated green-and-cream color palette, these adorable crochet cutlery pockets are perfect for Christmas dinners, holiday parties, winter gatherings, and handmade gifts.
Each holder features a triangular hat top, a sturdy rectangular pocket, a fluffy cream border, and a matching pom-pom. The finished pieces look beautiful alongside gold cutlery, linen napkins, evergreen branches, and warm candlelight.
This free crochet pattern shows you how to make a complete set of four Christmas cutlery holders using simple crochet stitches and easy assembly techniques.
Pattern Information
- Skill Level: Confident Beginner to Intermediate
- Finished Height: Approximately 20–23 cm (8–9 inches), including pom-pom
- Finished Width: Approximately 11–12 cm (4.3–4.7 inches)
- Pocket Depth: Approximately 7–8 cm (2.8–3.1 inches)
- Yarn Weight: Worsted-weight cotton or acrylic yarn
- Crochet Hook: 4 mm
- Terminology: US crochet terms
- Construction: Flat crocheted panels sewn together
- Estimated Time: 1–2 hours per holder
- Set Size: Four matching cutlery holders
Pattern Note: This original, photo-inspired pattern recreates the forest-green Santa hat shape, fluffy ivory trim, and pom-pom details shown in the reference image. Exact dimensions may vary depending on yarn, hook size, and tension.
Materials Needed
- Approximately 120–160 g forest-green worsted-weight yarn for four holders
- Approximately 40–60 g fluffy ivory or cream yarn for trim and pom-poms
- 4 mm crochet hook
- Optional 4.5 mm crochet hook for fluffy yarn
- Yarn needle
- Scissors
- Stitch markers
- Measuring tape
- Pom-pom maker or a small piece of cardboard
- Optional matching sewing thread
- Optional gold cutlery for festive presentation
Yarn Recommendation: Choose a firm, washable cotton or cotton-blend yarn for the green hat body. This helps the cutlery holder maintain its shape. Use a soft chenille-style or fluffy yarn for the ivory trim, or create a brushed fringe using regular acrylic yarn.
Crochet Abbreviations
- ch: Chain
- sc: Single crochet
- hdc: Half double crochet
- sl st: Slip stitch
- sc2tog: Single crochet two stitches together
- st: Stitch
- sts: Stitches
- RS: Right side
- WS: Wrong side
- FO: Fasten off
Part 1: Crochet the Main Santa Hat Panel
Use forest-green yarn and a 4 mm crochet hook.
The main panel consists of a rectangular lower section and a pointed triangular top. It forms the complete back of the cutlery holder.
Foundation Chain
Ch 25.
Row 1
Sc in the second chain from the hook and in each chain across. (24)
Rows 2–12
Ch 1, turn, sc in each stitch across. (24)
You should now have a rectangular section approximately 11–12 cm wide and 7–8 cm tall, depending on your gauge.
Row 13
Ch 1, turn, sc2tog, sc in the next 20 sts, sc2tog. (22)
Row 14
Ch 1, turn, sc across. (22)
Row 15
Ch 1, turn, sc2tog, sc in the next 18 sts, sc2tog. (20)
Row 16
Ch 1, turn, sc across. (20)
Row 17
Ch 1, turn, sc2tog, sc in the next 16 sts, sc2tog. (18)
Row 18
Ch 1, turn, sc across. (18)
Row 19
Ch 1, turn, sc2tog, sc in the next 14 sts, sc2tog. (16)
Row 20
Ch 1, turn, sc across. (16)
Row 21
Ch 1, turn, sc2tog, sc in the next 12 sts, sc2tog. (14)
Row 22
Ch 1, turn, sc across. (14)
Row 23
Ch 1, turn, sc2tog, sc in the next 10 sts, sc2tog. (12)
Row 24
Ch 1, turn, sc across. (12)
Row 25
Ch 1, turn, sc2tog, sc in the next 8 sts, sc2tog. (10)
Row 26
Ch 1, turn, sc across. (10)
Row 27
Ch 1, turn, sc2tog, sc in the next 6 sts, sc2tog. (8)
Row 28
Ch 1, turn, sc across. (8)
Row 29
Ch 1, turn, sc2tog, sc in the next 4 sts, sc2tog. (6)
Row 30
Ch 1, turn, sc across. (6)
Row 31
Ch 1, turn, sc2tog, sc in the next 2 sts, sc2tog. (4)
Row 32
Ch 1, turn, sc across. (4)
Row 33
Ch 1, turn, sc2tog twice. (2)
Row 34
Ch 1, turn, sc2tog. (1)
FO and weave in the ends.
You now have a flat Santa hat panel with a wide rectangular base and a pointed triangular top.
Part 2: Crochet the Front Cutlery Pocket
Use forest-green yarn and a 4 mm crochet hook.
This rectangular pocket will hold the cutlery securely.
Foundation Chain
Ch 25.
Row 1
Sc in the second chain from the hook and across. (24)
Rows 2–12
Ch 1, turn, sc across. (24)
FO, leaving a long sewing tail.
The pocket should match the width of the rectangular lower section of the main hat panel.
Part 3: Assemble the Cutlery Pocket
Step 1
Lay the main Santa hat panel flat with the right side facing upward.
Step 2
Place the rectangular pocket over the lower section of the hat.
Step 3
Align the bottom and side edges carefully.
Step 4
Use a yarn needle and matching forest-green yarn to sew the left side of the pocket to the main panel.
Step 5
Sew along the bottom edge.
Step 6
Sew the right side securely.
Step 7
Leave the top edge completely open.
Step 8
Insert a fork and spoon to test the pocket depth.
The cutlery should slide easily into the pocket and remain securely supported.
Important: The pocket must remain open along the upper edge. Do not sew the fluffy trim across the opening in a way that prevents cutlery from being inserted.
Part 4: Crochet the Fluffy Ivory Hat Trim
Use ivory fluffy yarn and a 4.5 mm crochet hook.
The trim runs horizontally across the upper edge of the pocket, creating the classic Santa hat appearance.
Foundation Chain
Ch 25.
Row 1
Sc in the second chain from the hook and across. (24)
Rows 2–4
Ch 1, turn, sc across. (24)
FO, leaving a long sewing tail.
The trim should measure approximately 3–4 cm tall.
Attach the Trim
Position the ivory strip along the upper front edge of the pocket.
Sew the lower edge of the trim to the pocket front.
Secure the ends at both sides.
Keep the upper pocket opening accessible behind the trim.
Create a Fluffy Texture
If you are using regular acrylic yarn instead of fluffy yarn, create a soft fringe.
Cut short lengths of ivory yarn approximately 5–6 cm long.
Fold each strand in half.
Pull the folded loop through stitches along the upper trim edge.
Pass the loose ends through the loop and tighten gently.
Repeat until the trim looks full and fluffy.
Trim the fringe evenly to create a soft, plush border.
Part 5: Make the Ivory Pom-Pom
Use soft ivory yarn.
Step 1
Wrap ivory yarn around a pom-pom maker or a small piece of cardboard approximately 70–100 times.
Step 2
Carefully remove the wrapped yarn.
Step 3
Tie a strong piece of yarn tightly around the center.
Step 4
Cut through the loops on both sides.
Step 5
Fluff the yarn strands.
Step 6
Trim the pom-pom into a round shape approximately 4–5 cm in diameter.
Step 7
Leave the center tying strands long for attachment.
Step 8
Sew the pom-pom securely to the pointed top of the Santa hat.
Make sure the pom-pom is firmly attached and does not pull the triangular hat out of shape.
Part 6: Add a Neat Crochet Border
Use forest-green yarn and a 4 mm crochet hook.
Step 1
Join the yarn at one lower corner of the assembled holder.
Step 2
Work sc evenly along the exposed outer edges of the hat.
Step 3
Place additional stitches at the lower corners if necessary to prevent curling.
Step 4
Continue around the triangular upper section.
Step 5
Work carefully around the pointed top beneath the pom-pom.
Step 6
Join with a sl st.
Step 7
FO and weave in the ends.
This simple border creates a polished finish and helps the Santa hat maintain its shape.
Part 7: Make a Complete Set of Four
Repeat Parts 1–6 until you have four matching Santa hat cutlery holders.
For a coordinated holiday table, keep the dimensions and colors consistent.
Each holder should include:
- One forest-green triangular hat panel
- One matching rectangular cutlery pocket
- One fluffy ivory trim strip
- One round ivory pom-pom
- One neat crochet border
Once all four holders are complete, arrange them together and check that their sizes match.
Part 8: Styling Your Christmas Table
Elegant Forest-Green Christmas
Pair the green Santa hat holders with gold cutlery, ivory plates, beige linen napkins, evergreen branches, and warm candlelight.
Classic Red and White Christmas
Replace the forest-green yarn with deep Christmas red while keeping the fluffy ivory trim and pom-pom.
Rustic Farmhouse Christmas
Use sage-green yarn, cream trim, natural linen napkins, wooden chargers, and pinecones.
Luxury Gold and Emerald Christmas
Use emerald-green yarn with soft ivory trim and metallic gold cutlery for a sophisticated holiday setting.
Winter Wonderland
Create the holders in white and silver-gray yarn and pair them with frosted greenery and silver table accessories.
Helpful Crochet Tips
- Use a firm yarn for the main hat to maintain its triangular shape.
- Keep your tension consistent across all four holders.
- Measure the cutlery you plan to use before making the pockets.
- Increase the foundation chain if you need wider holders.
- Add extra pocket rows if your cutlery requires more support.
- Keep the upper pocket opening free from stitching.
- Use fluffy yarn for a soft Santa-style border.
- Make the pom-poms approximately the same size.
- Secure pom-poms firmly to prevent them from coming loose.
- Use a yarn needle to hide all loose ends.
- Block the finished holders gently if the edges curl.
- Choose washable yarn for practical holiday table accessories.
- Keep the finished pieces away from open candle flames.
- Wash cutlery before use and keep the holders clean.
- Make a matching set of six or eight for larger holiday gatherings.
Frequently Asked Questions
Are these crochet Santa hat cutlery holders beginner-friendly?
Yes. Confident beginners who know how to make single crochet stitches, decreases, and simple seams can complete this project successfully.
Can I use red yarn instead of green?
Absolutely. Traditional red Santa hats with fluffy white trim look beautiful and are perfect for classic Christmas table settings.
Can I make these holders larger?
Yes. Increase the starting chain and work additional rows to create a wider and deeper pocket. Adjust the triangular decreases to match the new width.
Can I use cotton yarn?
Yes. Cotton yarn is an excellent choice because it creates sturdy stitches and holds its shape well.
Can I make these without fluffy yarn?
Yes. Regular ivory acrylic or cotton yarn can be used for the trim. Add short fringe strands if you want a fluffier appearance.
How many holders should I make?
A set of four is ideal for a small family dinner. For larger gatherings, make six, eight, or twelve matching holders.
Can these be used as Christmas gift holders?
Yes. You can place small wrapped candies, gift cards, or handwritten holiday messages inside the pockets instead of cutlery.
Can I sell finished Santa hat holders made from this pattern?
Yes. You may sell handmade finished items created using this original pattern. Credit to the pattern designer is appreciated.
Care Instructions
- Hand wash gently in cool water.
- Use mild detergent.
- Do not bleach.
- Avoid twisting or wringing the crochet fabric.
- Press gently between clean towels to remove excess water.
- Lay flat to air dry.
- Reshape the triangular hat while damp.
- Fluff the ivory trim and pom-pom after drying.
- Store flat in a clean, dry place between holiday seasons.
Final Thoughts
These Christmas crochet Santa hat cutlery holders are a delightful way to make your holiday table feel extra special. Their deep forest-green color, fluffy ivory trim, and soft pom-poms create a beautiful combination of traditional Christmas charm and elegant handmade style.
Whether you make a set of four for your family, a larger collection for a festive dinner party, or a few as thoughtful handmade gifts, these adorable crochet holders are sure to bring warmth and personality to your Christmas celebrations.
Gather your favorite yarn, crochet a matching set, and enjoy creating a festive table decoration that you can use year after year.
Love this Christmas crochet idea? Save this free Santa hat cutlery holder pattern to Pinterest and share it with your crochet-loving friends for more handmade holiday inspiration!