Blue and White Crochet Bedspread with Tassels – Free Crochet Pattern
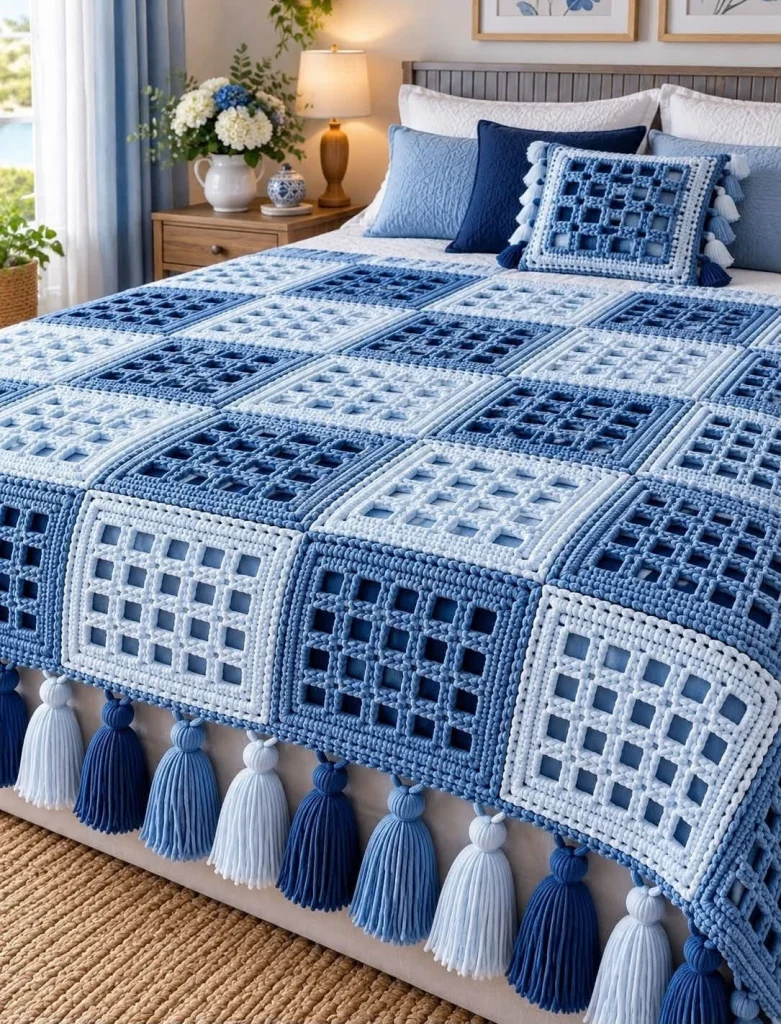
Transform your bedroom into a peaceful, elegant retreat with this beautiful blue and white crochet bedspread. Featuring textured lattice squares in navy blue, medium blue, pale blue, and crisp white, this handmade bed covering brings a fresh coastal-inspired look to any bedroom.
The design combines raised crochet grid patterns, neatly bordered square motifs, alternating blue and white colors, and luxurious tassels along the lower edge. A matching crochet accent pillow completes the coordinated bedding set.
This free crochet pattern shows you how to create the individual lattice squares, join them into a bedspread, add a decorative border, make the tassels, and crochet a matching pillow cover.
Pattern Information
- Skill Level: Intermediate
- Finished Bedspread Size: Approximately 220 × 240 cm (87 × 94 inches)
- Square Size: Approximately 22 × 22 cm (8.7 × 8.7 inches) after blocking
- Construction: Individual square motifs joined together
- Colors: Navy blue, medium blue, pale blue, and white
- Yarn Weight: Worsted-weight yarn (Category 4)
- Crochet Hook: 4.5 mm and 5 mm
- Terminology: US crochet terms
- Matching Pillow: Approximately 40 × 40 cm (16 × 16 inches)
- Estimated Time: 45–70 hours, depending on experience
Design Note: This is an original photo-inspired crochet pattern. The reference features a raised square lattice texture, alternating shades of blue and white, and large decorative tassels. The construction below recreates these characteristics using repeatable crochet squares. Exact stitch texture and sizing may vary depending on yarn and tension.
Materials Needed
- 1,200–1,500 g navy-blue worsted-weight yarn
- 1,200–1,500 g medium-blue worsted-weight yarn
- 1,000–1,300 g pale-blue worsted-weight yarn
- 1,200–1,500 g white worsted-weight yarn
- 5 mm crochet hook for the main squares
- 4.5 mm crochet hook for borders and finishing
- Yarn needle
- Scissors
- Stitch markers
- Measuring tape
- Blocking mats and rustproof pins
- 40 × 40 cm pillow insert
- Optional fabric lining for the pillow
- Cardboard approximately 15–18 cm long for making tassels
Yarn Tip: Choose soft, machine-washable acrylic or cotton-blend yarn. Use the same yarn weight and brand for all colors to keep the square dimensions consistent.
Crochet Abbreviations
- ch: Chain
- sc: Single crochet
- hdc: Half double crochet
- dc: Double crochet
- tr: Treble crochet
- sl st: Slip stitch
- st: Stitch
- sts: Stitches
- sp: Space
- BLO: Back loop only
- FPdc: Front post double crochet
- BPdc: Back post double crochet
- FO: Fasten off
Part 1: Understanding the Lattice Square Design
The bedspread is made from square crochet motifs featuring an open grid design framed by a solid crochet border.
Each square has three main sections:
- A textured outer frame
- An open lattice center
- A finishing border that makes joining easier
The squares are arranged in alternating shades of blue and white to create a balanced checkerboard appearance.
Suggested Color Arrangement
For a bedspread measuring approximately 220 × 240 cm, make 110 squares arranged in 10 columns and 11 rows.
Suggested distribution:
- 28 navy-blue squares
- 27 medium-blue squares
- 27 pale-blue squares
- 28 white squares
For a stronger checkerboard effect, alternate navy and medium blue with pale blue and white.
Sizing Note: Ten columns of 22 cm squares create approximately 220 cm of width. Eleven rows create approximately 242 cm of length before adding the border. Adjust the number of motifs according to your mattress size and desired drape.
Part 2: Crochet the Square Foundation
Use a 5 mm crochet hook and your chosen yarn color.
Foundation Chain
Ch 35.
Row 1
Dc in the fourth chain from the hook and in each remaining chain.
Turn.
Row 2
Ch 3, dc in each stitch across.
Turn.
Row 3
Ch 3, dc in the next 3 stitches.
*Ch 2, skip 2 stitches, dc in the next 2 stitches.*
Repeat the pattern across, adjusting the final solid section to keep the edges even.
Turn.
Row 4
Ch 3, dc in the next 3 stitches.
*Ch 2, skip the chain-space section, dc in the next 2 stitches.*
Repeat across.
Turn.
Rows 5–12
Continue repeating Row 4 to build the open lattice grid.
Keep the vertical double-crochet posts aligned above one another.
Row 13
Ch 3, dc across, working 2 dc into each ch-2 space.
Turn.
Row 14
Ch 3, dc in each stitch across.
FO, leaving a long tail.
Important: This is the basic lattice panel. Check your stitch count and dimensions after the first sample. If the panel is not square, adjust the number of lattice rows or foundation stitches before making the remaining motifs.
Part 3: Create the Raised Lattice Texture
The reference bedspread features prominent raised grid lines that give the squares a beautiful dimensional appearance.
To recreate this effect, add surface crochet lines over the lattice panel.
Step 1
Lay the finished lattice panel flat with the right side facing upward.
Step 2
Using the same yarn color, attach the yarn at the lower edge of the first vertical lattice post.
Step 3
Work surface slip stitches upward along the vertical post.
Step 4
Continue until you reach the upper edge.
Step 5
FO and weave the yarn ends into the back.
Step 6
Repeat along the remaining vertical posts.
Step 7
Add horizontal surface slip-stitch lines across the lattice at regular intervals.
Step 8
Keep the stitches relaxed so the panel remains flat.
This technique creates a raised grid texture without requiring complicated cable stitches.
Part 4: Crochet the Square Border
Use a 4.5 mm crochet hook.
Round 1
Attach yarn at one corner of the square.
Work sc evenly around all four sides.
At each corner, work:
(2 sc, ch 2, 2 sc).
Join with a sl st.
Round 2
Ch 2.
Work hdc in each stitch around.
At each corner ch-2 space, work:
(2 hdc, ch 2, 2 hdc).
Join with a sl st.
Round 3
Ch 3.
Work dc in each stitch around.
At each corner, work:
(2 dc, ch 2, 2 dc).
Join with a sl st.
Round 4
Work one round of sc around the square, maintaining the corner spaces.
FO and weave in the ends.
Block the finished square to approximately 22 × 22 cm.
Repeat the process until you have enough squares for the complete bedspread.
Part 5: Arrange the Blue and White Squares
Before joining, arrange all the squares on a clean floor or large table.
For a balanced color pattern, use the following repeating arrangement.
Row 1
Navy – White – Medium Blue – Pale Blue – Navy – White – Medium Blue – Pale Blue – Navy – White
Row 2
White – Medium Blue – Pale Blue – Navy – White – Medium Blue – Pale Blue – Navy – White – Medium Blue
Row 3
Medium Blue – Pale Blue – Navy – White – Medium Blue – Pale Blue – Navy – White – Medium Blue – Pale Blue
Row 4
Pale Blue – Navy – White – Medium Blue – Pale Blue – Navy – White – Medium Blue – Pale Blue – Navy
Repeat these four rows until the desired bedspread length is reached.
This arrangement distributes the colors evenly and gives the bedspread a fresh, coordinated appearance.
Part 6: Join the Crochet Squares
There are several ways to join the squares. A flat slip-stitch join works particularly well for this design.
Step 1
Place two squares side by side with their right sides facing upward.
Step 2
Insert your hook through the corresponding outer loops of both squares.
Step 3
Join the yarn and work a sl st through the matching loops.
Step 4
Continue joining across the entire edge.
Step 5
Repeat until all squares in the first row are joined.
Step 6
Join the squares in the remaining rows.
Step 7
Connect the completed rows using the same method.
Step 8
Weave in all yarn ends securely.
Tip: Use pale-blue or white yarn for the joining seams to create subtle decorative lines between the motifs.
Part 7: Crochet the Bedspread Border
Once all squares are joined, add a continuous border around the entire bedspread.
Use medium-blue yarn and a 4.5 mm crochet hook.
Round 1
Attach yarn at any corner.
Work sc evenly around the entire bedspread.
At each corner, work:
(2 sc, ch 2, 2 sc).
Join with a sl st.
Round 2
Ch 2.
Work hdc in each stitch around.
At each corner, work:
(2 hdc, ch 2, 2 hdc).
Join with a sl st.
Round 3
Ch 3.
Work dc in each stitch around.
At each corner, work:
(2 dc, ch 2, 2 dc).
Join with a sl st.
Round 4
Work one round of sc around the entire border.
FO and weave in the ends.
The finished border should be smooth and structured, framing the colorful square motifs.
Part 8: Make the Decorative Tassels
The large tassels are one of the most eye-catching features of this bedspread.
Use navy-blue, medium-blue, pale-blue, and white yarn.
Step 1
Cut a piece of cardboard approximately 15–18 cm long.
Step 2
Wrap yarn around the cardboard approximately 50–70 times.
Step 3
Slide a separate strand of yarn underneath the wrapped strands.
Step 4
Tie the strand tightly at the top.
Step 5
Carefully remove the wrapped yarn from the cardboard.
Step 6
Cut through the loops at the bottom.
Step 7
Wrap another strand around the tassel approximately 2 cm below the top.
Step 8
Tie securely to form the tassel head.
Step 9
Trim the bottom strands evenly.
Step 10
Repeat until you have enough tassels for the bedspread.
Suggested Tassel Arrangement
- Navy-blue tassel
- White tassel
- Medium-blue tassel
- Pale-blue tassel
Repeat this color sequence along the lower edge.
For a 220 cm wide bedspread, approximately 12–16 large tassels provide a decorative finish.
Attach each tassel securely to the lower border, spacing them evenly.
Part 9: Crochet the Matching Pillow Front
The matching pillow features the same lattice texture as the bedspread, framed by a contrasting border.
Use medium-blue yarn and a 5 mm crochet hook.
Step 1
Make one large lattice square using the same construction method as the bedspread motifs.
Step 2
Continue the lattice pattern until the panel measures approximately 35 × 35 cm.
Step 3
Add a decorative white border around the square.
Step 4
Continue the border until the pillow front measures approximately 40 × 40 cm.
Step 5
Add raised surface crochet lines to match the bedspread texture.
Step 6
Block the panel and allow it to dry completely.
Part 10: Crochet the Pillow Back
Use navy-blue or medium-blue yarn.
Foundation Chain
Ch enough stitches to measure approximately 40 cm.
Row 1
Sc in the second chain from the hook and across.
Turn.
Rows 2 onward
Ch 1, turn, sc in each stitch across.
Continue until the panel measures approximately 40 × 40 cm.
FO and weave in the ends.
Assemble the Pillow
Place the pillow front and back together with right sides facing outward.
Join three sides using sc.
Insert the pillow form.
Close the final side with sc or a sewn seam.
Part 11: Add Pillow Tassels
Make four smaller tassels using navy-blue and pale-blue yarn.
Wrap yarn around a 10–12 cm cardboard template.
Follow the same tassel-making instructions used for the bedspread.
Attach one tassel to each corner of the pillow.
For a more decorative finish, alternate navy-blue and pale-blue tassels.
Part 12: Final Assembly and Finishing
- Check that all squares are securely joined.
- Weave in remaining yarn ends.
- Inspect the bedspread border for uneven stitches.
- Make sure all tassels are attached securely.
- Trim tassel ends to a consistent length.
- Block the bedspread if necessary.
- Allow the finished piece to dry completely.
- Place the bedspread over your bed.
- Arrange the matching pillow near the headboard.
- Smooth the squares to display the raised lattice texture.
Creative Color Variations
Classic Coastal Blue
Combine navy blue, denim blue, pale blue, and white for a timeless coastal bedroom look.
Soft Blue and Cream
Replace bright white with ivory and use dusty-blue tones for a softer, more relaxed design.
Modern Navy and Gray
Use navy blue, slate blue, light gray, and white for a contemporary bedroom aesthetic.
Pastel Blue Bedroom
Choose powder blue, baby blue, white, and pale gray for a light and delicate appearance.
Elegant Blue Ombre
Arrange the squares from dark navy at the bottom to pale blue and white near the top for a beautiful gradient effect.
Helpful Crochet Tips
- Make one complete sample square before starting the full bedspread.
- Measure your sample after blocking.
- Use consistent tension throughout the project.
- Choose yarns with similar fiber content and thickness.
- Keep the raised lattice stitches relaxed.
- Block all squares to the same measurements.
- Arrange the colors before joining.
- Use stitch markers to align square corners.
- Join squares with even tension.
- Keep the border flat by adjusting corner increases.
- Attach tassels securely using several stitches.
- Trim all tassels after attaching them.
- Use a soft yarn for a comfortable bed covering.
- Wash a small swatch before washing the entire bedspread.
- Store the finished piece folded to prevent stretching.
Frequently Asked Questions
Is this blue and white crochet bedspread beginner-friendly?
This project is best suited to intermediate crocheters because it involves repeated lattice squares, surface crochet texture, joining techniques, and decorative finishing. Confident beginners can also attempt it by practicing the square motif first.
How many crochet squares do I need?
For the suggested 220 × 240 cm bedspread, approximately 110 squares are needed when each square measures 22 × 22 cm. Adjust the number of squares according to your desired size.
Can I make this bedspread for a king-size bed?
Yes. Add extra columns and rows until the bedspread reaches your preferred dimensions. Measure the mattress and allow extra width for the sides to drape.
Can I use cotton yarn?
Yes. Cotton yarn provides excellent stitch definition, especially for the raised lattice design. However, a large cotton bedspread may be heavier than one made with acrylic or a cotton blend.
Can I make the bedspread without tassels?
Absolutely. The tassels are optional. The bedspread will still look beautiful with a simple crochet border.
Can I change the color combination?
Yes. This design works well with many color palettes, including sage green and cream, blush pink and beige, lavender and white, or earthy neutral tones.
How do I keep all the squares the same size?
Use the same yarn weight, hook size, and tension for every square. Blocking each motif before joining will help maintain consistent dimensions.
Can I sell finished bedspreads made from this pattern?
Yes. You may sell handmade finished pieces created using this original pattern. Credit to the pattern designer is appreciated.
Care Instructions
- Check the yarn label before washing.
- Wash gently in cool water.
- Use a mild detergent.
- Avoid harsh bleach.
- Do not wring or twist the bedspread.
- Lay flat to dry whenever possible.
- Reshape the squares while damp.
- Gently comb the tassels with your fingers after drying.
- Avoid hanging the wet bedspread because its weight may stretch the stitches.
- Store folded in a clean, dry place.
Final Thoughts
This blue and white crochet bedspread with tassels is a wonderful combination of texture, color, and handmade comfort. The raised lattice squares create a beautiful geometric pattern, while the alternating shades of blue and white give the finished blanket a fresh and timeless appearance.
The decorative tassels add movement and personality, and the matching crochet pillow brings the entire bedroom design together.
Whether you’re refreshing your own bedroom, decorating a guest room, or creating a special handmade gift, this crochet bedspread is a rewarding project that can be enjoyed for years.
Love this crochet bedding idea? Save this free blue and white crochet bedspread pattern to Pinterest and share it with your crochet-loving friends for more beautiful handmade home decor inspiration!