Cream Crochet Summer Tote Bag with Wooden Handles – Free Crochet Pattern
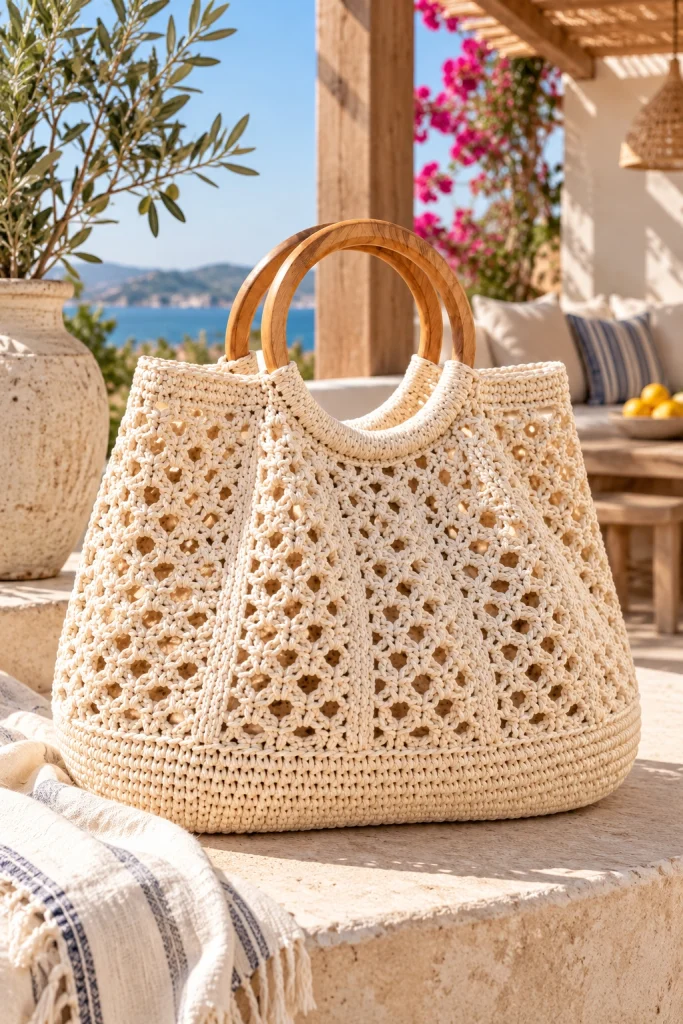
Create a beautiful handmade accessory with this cream crochet summer tote bag, featuring elegant wooden ring handles, delicate openwork lace, textured vertical panels, and a sturdy crocheted base. Inspired by Mediterranean summer style, this spacious tote combines natural materials with timeless craftsmanship.
The soft ivory color gives the bag a sophisticated appearance, while the airy crochet stitches create a lightweight texture perfect for sunny days, beach outings, shopping trips, and summer vacations. The round wooden handles provide a stylish finishing touch that complements the natural cotton yarn.
This free crochet pattern guides you through making the structured oval base, crocheting the lace body, creating decorative textured panels, attaching wooden handles, and finishing your bag professionally.
Pattern Information
- Skill Level: Intermediate
- Finished Width: Approximately 38–42 cm
- Finished Height: Approximately 32–36 cm, excluding handles
- Base Depth: Approximately 12–14 cm
- Construction: Oval base worked in continuous rounds, followed by an openwork body
- Yarn Weight: Worsted-weight cotton yarn (Category 4)
- Hook Size: 4 mm or 4.5 mm
- Terminology: US crochet terms
- Estimated Time: 8–12 hours
- Color: Natural cream or warm ivory
Design Note: This original pattern is inspired by the reference image. It uses an oval foundation, repeated lace motifs, and raised crochet strips to recreate the bag’s elegant shape. The exact dimensions and stitch arrangement may vary depending on yarn, tension, and handle size.
Materials Needed
- Approximately 600–800 g of worsted-weight cotton yarn in cream or ivory
- 4 mm crochet hook for the base
- 4.5 mm crochet hook for the lace body
- Two round wooden bag handles, approximately 14–16 cm in diameter
- Stitch markers
- Yarn needle
- Scissors
- Measuring tape
- Optional cotton fabric for lining
- Optional magnetic snap closure
- Optional lightweight bag base insert
- Optional matching sewing thread and needle
Crochet Abbreviations
- ch: Chain
- sc: Single crochet
- hdc: Half double crochet
- dc: Double crochet
- tr: Treble crochet
- sl st: Slip stitch
- st: Stitch
- sts: Stitches
- sp: Space
- sk: Skip
- BLO: Back loop only
- FLO: Front loop only
- FO: Fasten off
- RS: Right side
- WS: Wrong side
Part 1: Crochet the Oval Bag Base
The base is worked in continuous oval rounds using tight single crochet stitches. This creates a firm foundation that helps the tote maintain its shape.
Use the 4 mm crochet hook.
Round 1
Ch 35.
Work 2 sc in the second chain from the hook.
Sc in each of the next 32 chains.
Work 4 sc in the last chain.
Continue along the opposite side of the foundation chain.
Sc in each of the next 32 chains.
Work 2 sc in the final chain.
Join with a sl st to the first sc. (72 sc)
Round 2
Ch 1.
Work 2 sc in each of the first 2 stitches.
Sc in the next 32 stitches.
Work 2 sc in each of the next 4 stitches.
Sc in the next 32 stitches.
Work 2 sc in each of the final 2 stitches.
Join with a sl st. (80 sc)
Round 3
Ch 1.
*Sc in the next stitch, work 2 sc in the next stitch.*
Repeat twice around the first curved end.
Sc across the straight section.
Repeat the same increases around the opposite curved end.
Continue across the remaining straight section.
Join with a sl st.
Rounds 4–8
Continue increasing evenly around both curved ends of the oval.
Work one sc in each stitch along the straight sections.
Space increases evenly to prevent curling or puckering.
Stop increasing when the oval measures approximately 38 cm long and 12–14 cm wide.
Tip: Place stitch markers at both curved ends to help distribute increases evenly.
Part 2: Create the Structured Lower Band
The reference bag features a solid, textured lower section that contrasts beautifully with the delicate lace body.
Round 1
Ch 1.
Work 1 sc in the back loop only of every stitch around.
Join with a sl st.
This creates a defined fold between the base and the bag’s sides.
Rounds 2–5
Ch 1.
Work 1 sc in every stitch around.
Join with a sl st.
Rounds 6–10
Ch 2.
Work 1 hdc in every stitch around.
Join with a sl st.
Continue until the solid lower band measures approximately 7–9 cm tall.
Keep your stitches firm and even to create a stable bag structure.
Part 3: Crochet the Openwork Lace Body
The main body features an airy repeating lace pattern that creates the bag’s delicate summer appearance.
Switch to the 4.5 mm crochet hook.
Before starting, make sure your stitch count is a multiple of 6. Add or decrease a few stitches evenly if necessary.
Lace Round 1
Ch 3 (counts as first dc).
Work 1 dc in the next stitch.
Ch 2, skip 2 stitches.
Work 1 dc in each of the next 2 stitches.
Repeat around.
Join with a sl st to the top of the beginning ch 3.
Lace Round 2
Ch 3.
Work 1 dc in the next dc.
Ch 2.
Skip the chain-2 space.
Work 1 dc in each of the next 2 dc.
Repeat around.
Join with a sl st.
Lace Round 3
Ch 3.
Work 2 dc in the next chain-2 space.
Ch 1.
Skip the next dc.
Work 1 dc in the following stitch.
Repeat around, adjusting the final repeat to maintain the pattern.
Lace Round 4
Ch 3.
Work 1 dc in each of the next 2 stitches.
Ch 2, skip the next space.
Repeat around.
Lace Rounds 5–20
Repeat the established lace sequence, alternating open spaces and small groups of double crochet stitches.
Continue until the lace section measures approximately 20–23 cm tall.
Maintain even tension to keep the openwork pattern consistent.
Important: The decorative openwork should remain flexible but not overly loose. If the fabric stretches excessively, switch to a smaller hook.
Part 4: Crochet the Decorative Vertical Panels
The bag features raised vertical crochet sections that add structure and visual interest to the lace body.
These panels can be crocheted separately and sewn onto the bag.
Panel Foundation
Ch 7.
Row 1
Sc in the second chain from the hook and across. (6 sc)
Turn.
Row 2
Ch 1.
Sc in the first stitch.
Work 1 front post double crochet around the next suitable stitch from the previous row, or substitute a regular dc for the first textured row.
Continue across, alternating raised stitches and sc.
Turn.
Rows 3–35
Continue the textured pattern until the panel measures approximately the same height as the lace section.
FO, leaving a long sewing tail.
Assembly
Make four to six vertical panels.
Position them evenly around the bag.
Pin each panel in place using stitch markers.
Sew the panels securely to the crochet body.
Keep the stitching neat and discreet.
These panels help create the structured, slightly pleated appearance seen in the finished tote.
Part 5: Crochet the Upper Reinforcement Band
The upper band provides strength for attaching the wooden handles.
Round 1
Return to the top edge of the lace body.
Ch 1.
Work sc evenly around the entire opening.
Join with a sl st.
Rounds 2–4
Ch 1.
Sc in every stitch around.
Join with a sl st.
Round 5
Ch 1.
Work reverse single crochet around the upper edge for a decorative finish.
FO and weave in the ends.
The reinforced band should feel firm enough to support the weight of the bag.
Part 6: Attach the Round Wooden Handles
The wooden ring handles are one of the most distinctive features of this design.
Use two smooth wooden handles approximately 14–16 cm in diameter.
Step 1
Lay the bag flat and identify the center of the front and back panels.
Step 2
Position one wooden ring handle against the upper front edge.
Step 3
Mark two attachment sections approximately 12–15 cm apart.
Step 4
Thread the crochet hook through a stitch on the upper band.
Step 5
Pull the yarn through the stitch and around the wooden handle.
Step 6
Work single crochet stitches around the wooden ring and through the bag edge.
Step 7
Continue across the first attachment section.
Step 8
Secure the yarn and repeat for the second attachment section.
Step 9
Attach the second wooden handle to the back of the bag in the same way.
Step 10
Reinforce all attachment points with additional stitching.
Tip: Use tightly worked cotton stitches around the handles to prevent stretching during use.
Part 7: Create the Soft Pleated Shape
The bag’s elegant silhouette comes from its gently gathered upper edge and wider lower body.
Step 1
Place the bag upright on a flat surface.
Step 2
Gently push the side panels inward.
Step 3
Arrange the decorative vertical strips into soft folds.
Step 4
Adjust the fabric around the wooden handles.
Step 5
Make sure both sides are symmetrical.
Step 6
Secure any loose folds with small hidden stitches if necessary.
The finished shape should be wider at the bottom and gently gathered toward the handles.
Part 8: Optional Fabric Lining
Adding a fabric lining makes the bag more practical for everyday use.
Step 1
Measure the inside width, height, and depth of the bag.
Step 2
Cut two fabric panels according to your measurements, allowing approximately 1.5 cm for seam allowances.
Step 3
Place the fabric pieces with right sides facing.
Step 4
Sew the side seams and bottom seam.
Step 5
Create boxed corners if needed to match the oval base.
Step 6
Fold the upper fabric edge inward and press.
Step 7
Insert the lining into the crochet bag.
Step 8
Pin the lining to the inside of the upper band.
Step 9
Hand-sew the lining using small invisible stitches.
Step 10
Optional: Add an interior pocket or magnetic snap closure.
A cream cotton lining works beautifully with the natural color of the crochet bag.
Part 9: Optional Structured Base Insert
For extra stability, add a removable base insert.
Step 1
Measure the interior oval base.
Step 2
Cut a lightweight plastic canvas or bag base insert slightly smaller than the measurements.
Step 3
Round the edges to prevent damage to the crochet fabric.
Step 4
Cover the insert with matching fabric if desired.
Step 5
Place it inside the bottom of the bag.
This helps the tote stand upright and maintain its shape when carrying personal belongings.
Part 10: Final Finishing
- Weave in all remaining yarn ends.
- Check the wooden handle attachments.
- Reinforce any loose stitches.
- Adjust the vertical decorative panels.
- Shape the bag into a balanced silhouette.
- Inspect the lower band for even tension.
- Block the crochet fabric lightly if necessary.
- Allow the bag to dry completely.
- Insert the optional lining and base support.
- Check that the handles are comfortable to hold.
Creative Color Variations
Natural Mediterranean Cream
Use warm ivory cotton yarn with light wooden handles for a timeless coastal appearance.
Sand Beige
Choose soft beige yarn and medium-brown wooden handles for a natural bohemian look.
Classic White
Use bright white cotton with pale wooden handles for a fresh summer accessory.
Terracotta Sunset
Choose muted terracotta cotton yarn and dark wooden handles for a warm earthy style.
Olive Green
Use sage or olive-green yarn with natural wooden handles for a sophisticated botanical look.
Chocolate Brown
Choose rich chocolate-brown cotton with caramel-colored wooden handles for a chic neutral accessory.
Styling Ideas for Your Crochet Tote Bag
Beach Vacation Outfit
Pair the bag with a white linen dress, flat sandals, and a straw hat for a relaxed Mediterranean-inspired outfit.
Casual Summer Look
Style the tote with denim shorts, a cotton blouse, and comfortable sandals.
Elegant Weekend Outfit
Combine the cream crochet bag with wide-leg linen trousers, a neutral top, and gold jewelry.
Farmers Market Accessory
Use the spacious tote for lightweight shopping essentials and small everyday items.
Handmade Gift
Create a personalized bag in the recipient’s favorite color for birthdays, Mother’s Day, or other special occasions.
Helpful Crochet Tips
- Choose high-quality cotton yarn for durability.
- Use a smaller hook for the solid base.
- Keep the lower band tightly crocheted.
- Maintain consistent tension throughout the lace section.
- Count stitches regularly to prevent accidental increases.
- Use stitch markers to identify round beginnings.
- Block decorative panels before attaching them.
- Distribute vertical panels evenly around the bag.
- Choose smooth wooden handles without sharp edges.
- Reinforce handle attachment points carefully.
- Add fabric lining for better everyday functionality.
- Use a removable base insert for additional structure.
- Avoid overloading the bag with heavy objects.
- Test the finished handles before regular use.
- Store the bag upright or flat to preserve its shape.
Frequently Asked Questions
Is this crochet tote bag suitable for beginners?
This pattern is best suited to intermediate crocheters because it combines oval shaping, lace stitches, decorative panels, and handle assembly. Confident beginners can also try it with patience.
What is the best yarn for a summer crochet bag?
Cotton yarn is one of the best choices because it provides good stitch definition, durability, and a natural appearance. Cotton-blend yarn can also work well.
Can I make this bag without wooden handles?
Yes. You can replace the wooden rings with crocheted straps, fabric handles, or leather handles. However, wooden handles provide the closest appearance to the reference design.
How much yarn do I need?
Approximately 600–800 g of worsted-weight cotton yarn is recommended, depending on your gauge, the final dimensions, and the amount of decorative texture.
Can I make the bag larger?
Yes. Increase the oval base dimensions and continue the lace section for additional rounds. Adjust the number of decorative panels to match the larger circumference.
Will the lace body stretch?
Openwork crochet can stretch under weight. Using firm cotton yarn, reinforced handles, and a fabric lining can help maintain the bag’s shape.
Do I need to add a lining?
A lining is optional, but it is recommended if you plan to carry small personal belongings. It prevents items from slipping through the openwork stitches.
Can I wash the finished bag?
Spot-cleaning is recommended, especially when the bag includes wooden handles. Avoid soaking the wooden rings or exposing them to excessive moisture.
Can I sell finished bags made from this pattern?
Yes. You may sell handmade bags created using this original pattern. Credit to the pattern designer is appreciated.
Care Instructions
- Spot-clean with a soft damp cloth.
- Use mild detergent when necessary.
- Avoid soaking the wooden handles.
- Do not use bleach.
- Do not tumble dry.
- Reshape the bag while slightly damp.
- Dry flat in a shaded area.
- Avoid prolonged exposure to strong sunlight.
- Store in a clean, dry place.
- Do not hang the bag with heavy contents inside.
Final Thoughts
This cream crochet summer tote bag with wooden handles is a beautiful combination of practical design and handmade elegance. The airy lace texture, structured base, decorative vertical panels, and natural wooden handles create a timeless accessory that complements a wide variety of summer outfits.
Whether you make it for yourself, give it as a thoughtful handmade gift, or create it in different colors, this crochet tote is a rewarding project for anyone who loves stylish handmade accessories.
Love this crochet bag? Save this free crochet summer tote bag pattern to Pinterest and share it with your crochet-loving friends for more handmade fashion inspiration!